A partially-automated medium-throughput homemade cider press with lasers.
Pressing Cider from 900lbs of Apples
Most people who know me well know I really like apples. I'm a big fan for a lot of reasons- taste, texture, the fact that they're a symbol of my favorite season, the sheer quantity of accessible food that can grow on a single tree, et cetera. Last year, I decided I wanted to make some homemade apple cider. I bought a small screw press online, several boxes of apples from a nearby farmstand, and some nylon strainer bags from a homebrew store.
The process looked something like this:
- Wash an apple in some water
- Use a knife to cut the apple into quarters or eighths to fit in the intake for a kitchen grinder
- Push the slices of apple through the grinder, collect the ground apple in a nylon bag
- Once enough ground apple pulp has been collected, place the bag in the press
- Turn the press screw by hand until I extract about a quart of juice
The new press
As soon as the cider was done, I started planning for the coming year. A single full basket in the press above produced barely a quart of juice; we would need something much larger. I found plans online for a much higher capacity apple press (archive), one which could both exert more force and hold more apple at the same time. My wife does woodworking as a hobby and was looking for a project. We sourced four-quarter red oak and maple boards from a local hardwood seller, and we (mostly her) got to work. The red oak made the frame and all other structural pieces, and 1x4 planks were cut and then glued together to make large 4x4 beams. After fitting the pieces together into the pre-cut grooves, we drilled through the beams and bolted them together with half-inch steel threaded rods. Rather than create a drain from countertop material as in the link above, I reached out to a metal fabrication shop and had a food-grade stainless steel tray with a drain made to the exact size we would need. All wooden pieces that came in contact with the cider- the basket, the press base, and the press board- were made from maple, and waterproofed with pure tung oil. With the exception of the threaded rods, all metal used is food grade stainless steel. In the end, it looked like this.
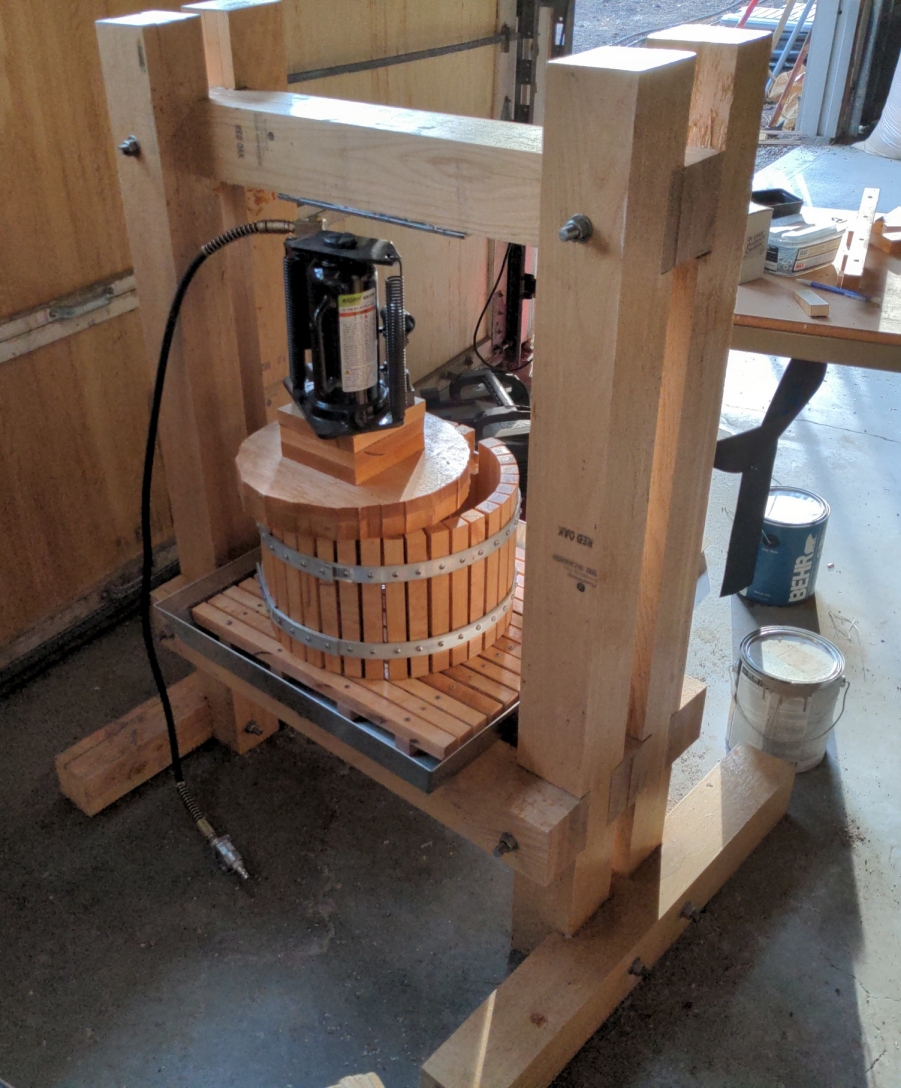
The completed press.
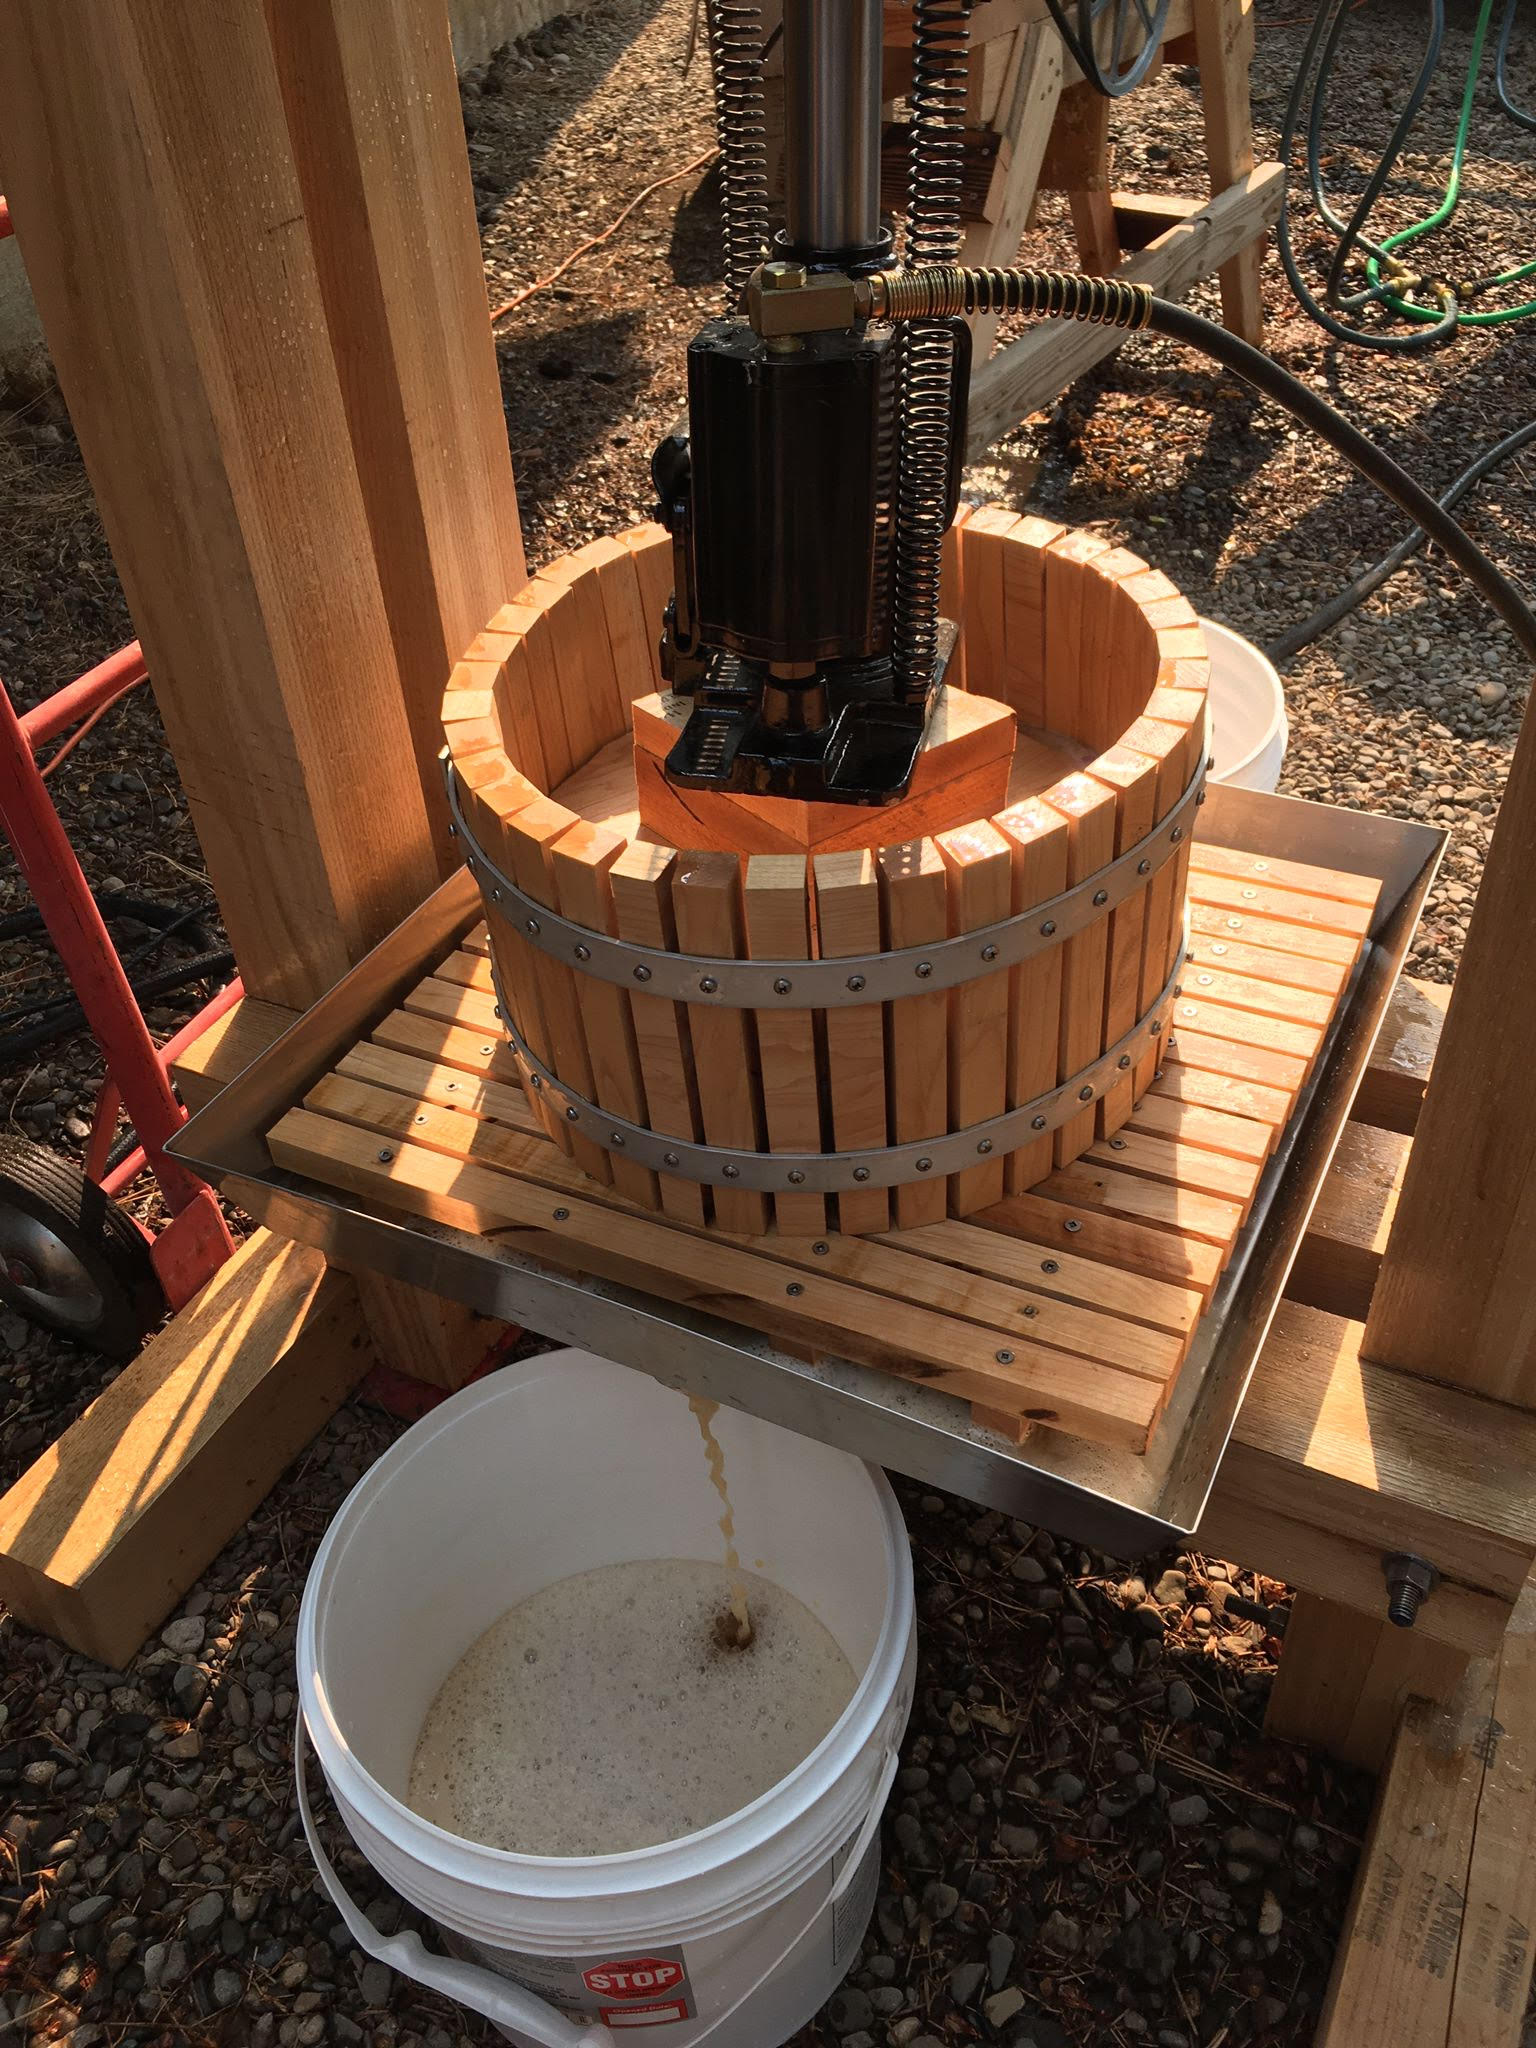
The press in action, with cider flowing.
The laser ramp
The press is just one piece of the story, though. Other problems needed to be solved. The plan was to press a full bin of apples, about 900lbs worth of mostly Red Gravenstein. All of those apples would need to be washed and ground into pulp, and there were far too many to easily lift out of the truck in which we would bring them home.
Between purchasing and pressing, the apples went through a process called "sweating", which basically means letting them sit in a big pile for a while to ripen further. They were left in the bed of a pickup truck in the shade for a week, with a tarp over the whole thing to keep wildlife from eating them.
To at once tackle the problem of washing 900lbs of apples and moving them from the truck to the grinder, I built a ramp. One end could be leaned on the tailgate of the truck to have apples placed on it, where they would roll down to the other end which delivered apples to the grinder. I mounted several spray nozzles near the bottom of the ramp to spray apples with water as they rolled by, effectively washing them.
It would of course be a waste of water to leave the sprayers running the entire time we were pressing. Why get everything wet if there isn't an apple rolling by at that particular moment?
I drilled a hole through both sides of the ramp. On one side, I inserted a small 5v laser pointer, and on the other side, a photoresistor. I wired the photoresistor to one of the same moisture sensors I experimented with in my last project, which is really just a LM393 op amp wired up as a voltage comparator. Adjusting the potentiometer, I could calibrate the op amp so that it would output 5V when the laser beam was broken, and nothing otherwise.
The 5V output feeds to the base pin of a transistor, which controls a 12V input to a delay relay. This relay has a circuit attached such that when activated, it remains open for a period of time determined by an adjustable on-board potentiometer- for my purposes I set it to about 8 seconds. When activated this relay allows 120V AC wall power to flow to a large solenoid, opening a valve allowing water to flow. Thus, an apple rolling down the ramp would break the laser beam as it rolled by, triggering this cascade of circuit activations and turning on the spray nozzles long enough to clean the triggering apple as well as any apples close behind it.
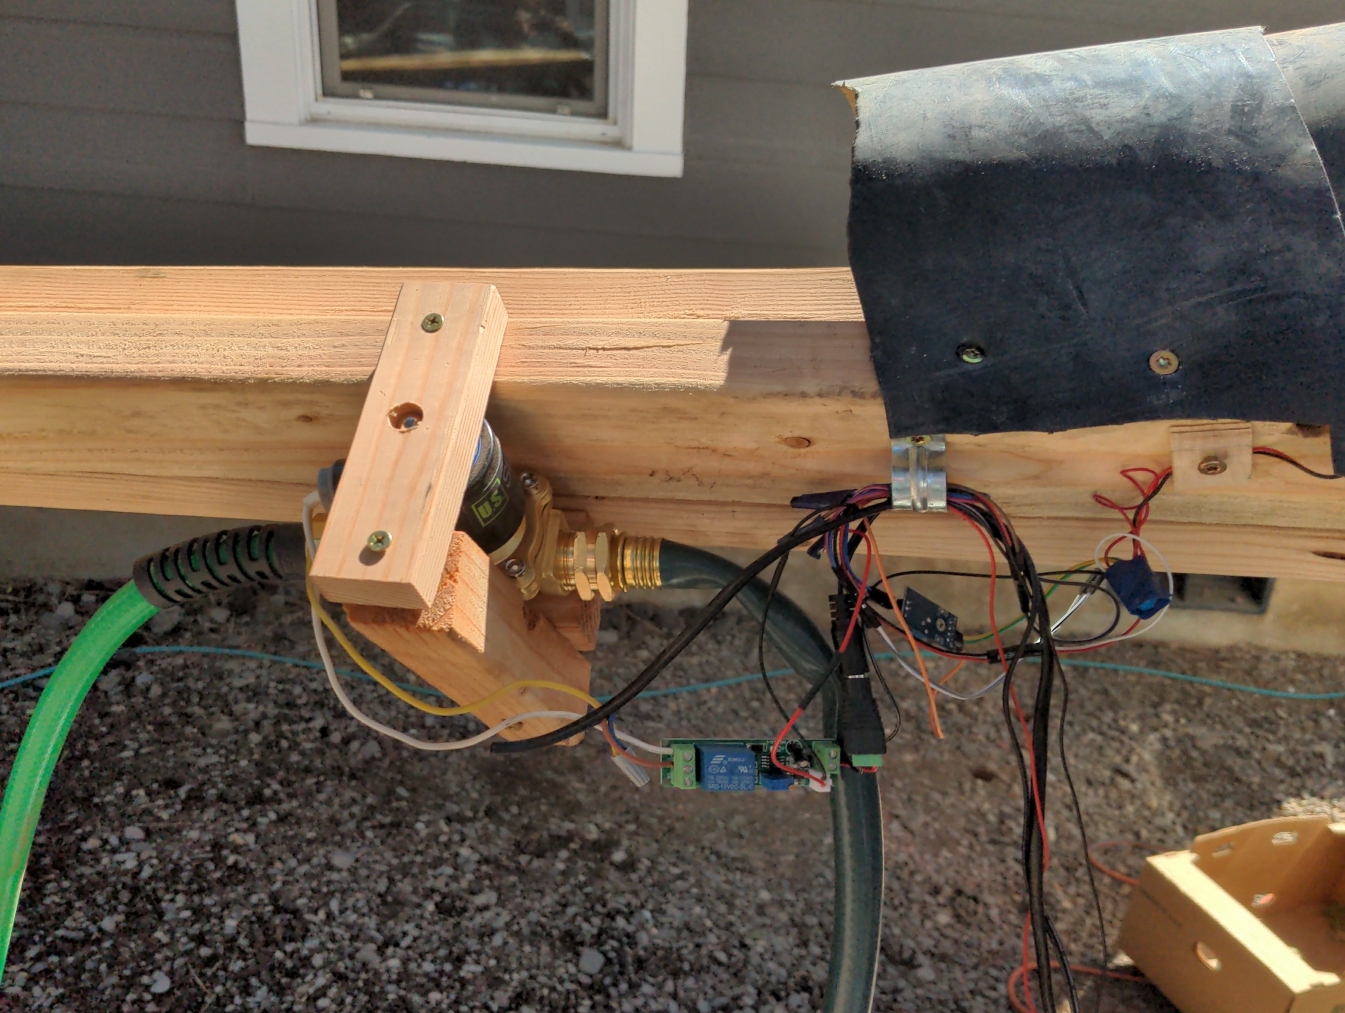
The op amp, relay, and solenoid. The black plastic enclosure keeps sunlight off of the photoresistor.
The grinder
I had systems to wash the apples, to deliver them from the truck, and to press the juice from the pulp. The last piece is the system which created the pulp: the grinder. I wanted something into which the apples could fall directly from the wash ramp, without needing human intervention. A large wooden hopper received the apples, and they fell downwards into a narrowing space to cutting teeth which could grind the apples to pulp. We cut and glued together a large cylinder of solid maple into which I embedded cutting teeth, thin stainless steel strips which I bent at right angles and screwed into the maple. The cylinder is mounted on an axle and is driven by a 3/4HP AC motor via a pulley.
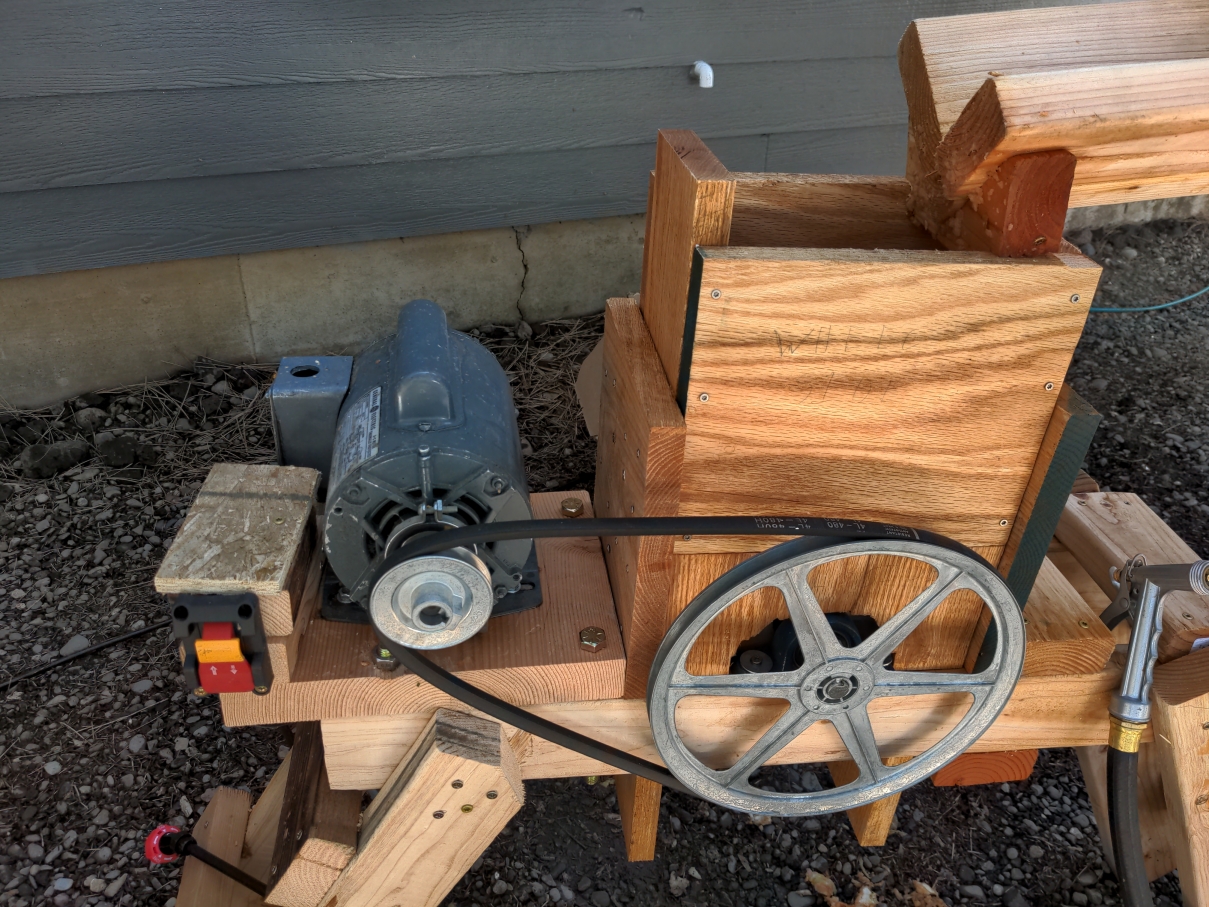
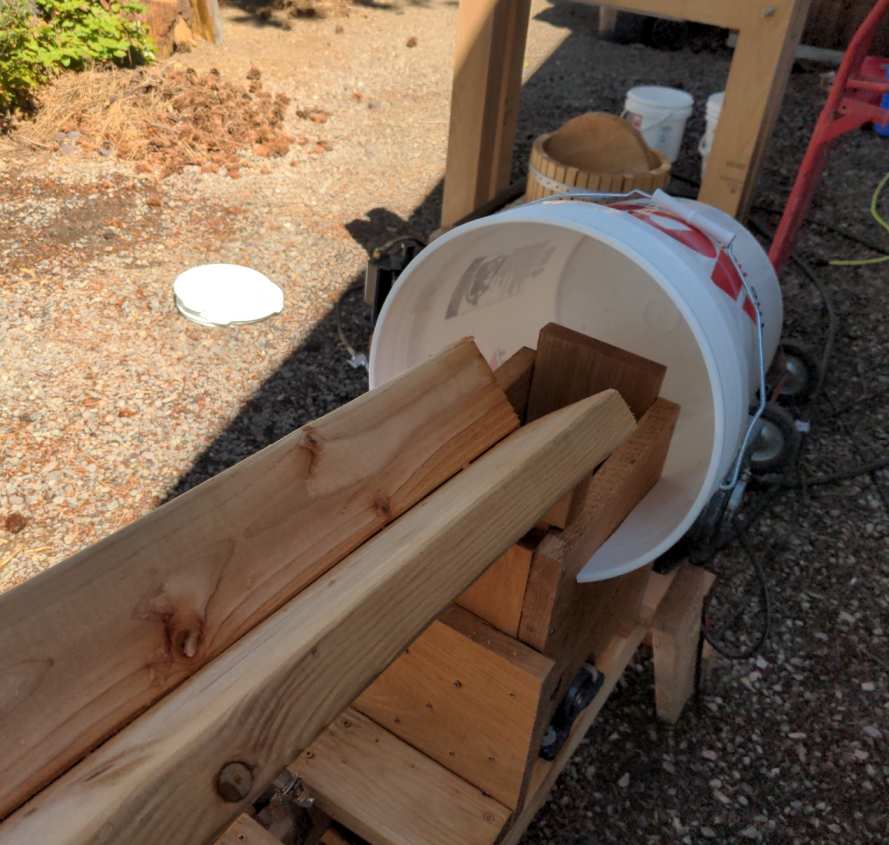
Side of the grinder, with ramp installed to dump apples directly in. Normally a plastic cover is over the top, to prevent spray of apple chunks.
The whole thing is modeled after this grinder design (archive). You can see a similar grinder in action here. There were a few lessons learned here. Firstly, the grinder teeth would bend if the screws were placed too far from the ends. Repeated impacts with the apples would twist the extremities of the teeth upwards, both ruining their ability to chop apples and also impacting the teeth against the grinder housing as it spun. Secondly, the shape of the grinder feed is very important. A slow and consistent narrowing is crucial for the grinder to self-feed, otherwise some sort of mechanism is necessary to push the apples down. I had to add a curved slope into my grinder housing after it was originally completed for this very reason. Apples were simply bouncing around on the blades and not being sucked into the teeth. One final thing I will be changing will be to decrease the gap between the teeth and the housing at the spot where apples pass through the tightest space, in order to grind them even finer. Cider is pressed out of apple cells that have been broken open, and large chunks of uncut apple in my pulp means the cider will not be fully extracted.
As apples are ground, they are expelled out the bottom of the grinder into a waiting bucket which has been lined with a nylon press bag. The bucket itself is a standard food-safe 5-gallon bucket. One can purchase these, but it is often easier to go into any supermarket with a bakery and ask if they have any empties in the recycling. After any remaining frosting is washed out, they are ready to start their second life as apple pulp collectors.
Fun fact for the home cider maker- if you only have one variety of apple but want to take advantage of the different flavor profiles that blending can yield, there are some tricks you can do during this process to yield different profiles of cider. One easy one, assuming you are not allergic to sulfites, is to dissolve a ground-up Campden tablet in water, in a standard spray bottle. As the pulp comes out the bottom of the grinder, mist it lightly with the spray bottle. The spray will prevent oxidation of the pulp, allowing for greater tannin levels in the cider. Apples contain tannins, as well as an enzyme called polyphenol oxidase. In an intact apple, these are kept separate from one another. When the apple tissue is ruptured during grinding, these molecules are brought together in the presence of oxygen, and oxidation begins. Preventing this oxidation will yield a cider that is yellowish-clear, unlike the typical brown, and is more astringent than cider that has not had this treatment. Note that this is just one of several different pathways preventing tannin extraction. For instance, the tannins will also adsorb directly to the solid material of the pulp. For this reason, the less time elapses between the grinding and pressing of an apple, the higher quality cider will be produced.
Looking down the ramp to where the apples will fall in, note the plastic spray shield

Looking down the length of the whole system, from apples to press
The pressing
Once the bucket is filled, the bag of pulp is lifted out of the bucket and placed in the press basket. Last year, we had to turn a screw by hand to push down the press board, which had all sorts of problems. The screw sometimes sheared off small slivers of metal that had to be picked out. I could only twist the handles so hard, and keeping the whole press on the ground when twisting hard proved to be difficult. Additionally, it simply took a long time to screw the press all the way down and then unscrew it each press. With the new press, all of these problems went away. The pulp is placed in the basket, the pressboard is placed on top, and atop that I put a 12-ton pneumatic hydraulic bottle jack. Those of you that have used bottle jacks before, especially higher capacity ones, know that they move very slowly with each pump of the handle. This bottle jack has a pneumatic hookup for an air compressor, and when connected to one set to 90PSI, could quickly extend its ram without effort.
Once the ram extended enough to hit the steel pressure plate on the underside of the top beam, the cider began to flow. With a strong press frame and a strong jack, I did not hit the limit of either piece of equipment. Instead, once pressure increased past some critical point, one of two things would happen. Firstly, the pressbag would often be pushed upwards through a narrow gap between the pressboard and basket, at which point pressing would need to cease or risk an exploding bag. Secondly, if the pressboard successfully contained all bagged pulp, it could sometimes increase the outwards pressure at the base of the basket so much that it would lift the basket upwards off of the drain slats- also risking a bag explosion, and reducing the applied pressure. Typically, pressing a full bag with 25-30 pounds of pulp would yield about two gallons of cider before one of these two things happened.
When pressing was completed, I was left with several hundred pounds of pressed ground apple, called pomace. Some of this we fed to our chickens or used as fertilizer, and the rest was given to our neighbors who keep horses.
Storage
Let's do some quick math on that last sentence really quick. 900lbs of apples divided by 30lbs per pressing is 30 pressings, which at 2 gallons per pressing yields 60 gallons. A traditional, professional cidermaker would have some 50 gallon barrels or other large vessels into which to put large quantities of cider. We're just a single household, and need to store 60 gallons of perishable liquid.
One of the nice things about cider (in addition to the taste) is that it freezes extremely well. Frozen cider, when thawed, will taste almost identical to when it was fresh. We bought about twenty five food-safe 1-gallon buckets at a local restaurant supply store, and filled these up to stack in our chest freezer, filling it to the brim and then some. We will thaw one every other week or so, and have fresh cider for the entire year until the season comes around again.
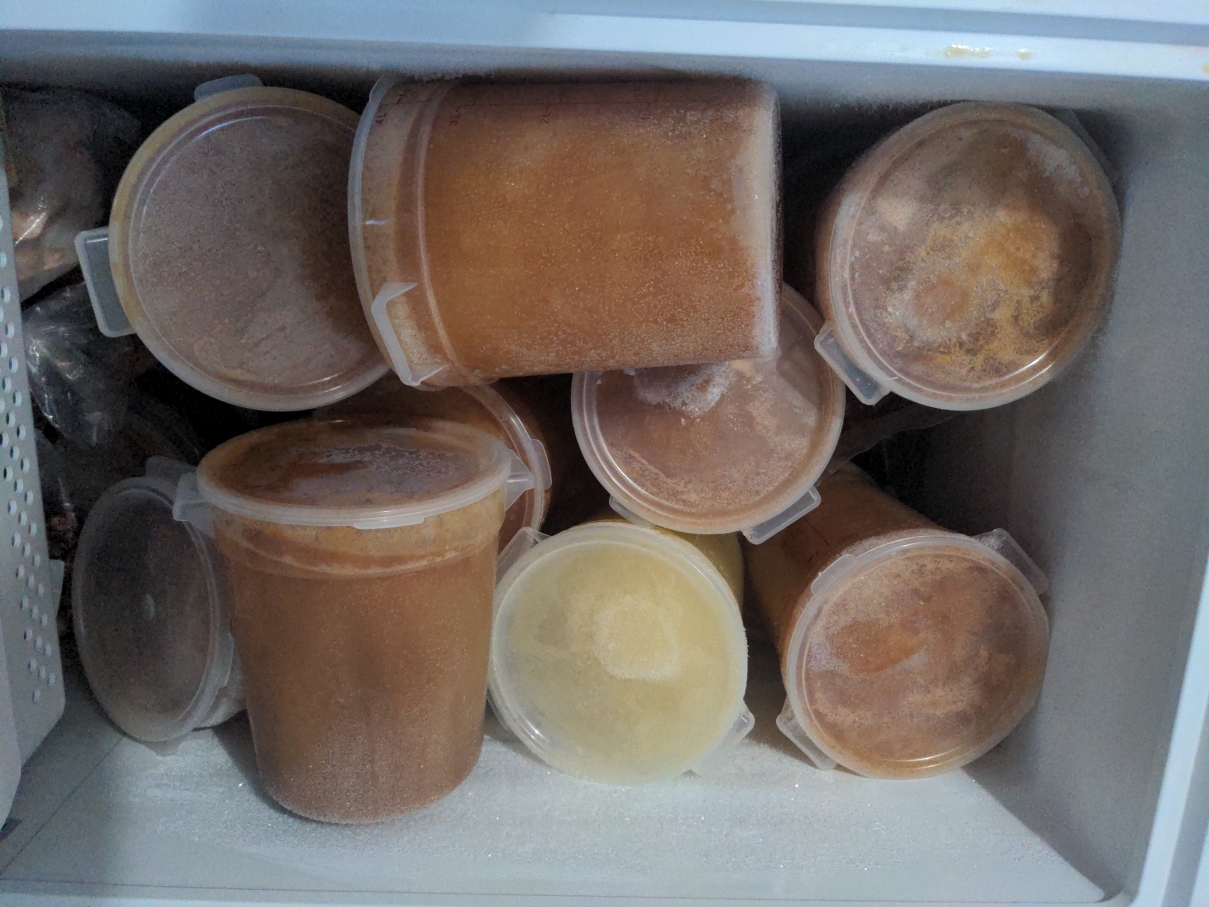
These go down three layers deep.
The differently colored gallon in the bottom row is the result of me treating the pulp with sulfite water to prevent oxidation, as described above.
This still left me needing to find a home for another 35 gallons of cider, weighing nearly 300lbs. One of my hobbies is home-brewing beer, and I have a number of 5- and 6-gallon fermenting vessels available. Between the five fermenters I own and the one I borrowed from a friend, I am able to store nearly all of the cider I needed to. The quantity remaining after all vessels had been filled, was the perfect amount to drink and share on the spot.
Fermentation
The cider in the freezer has finished its journey for now. But for the cider in the fermenters, it is just beginning. I measured the pH of my juice- it was about 3.4, perhaps a little lower. Accordingly, I put two Campden tablets per gallon (archive) in each fermenter and added this to the cider. Note that many recipes only call for one Campden tablet per gallon- the required number is pH dependent. The goal is to have about 75ppm of free SO2, and higher pH means a tablet will yield less SO2. Lesson learned- the first 5-gallon batch I made, I did not crush the tablets to powder before adding, and the cider grew mold and required reracking and other rescue methods. All other batches had their tablets crushed, and none molded.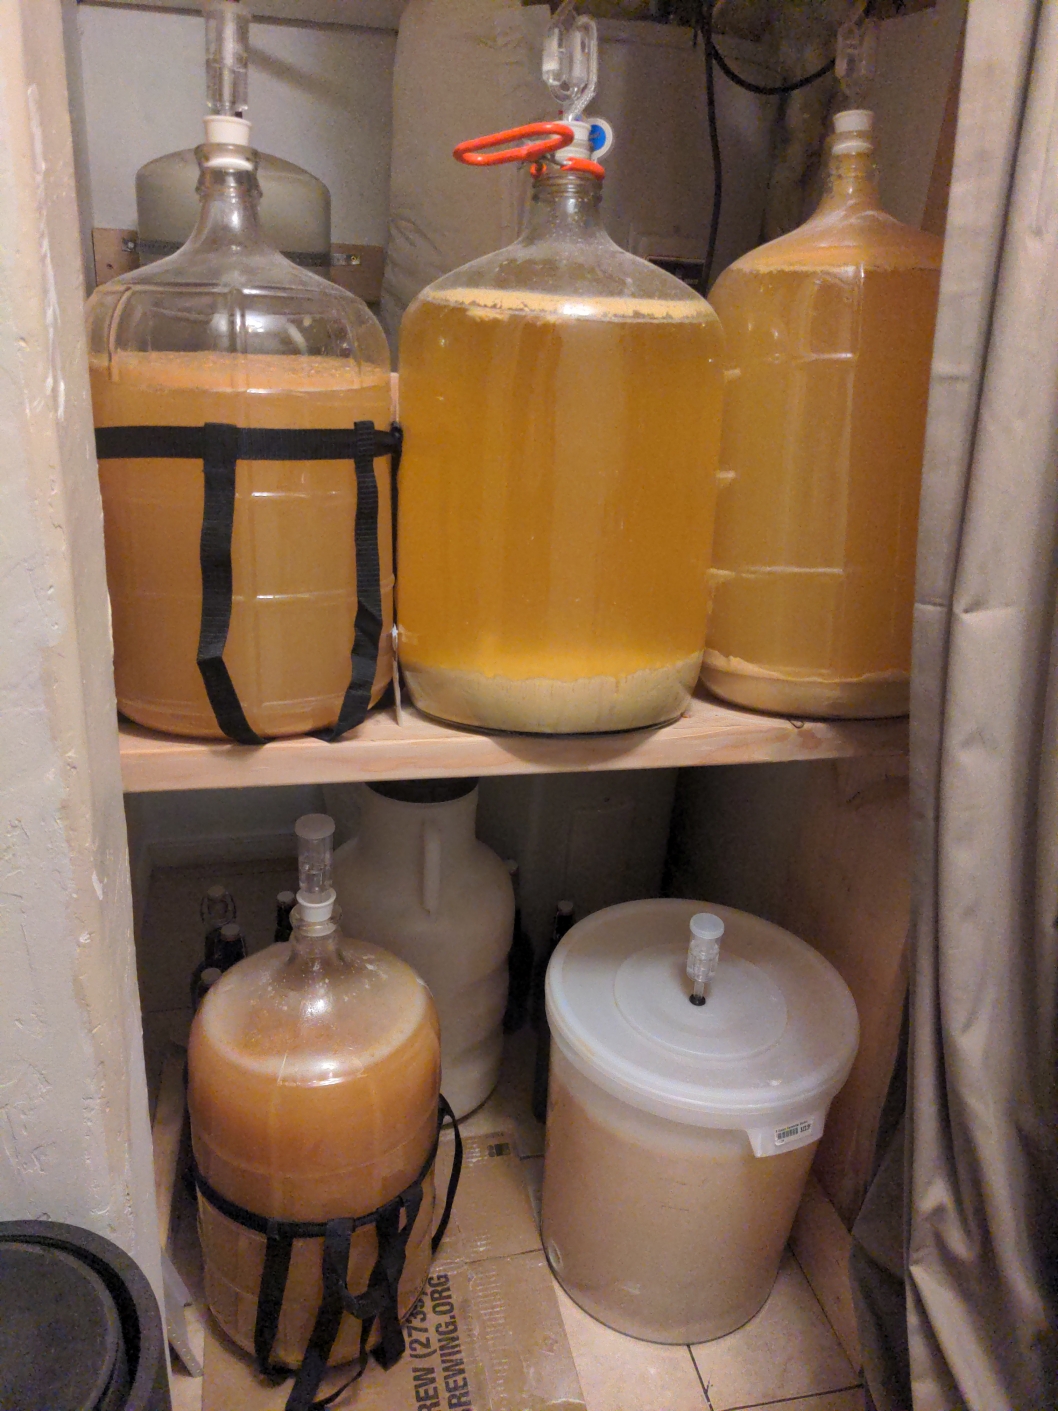
Six large cider containers, full of happy yeasty beasties
I took a hydrometer reading of the cider, and got a specific gravity reading of 1.040, enough to ferment to about 4.8% alcohol. For those unfamiliar, specific gravity measures the amount of dissolved solids in a liquid. Pure water reads 1.000, and dissolved sugars in the cider increase the density of the liquid, allowing a partially-submerged calibrated weight to measure the new density.
The potential 4.8% final ABV is too low to safely preserve the juice; 5.7% is really the bare minimum to not have risky keeping qualities, and for long-term storage it's preferred to be closer to 8-9%. I added about 7oz of pure glucose per gallon along with some yeast nutrients, which will bring my alcohol percent up to about 7% once it is done happily bubbling away. Some of it I plan to increase further for very long-term storage, the rest will be left at 7% for bottling and shorter-term consumption.
Next Year
Apparently, subjecting pomace to a high voltage pulsed electrical field (30kV, 40us and 1kHz duration and frequency) will crack open intact cell walls and improve yields (archive) for both the tannin compounds in the juice, and also juice quantity in general. If anyone has ideas on how to home-build such a system, please reach out.