biotinker.dev
An Underground Cider Aging Cellar Of My Very Own
Anyone can build a bridge underground building that stands, it takes a (real, not me) engineer to build one that barely stands
AI is great at writing software. AI-written prose is terrible to read, and rather defeats the purpose of me organizing my thoughts in a blog. Every piece of this website, from the blog post words to the raw HTML itself, was 100% written by human me without AI. I sometimes discuss software I used AI to create but zero prose on biotinker.dev have been touched by an LLM.
If you have read my other posts, you've noticed they're almost all about apples. I like to grow apples, and once grown, I like to grind them up and squeeze them as hard as I can so all their juice comes out, because it's delicious. But I'm not selfish; I happily share the juice with yeast! Anything I don't want fresh, they get the first go at, and I'm more than happy to drink what's left when they're done.
Anyway, I made a lot of cider. Like, a loooot of cider. 40 gallons per year or so fermented, for a few years in a row, for personal use. I don't drink a gallon of cider a week, so it started building up. I started keeping track of which batch was which by which dark nook or cranny of the house I had chosen to stash it in.
This worked great (read: my wife tolerated it, barely) for several years, until we decided that two of us wasn't quite enough related humans under our roof. Seeking to correct this, we went on a long and emotionally turbulent adventure spanning several years and four rounds of IVF, but eventually it seemed likely that reproduction was imminent! I realized that having caches of glass bottles of alcohol all over the house would not mesh well with toddler occupancy, and I knew that once parenthood status was achieved, I would have very little time to do anything meaningful about it. It was decided, the bottles needed to go out of the house, and I had a deadline.
I had had the thought of digging an aging cellar for the cider in the back of my mind for a while. Things holding me back included the fact that where I live, bedrock is anywhere from 7 feet below the surface in some areas, to jutting above the surface in others. Also, the rest of it. But I decided to go for it.
Did you know they'll rent an excavator to just anybody?
Seriously, if you have a credit card you can go rent a full size excavator for the weekend and do whatever you like with it. That said, I don't recommend it. The treads tear up the ground terribly. Instead, rent a 10k pound excavator for the weekend. That's what I did! Powerful enough to dig a big hole, light enough that the arm can push the rest of it out when you accidentally fall into that hole and get stuck.
The spot for the cellar, I had picked out years in advance, and every time we walked by I would say "Wouldn't it be neat to dig a cellar here?" Turns out, I have great taste in cellar location sites. The spot I chose happened to be somewhere where the bedrock was mostly quite deep below the surface. I rented a 5-ton excavator for the weekend, and went to work. After 10 hours of digging, here's what I had:
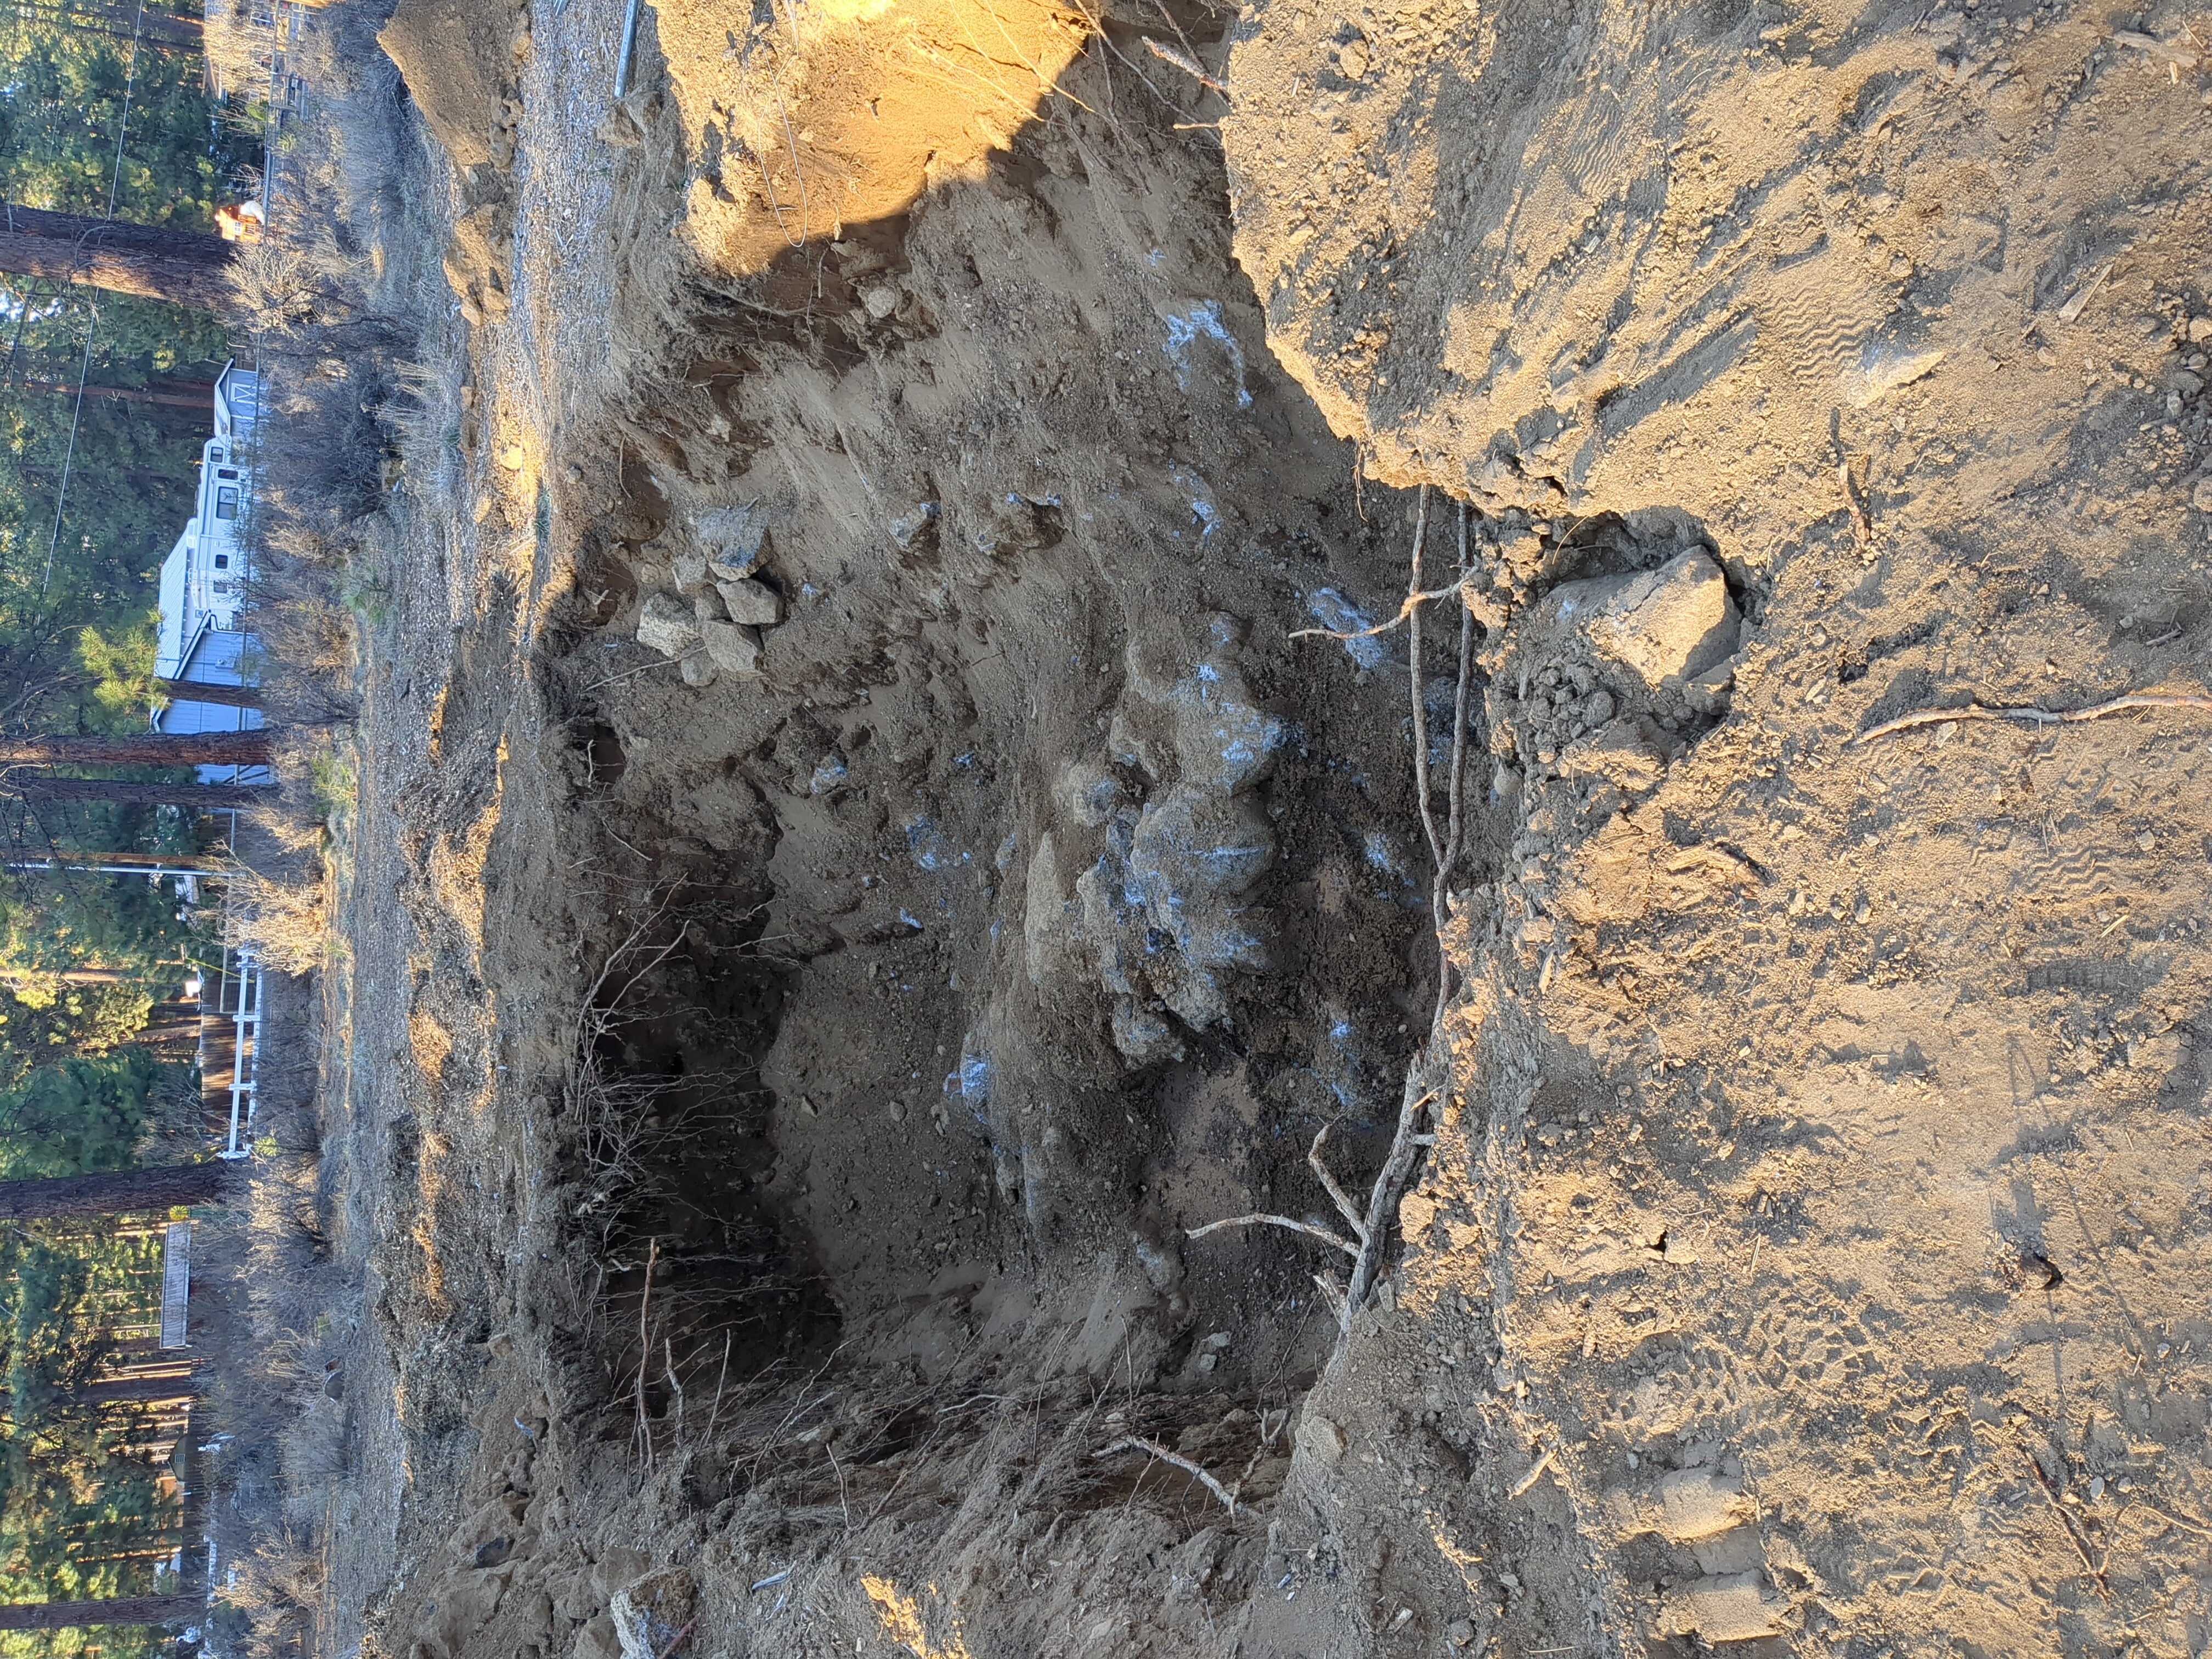
That's a decent hole, but there's that really obnoxious bulge of rock riiiiight in the middle of what I would like to be the floor. 0What do do about that?
Did you know they'll rent a jackhammer to just anybody?
Renting a jackhammer was actually slightly less easy than renting an excavator, because the rental place screwed up and gave me a rock drill at first instead of a jackhammer, necessitating an extra trip across the city. Having never held either before, I accepted that the 60lb steel pneumatic tool they handed me was what they said it was. Oh well, I went back and they fixed it, I just lost an hour.
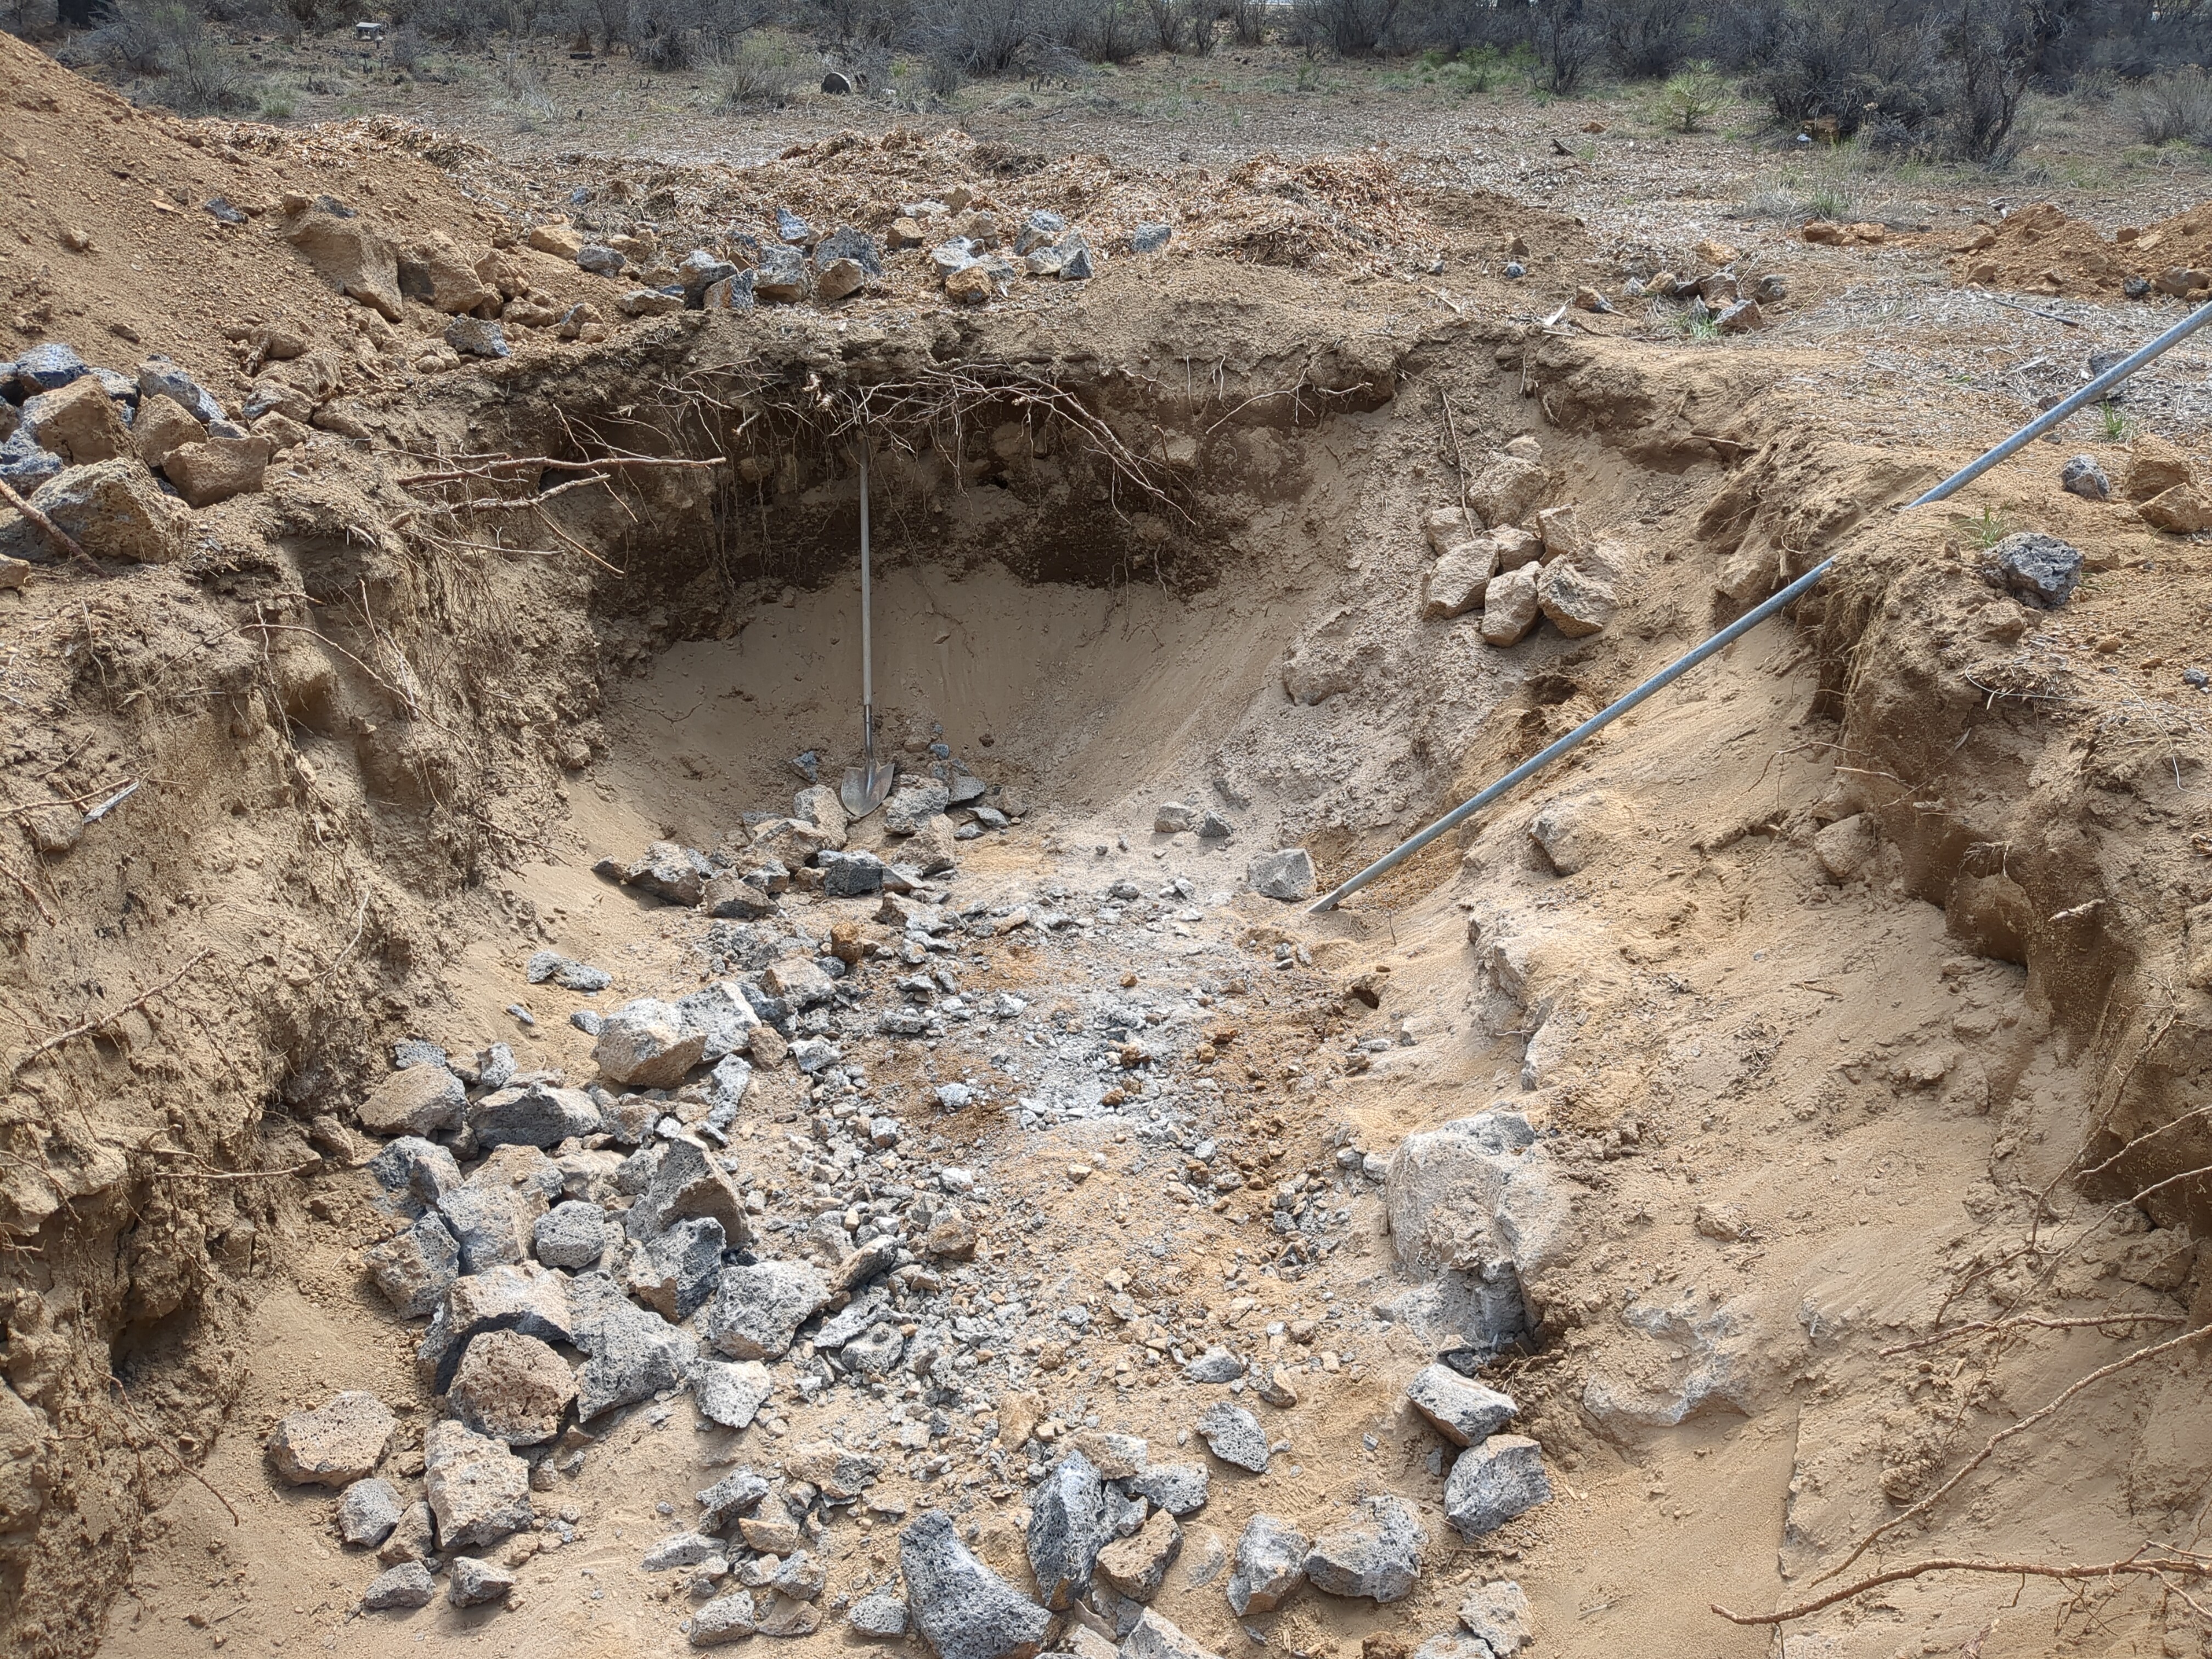
I really wasn't sure what jackhammering would be like. Basically a giant deadweight with a pneumatic mechanism, that attaches to a giant diesel air compressor that needs its own trailer. I got down in the hole with the hammer, turned everything on, and just kind of leaned on the jackhammer. Luckily the bedrock here is bubbly, porous, brittle lava rock and after a dozen hours of jackhammering the bulge in the floor was a bunch of broken rock on the floor.
Here's a photo, with a shovel in the hole to show scale.
I removed the broken rock by hand (note for anyone else: don't do this by hand, and don't rent a jackhammer either. They make hydraulic breakers for excavators. Get one of those, use it to break the rock, and then swap back to the bucket to scoop out the rock). Finally, it was time to start building the cellar. Having mixed some cement in a pan before, I knew that was absolutely not an option for the quantity I was expecting here. I'm a fan of the Harbor Freight rule of "buy Harbor Freight first, and if the tool breaks, then you know you need to buy a nice one". So I got their cement mixer. It's a pain in the butt to assemble, but it spins and tilts and that's really what you need.
Before we go further, let's contextualize my knowledge here. This is pre-AI, so I can't just ask questions about how to build a building. The most structural thing I had built before was a deer fence. I knew very little. However, I think there's a lot of truth to the saying "anyone can build a bridge that stands. It takes an engineer to build a bridge that barely stands". In other words, if I just go overboard an massively overbuild everything I can, it should make up for my lack of technique, proper materials, etc.
Cinderblocks are just heavy adult legos
So it's time to start laying some cinderblocks. Of course, you can't just put cinderblocks down on soil directly. That would be ridiculous. You need some sort of footer that's flat on top, to put the cinderblocks onto. They make flat concrete blocks, so I figured, why not just cement those down directly?
So that's what I did.
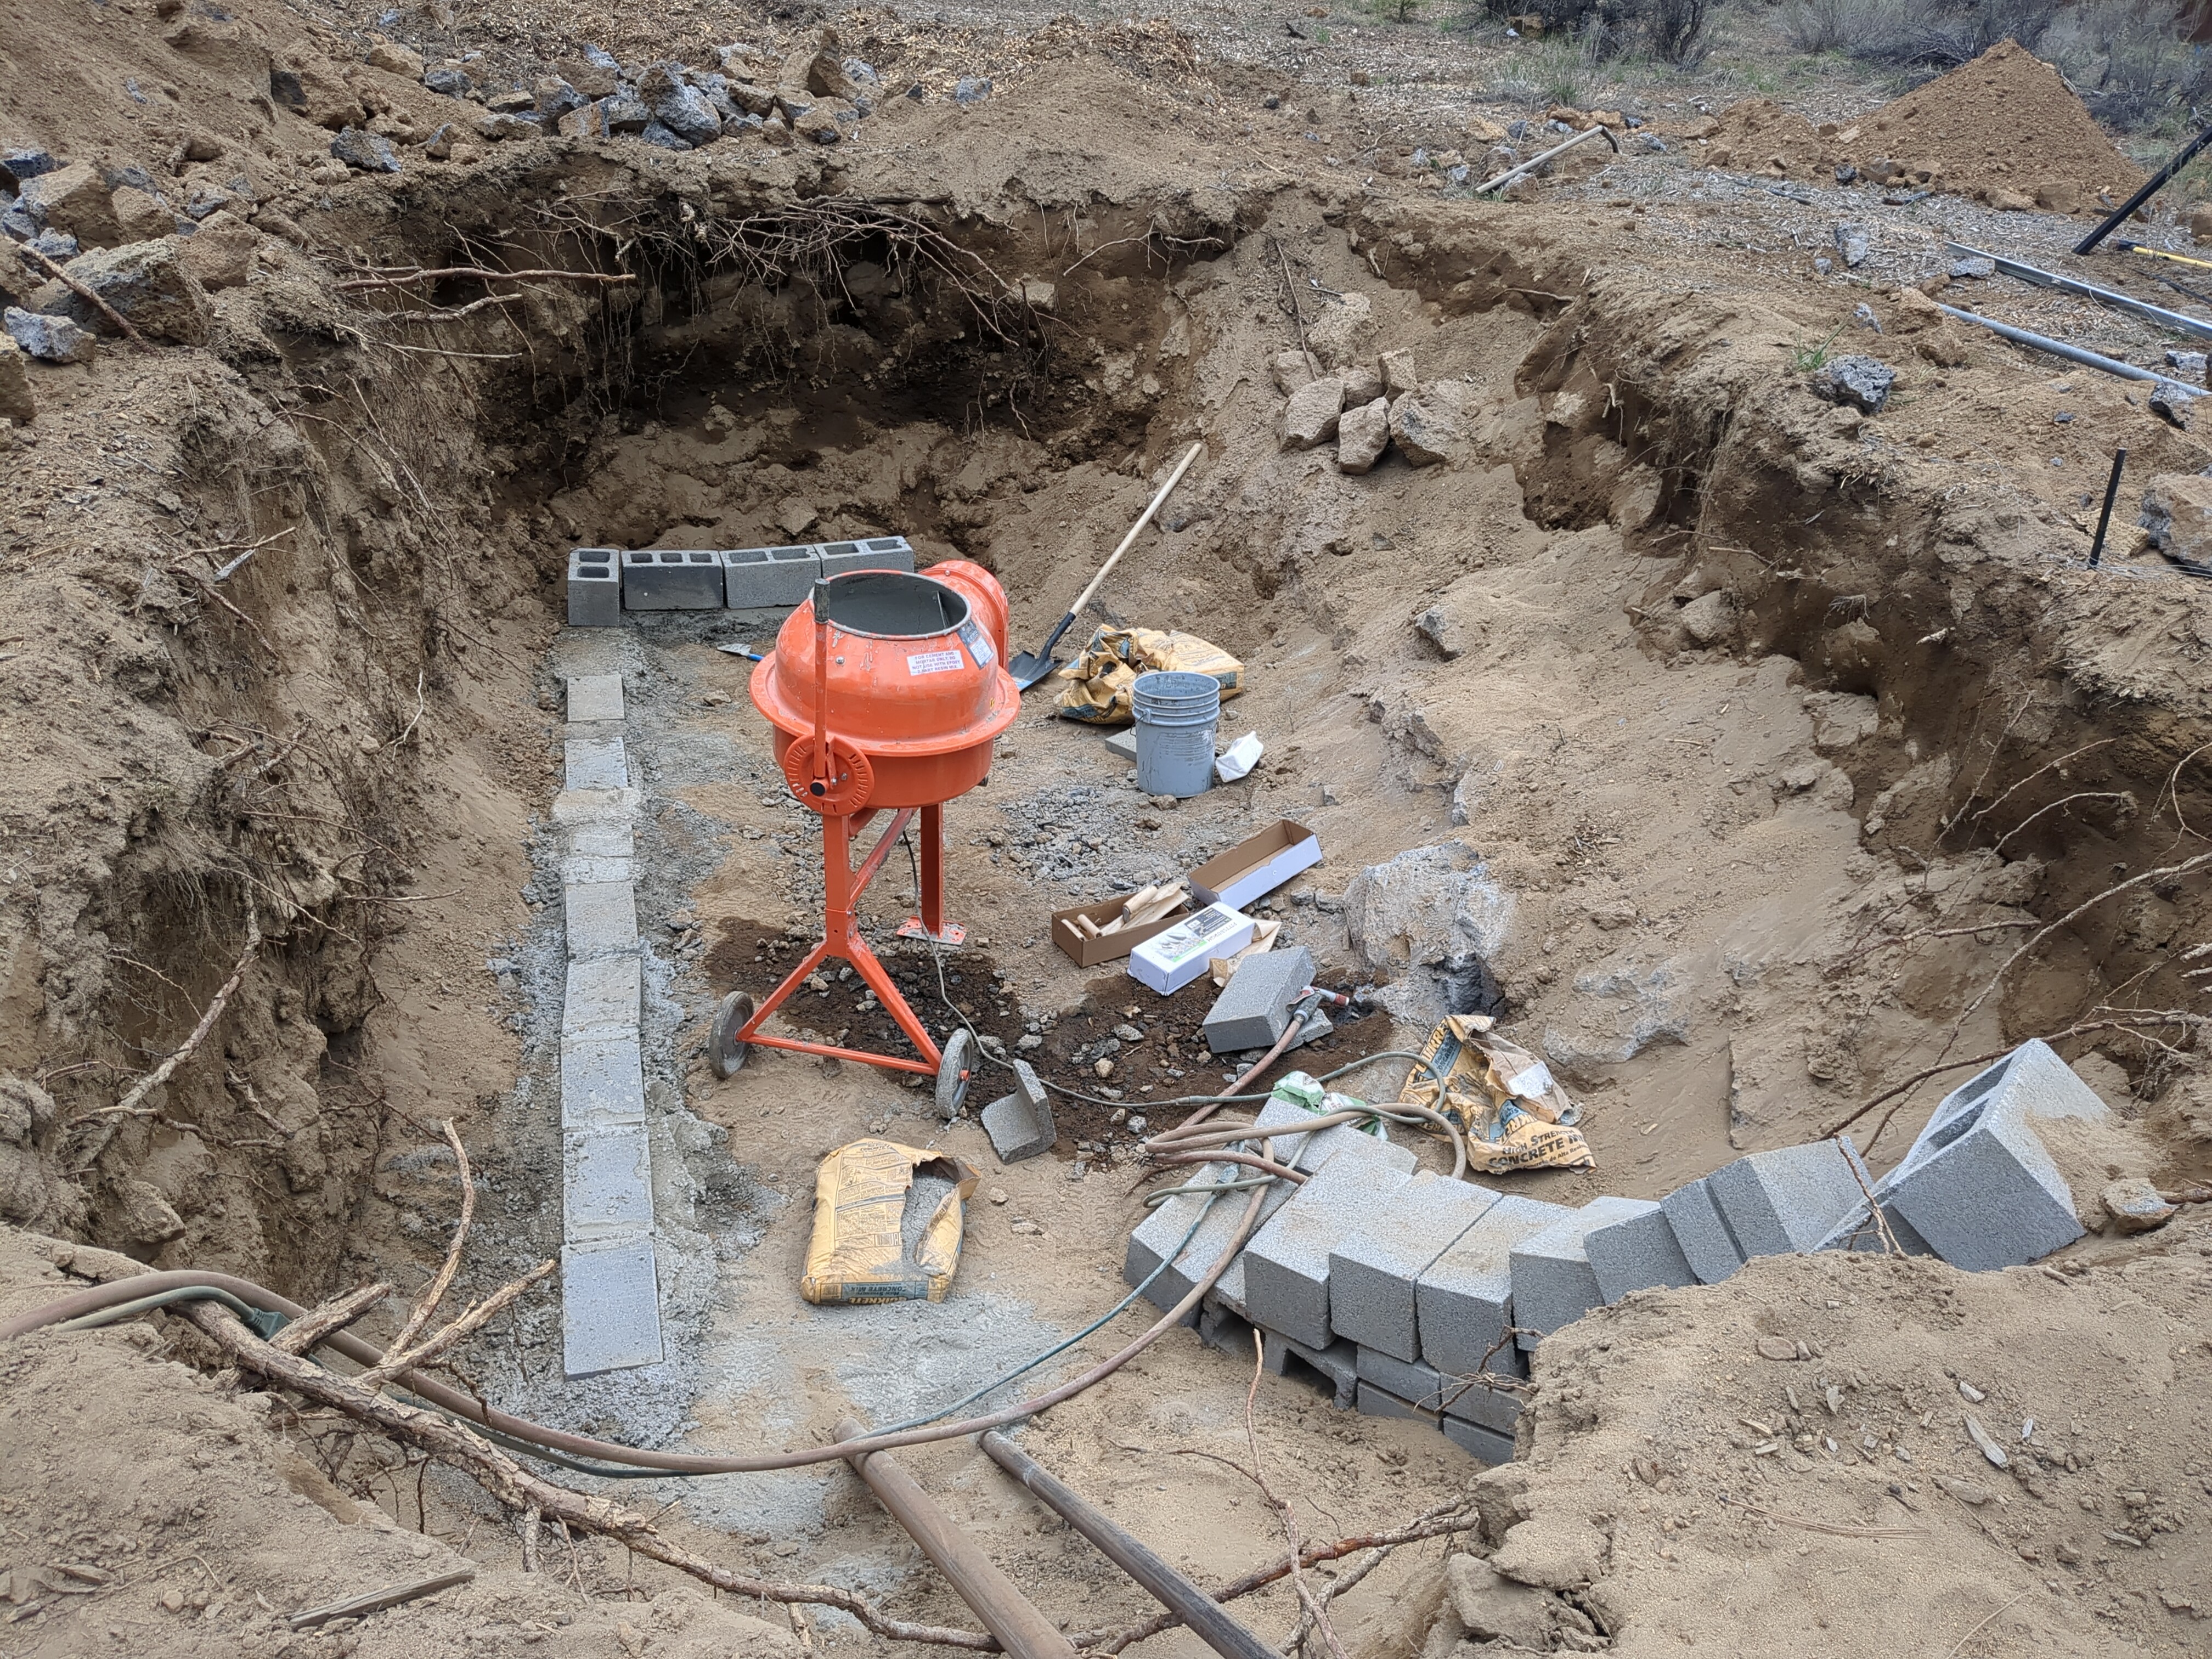
I dug out a bit of a trench, mixed up a bunch of concrete, poured it into the trench, and slapped the blocks on top and pushed them in. I'm sure someone will reach out to tell me all the ways this is terrible. Fortunatley, I'm not trying to do this for a living.
Now that I had a foundation of sorts, it was time to start actually laying cinderblocks. That means mortar. I had one of those fun diamond shaped things you see bricklayers use (from Harbor Freight; it broke almost immediately, I got a much nicer one elsewhere) and mixed up some mortar. And let me tell you, mixing mortar to the right consistency is a righteous pain. You try to follow the instructions, and get something completely unworkable you wind up just poking between the bricks with your hands. Using the diamond shaped tool was useless at first. Mortar would just fall right off. But it turns out that you can still lay bricks by poking the mortar into place with your hands, just veeerrryyyyy slooowwwwllllyyyy. After a few days of 5 bricks per hours, I had this:
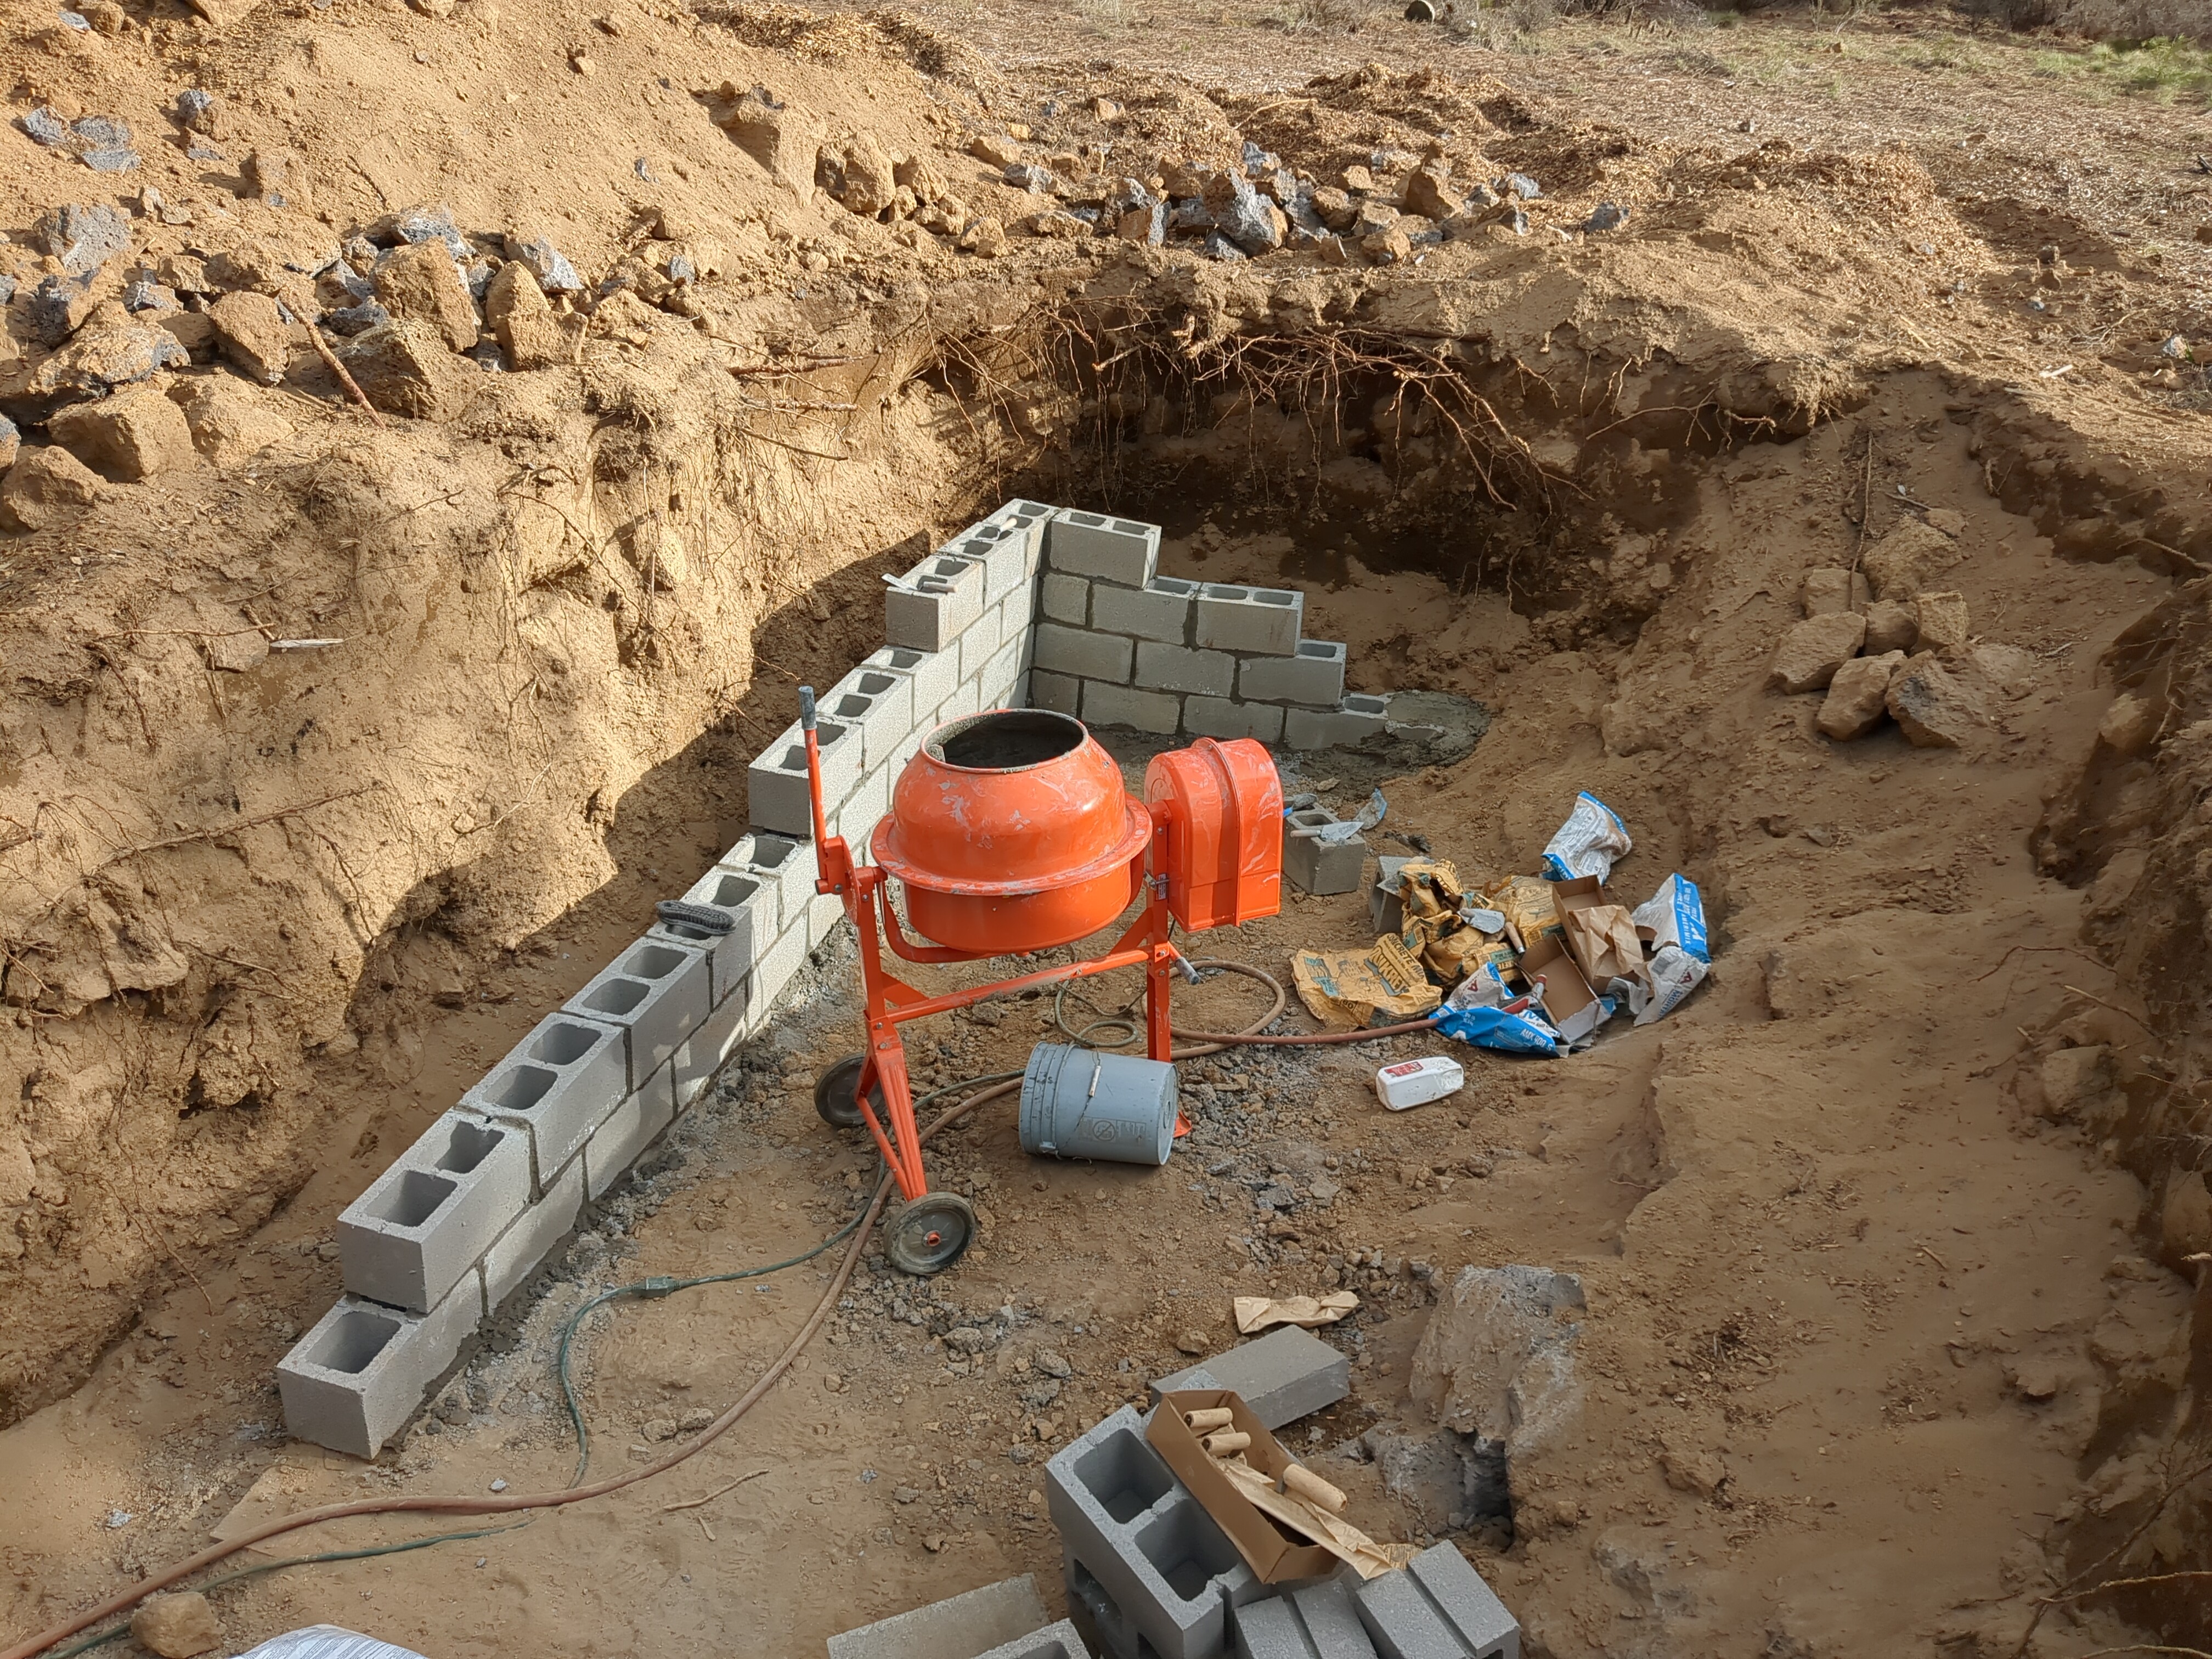
Having somewhere north of 500 cinder blocks to lay, 5 per hour was much, much, much too slow. A few youtube videos later, though, I had a technique to practice, and I started to get the hang of it. I stopped needing to measure water per mortar bag and just counted seconds of spraying water, I could tell when the mortar was mixed, and I could get it to stick to the trowel. With this, things accelerated.
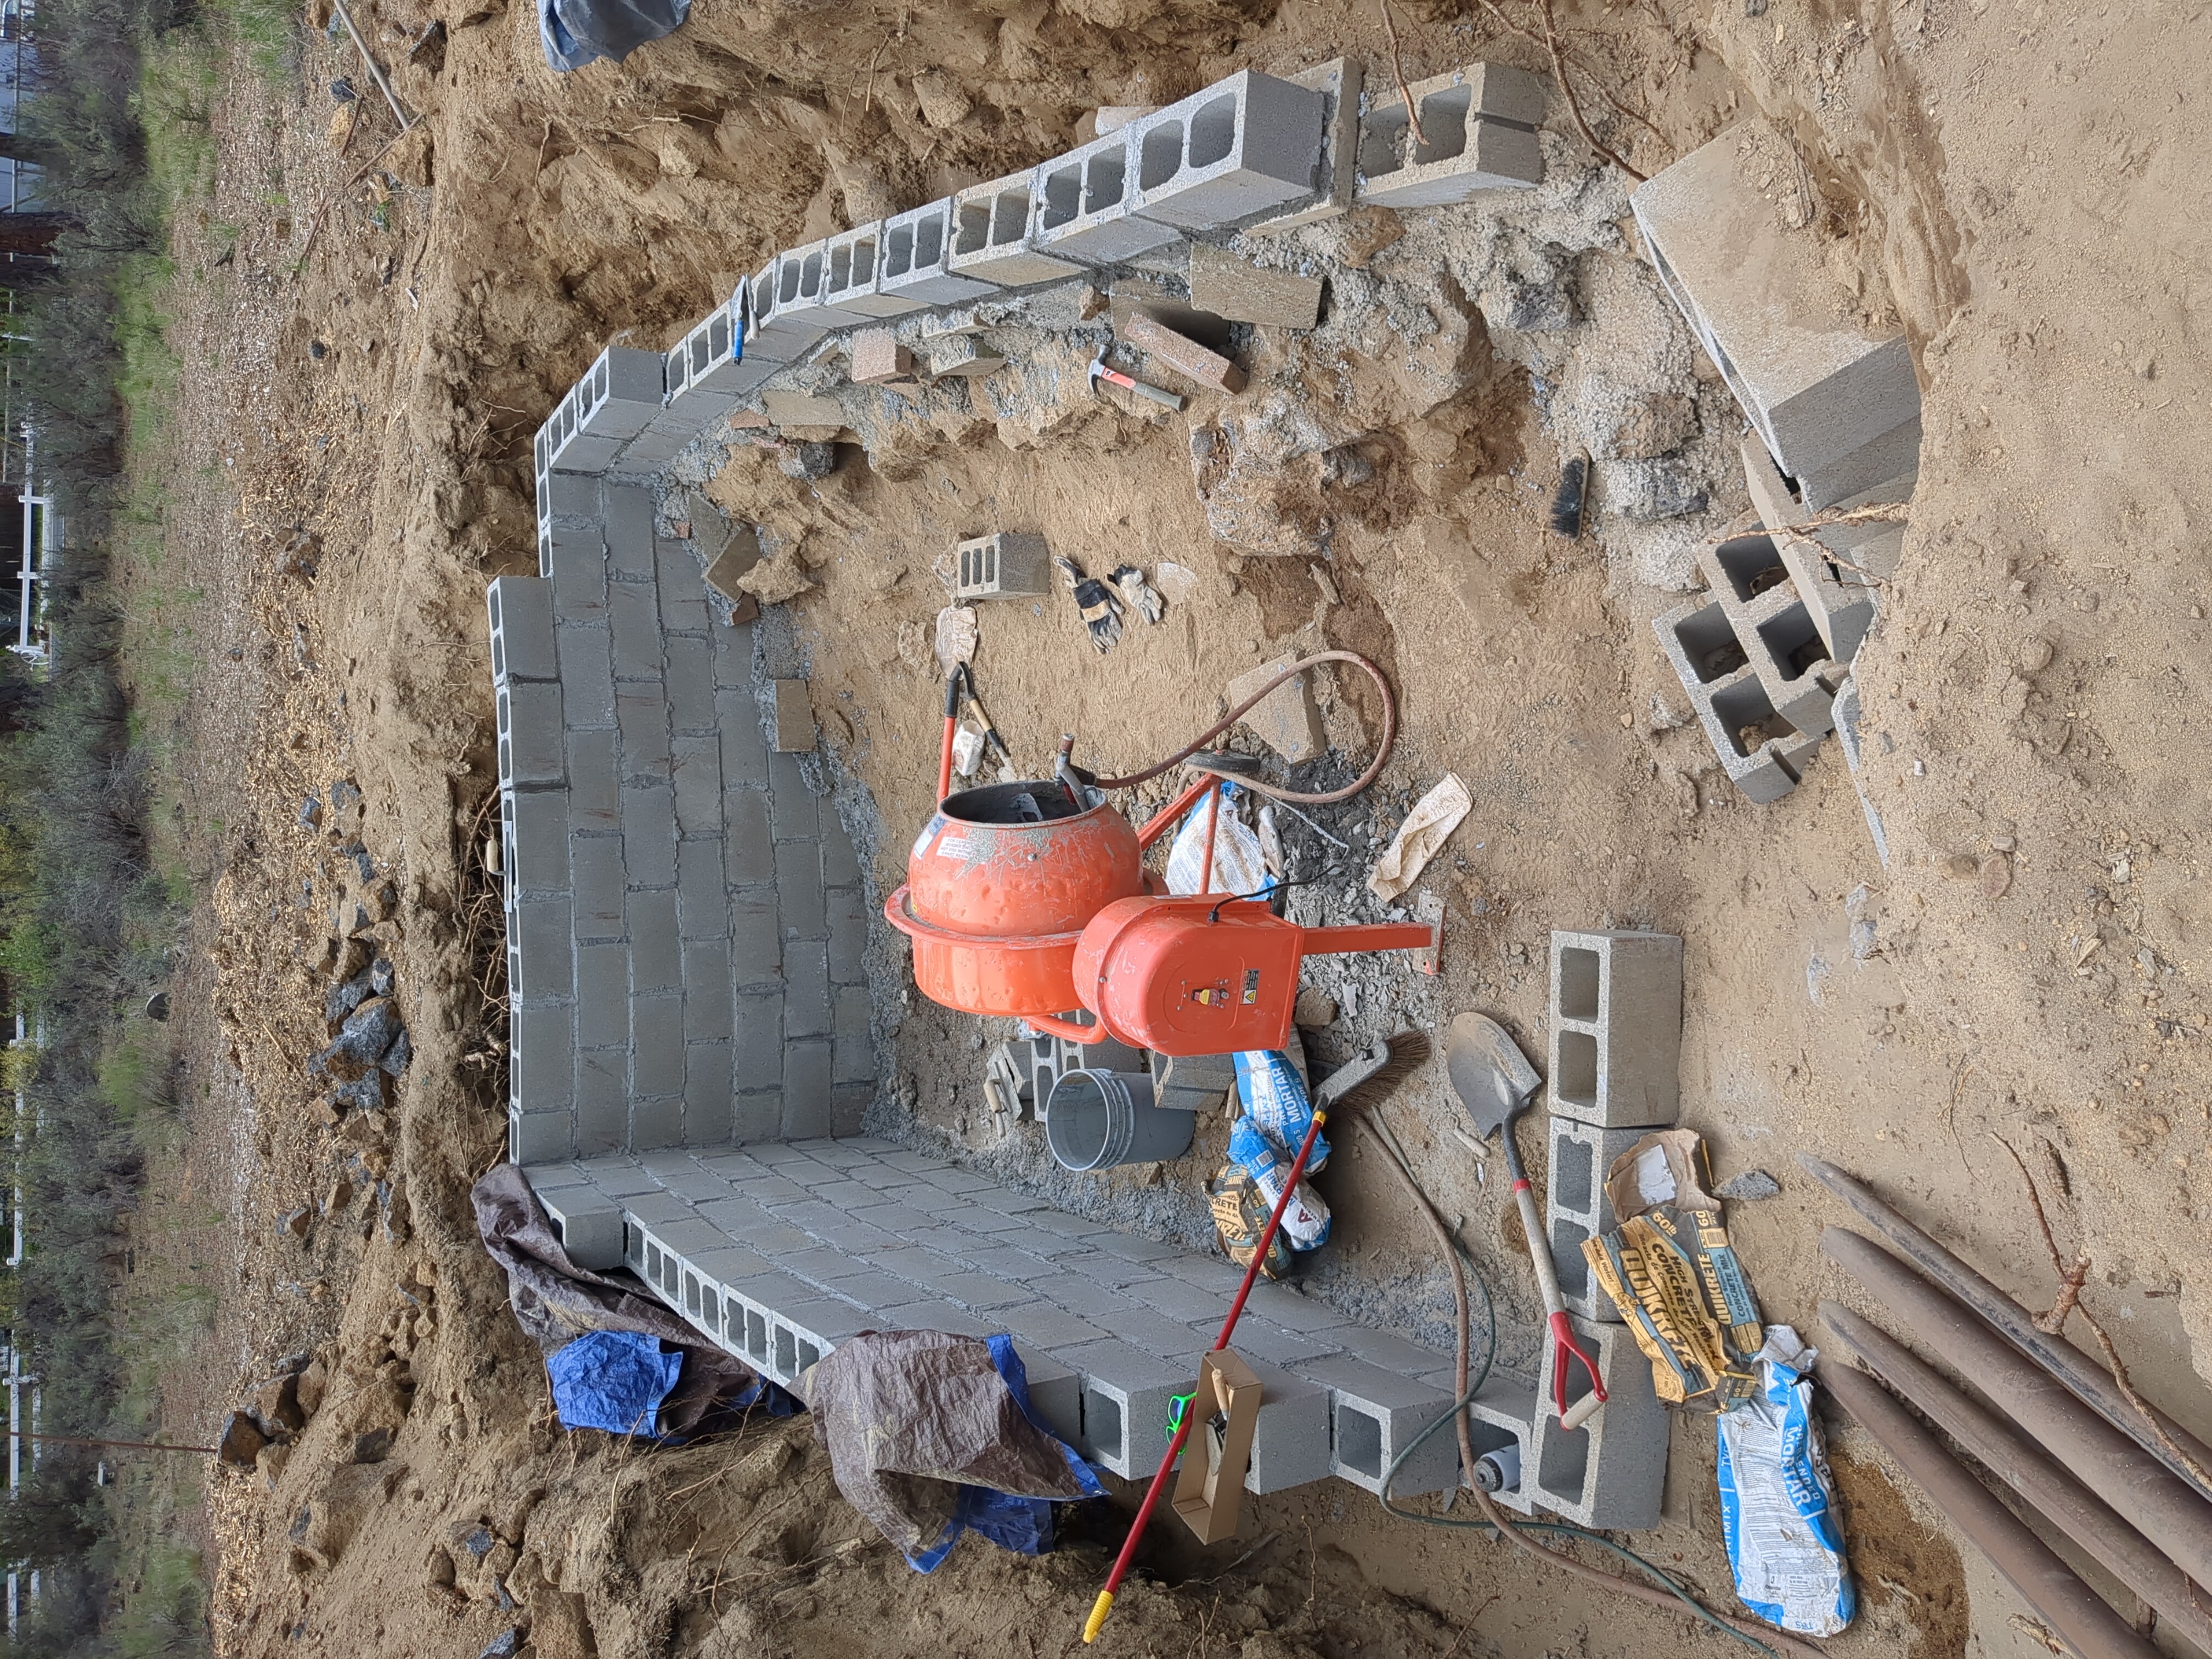
Some fun things to point out in that photo.
Firstly, a surprising challenge was actually getting the cinderblocks down into the pit from the ground where they were on pallets. I laid down 4 metal pipes from the scrap metal pile, and used those to slide the cinderblocks down. Getting myself down was an equivalent challenge, and I started out just stacking up cinderblocks against the side to be used like a staircase, if staircases had holes and moved around unexpectedly and were occasionally cannibalized to build walls.
Secondly, while the floor of the cellar-to-be had a decent depth to bedrock, the right hand side did not. Notice the left wall has a full four layers more of blocks than the right wall. Due to an outcropping of bedrock, I had to use an exciting combination of rock, paver stones, cement, and muscle to create a surface that was both flat enough to lay cinderblocks, and even with the existing height of the cinderblock wall. This was not easy.
Thirdly, the keen eye will notice the lack of straight lines. The back wall curves up, the right wall curves out in the middle, and in general things are following the contours of the bedrock on which it's built than anything rectilinear. Hopefully it's fine. You can get a surprisingly sharp angle between two cinderblocks if you're willing to use your fingers to poke mortar in between them.
Eventually, though, I got all the way around and was ready to complete the "foundation" into a full ring. Something I had been avoiding at that point, as it would ruin my metal block ramp. Fun fact, did you know that in a pinch you can use paving stones as a form for concrete?
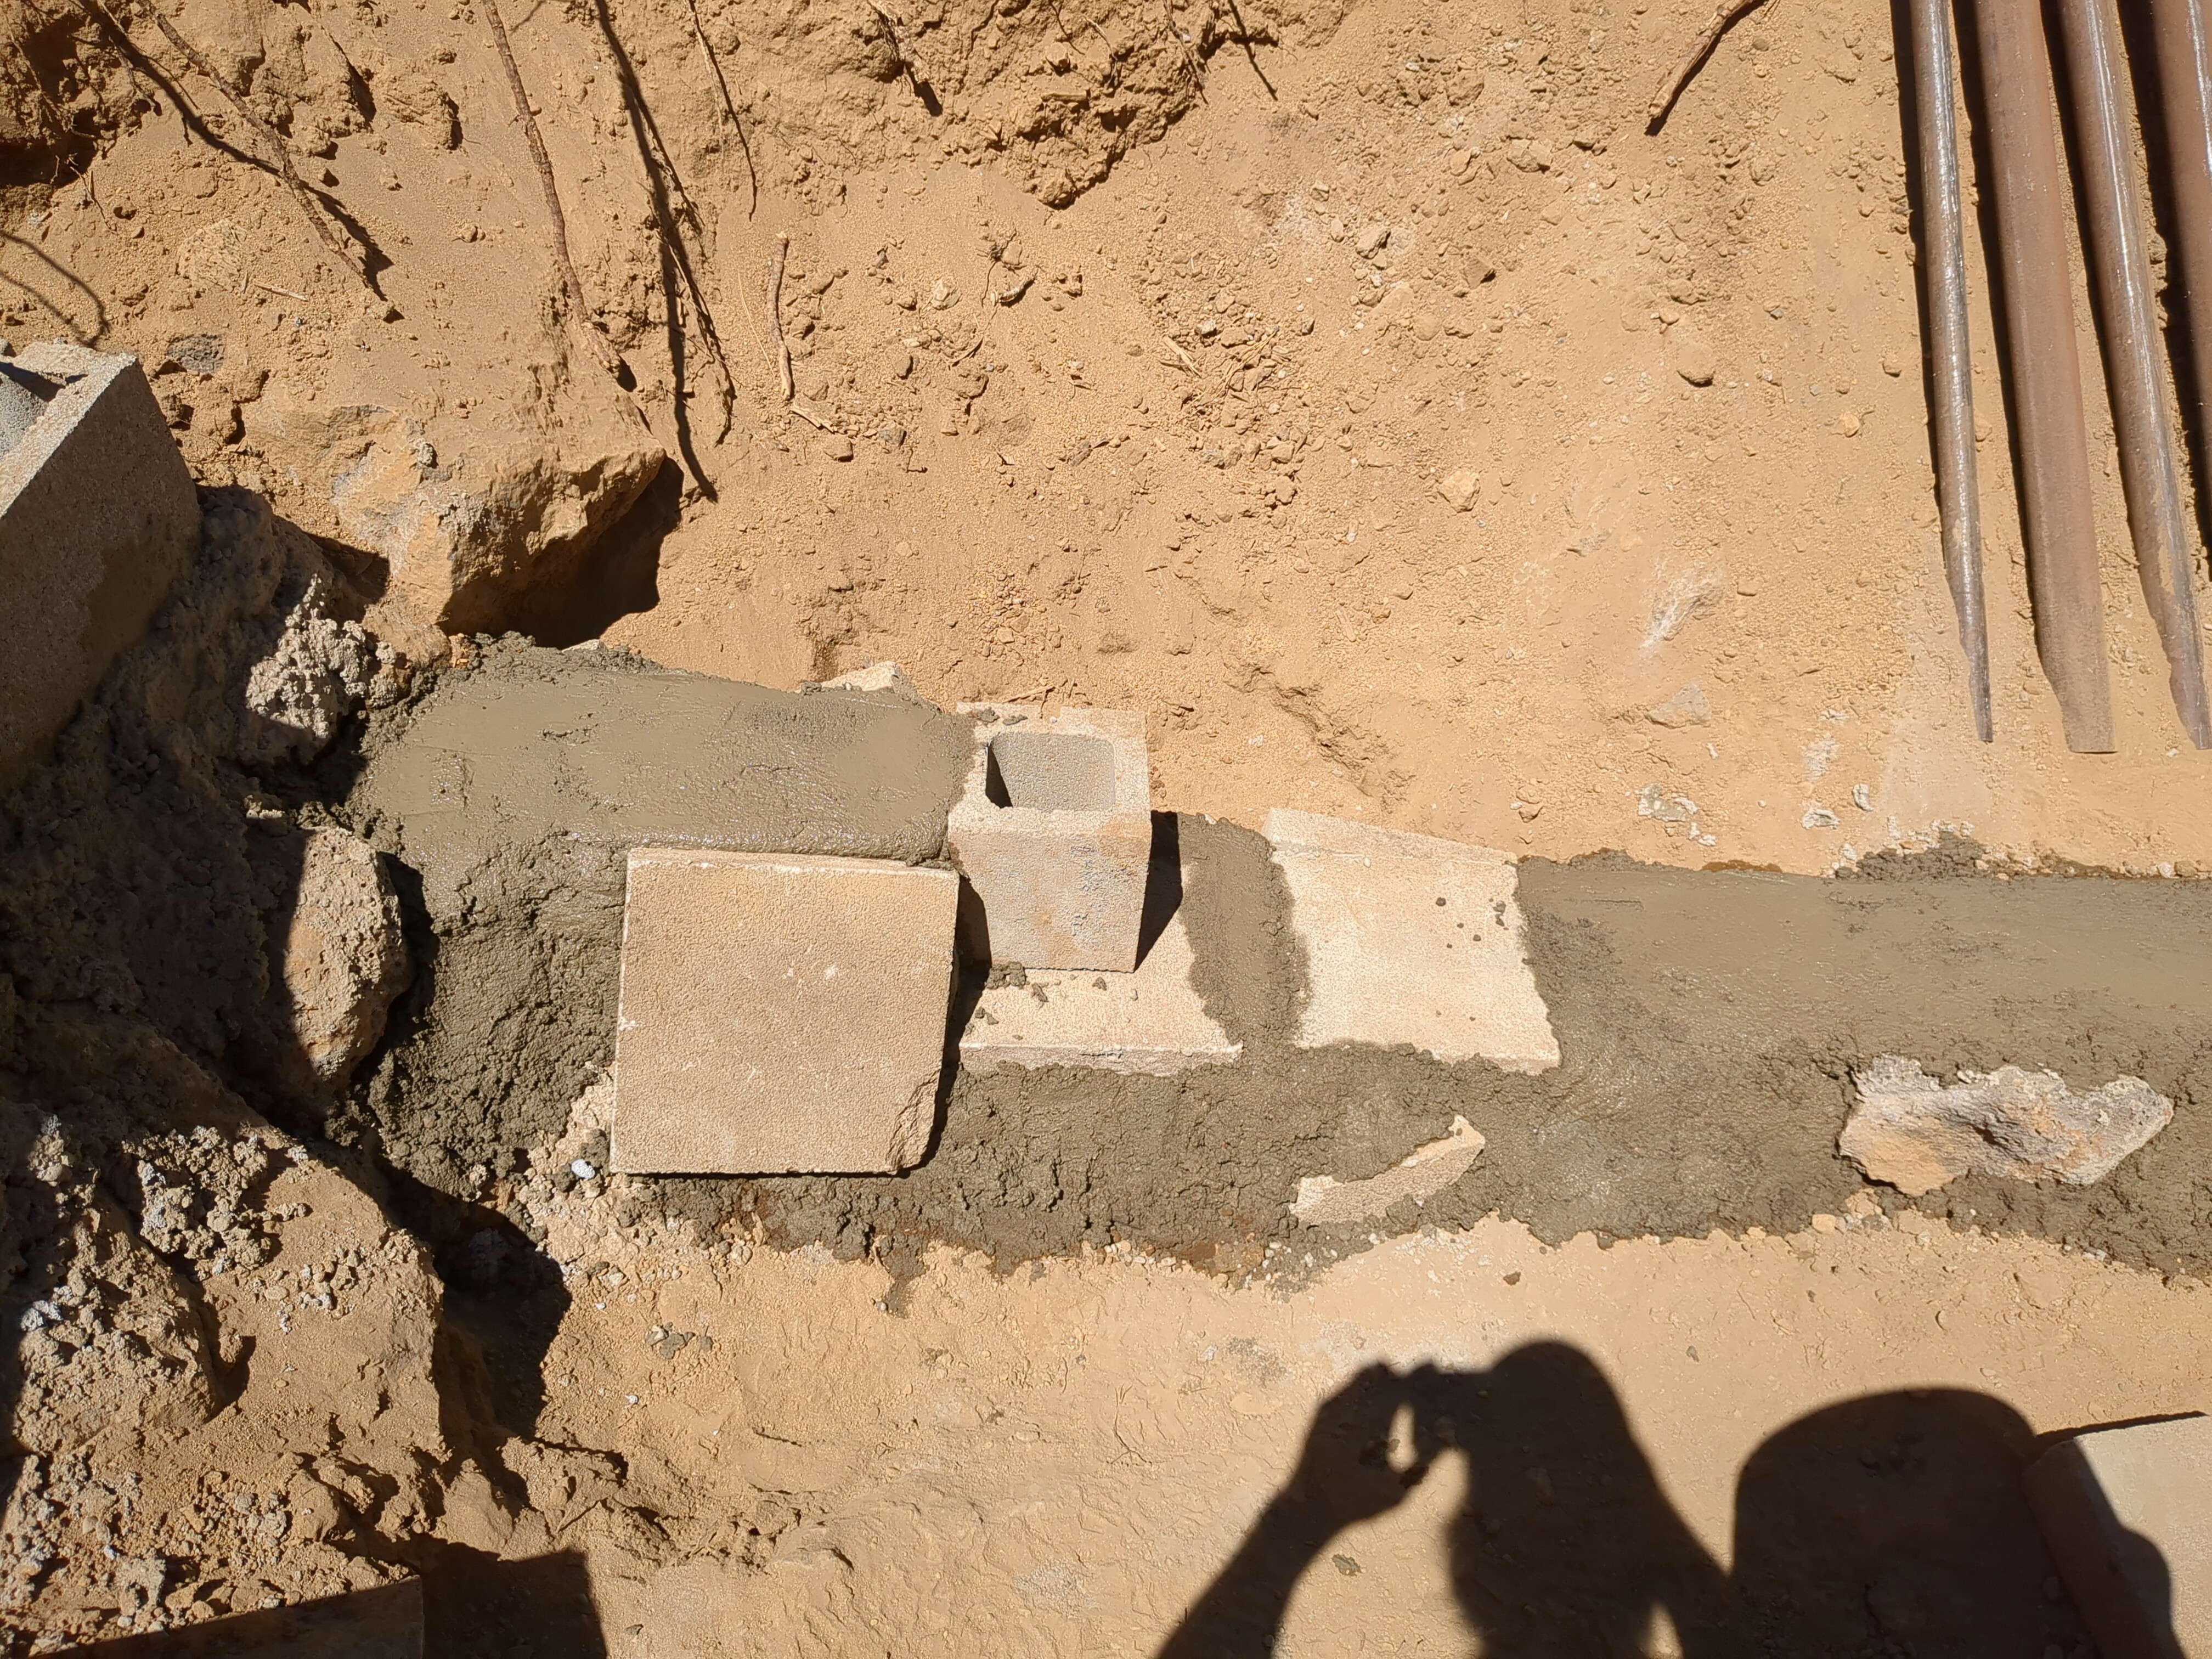
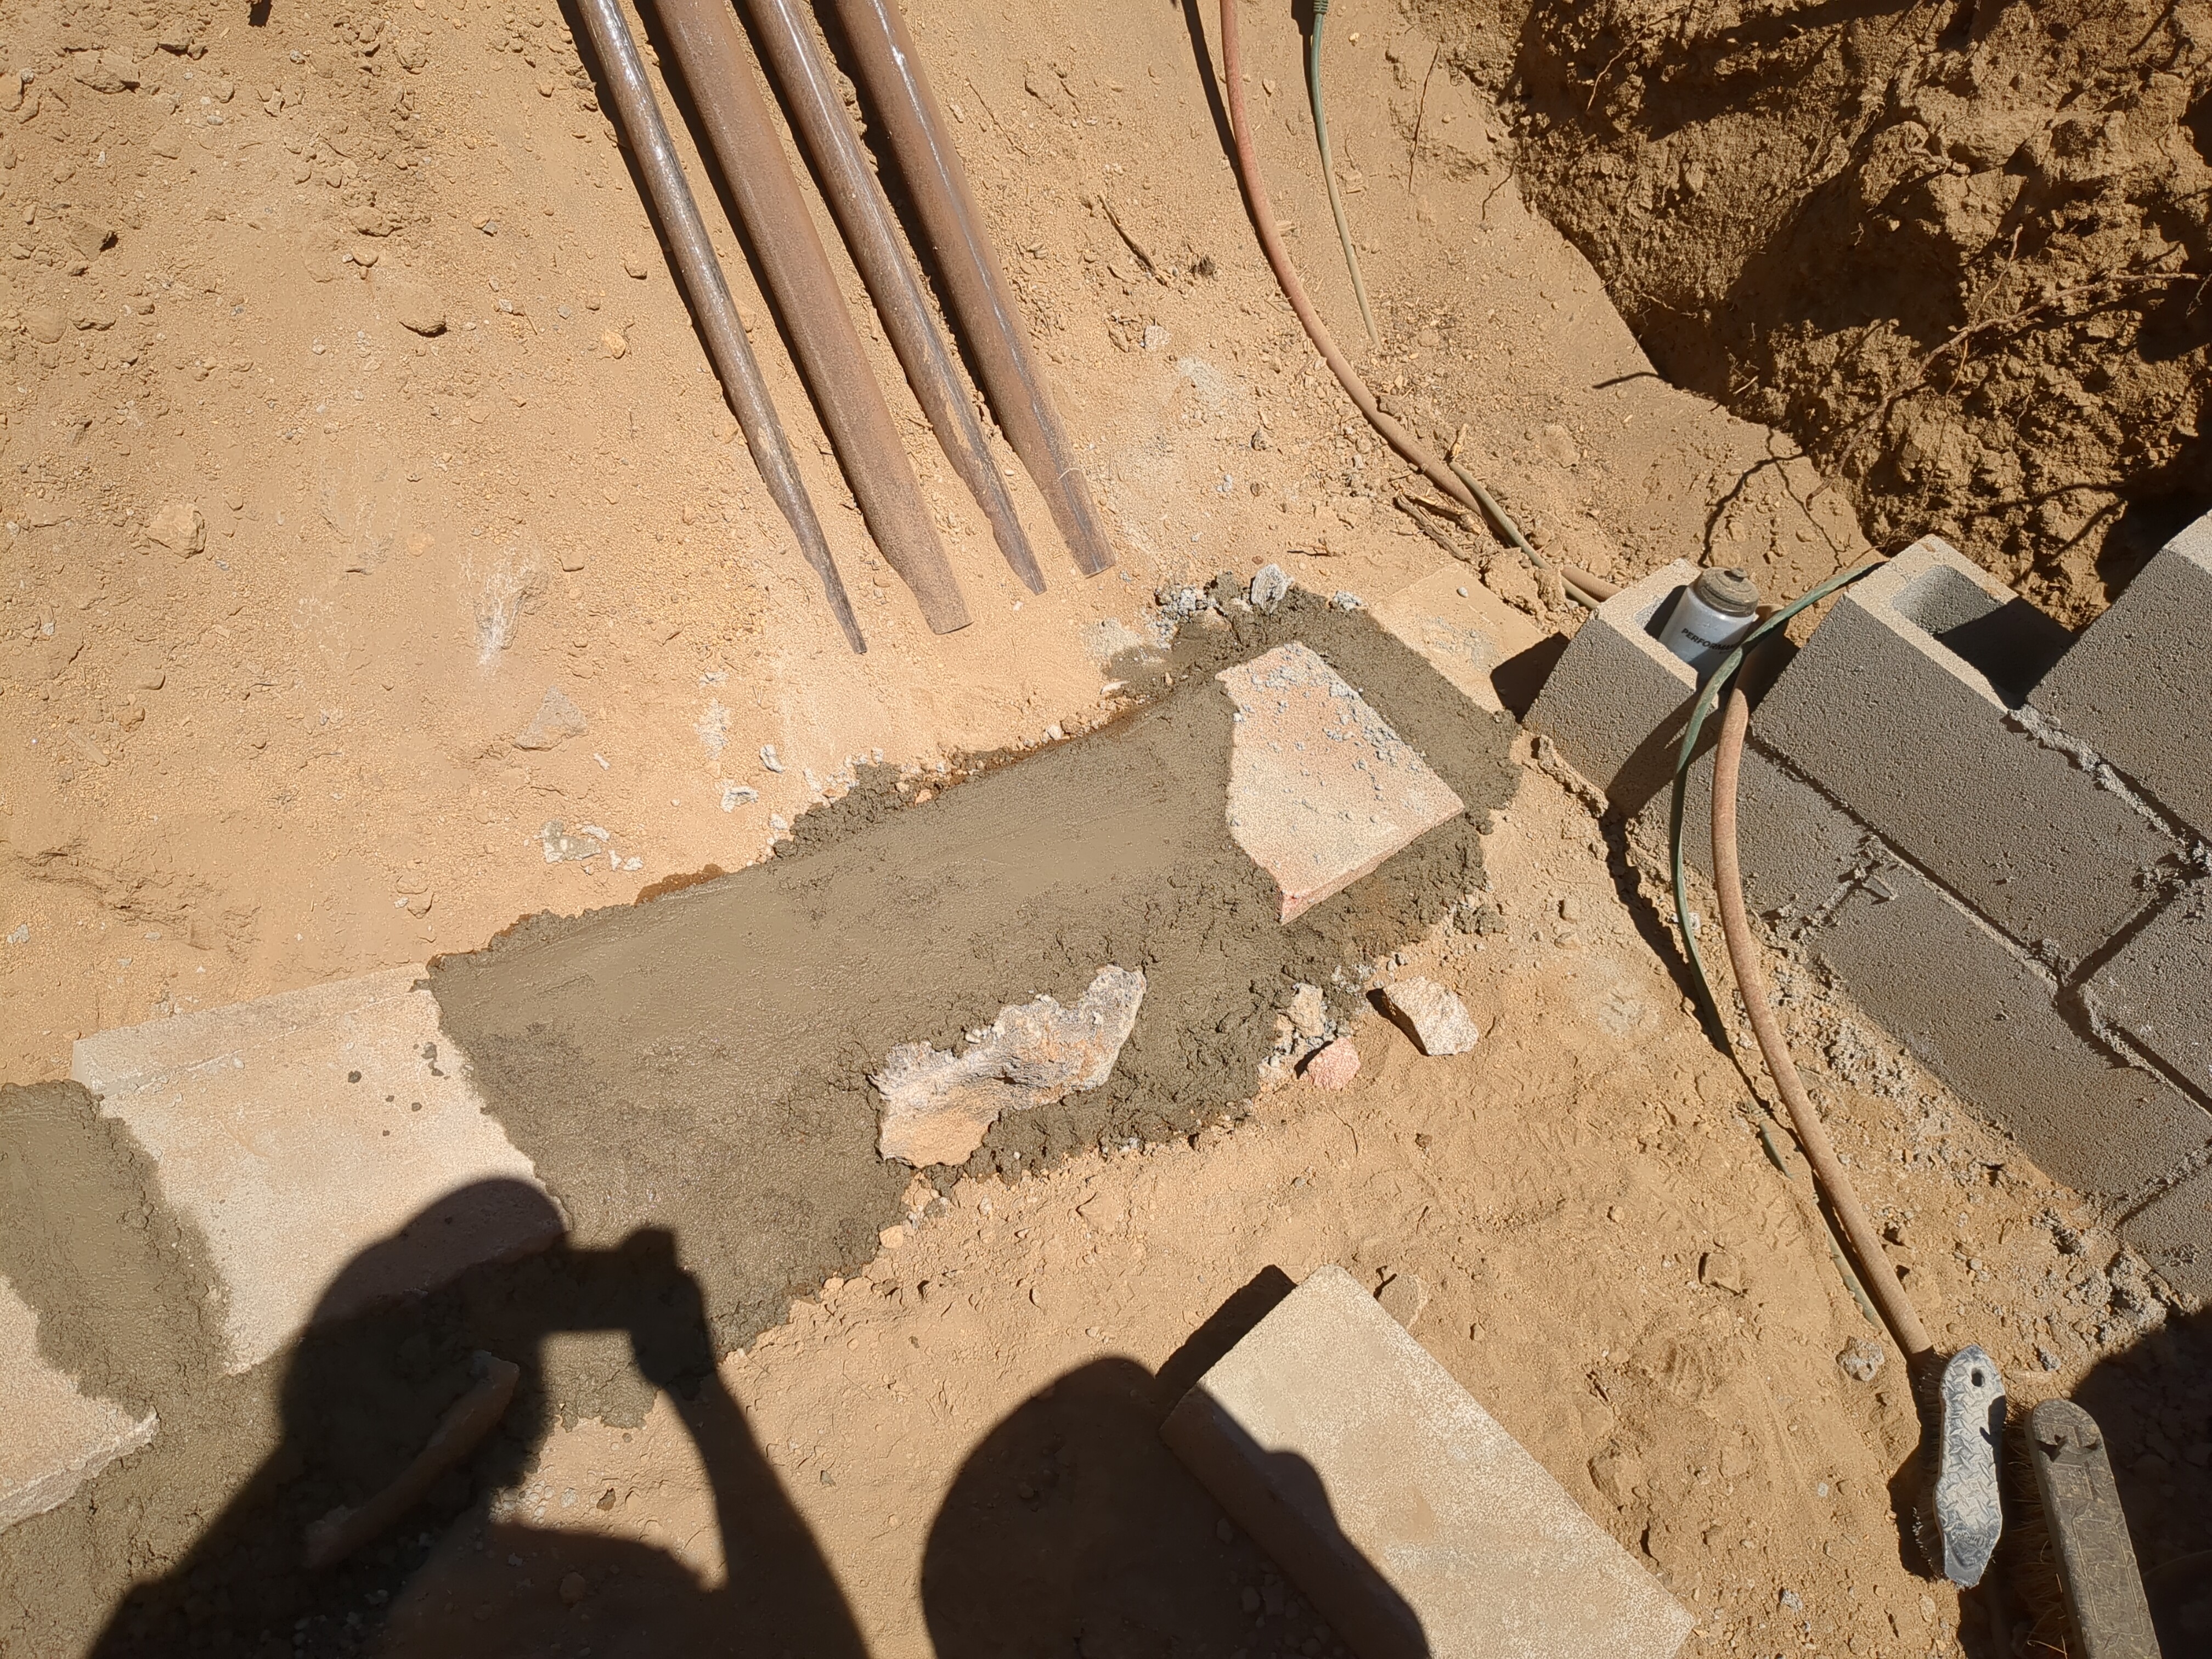
Having wrapped all the way around, it was time to start thinking about the doorway. Also, I noticed that I had been building slightly askew. and after wrapping around the blocks were not quite at the same height relative to the floor. This was a huge pain, the gap was several inches, far larger than I could fill with mortar for a single block. This forced me to accelerate my plans to learn about walls. Turns out, one reason cinderblocks have holes, is so that later on you can stick rebar down the hill and fill it with more cement (technically grout. Difference is that grout is more flow-y for better filling of holes). Needing to even out my wall layers before meeting the rest of the wall, I built up the end wall to the needed height, added rebar, and cemented it in place. I then took some paver stones, drilled half inch holes in them with a masonry bit, and slid them down over the rebar and mortared them into place. This gave enough of a boost to wall height to even things up so I could finish the wall. Photo before adding the pavers:
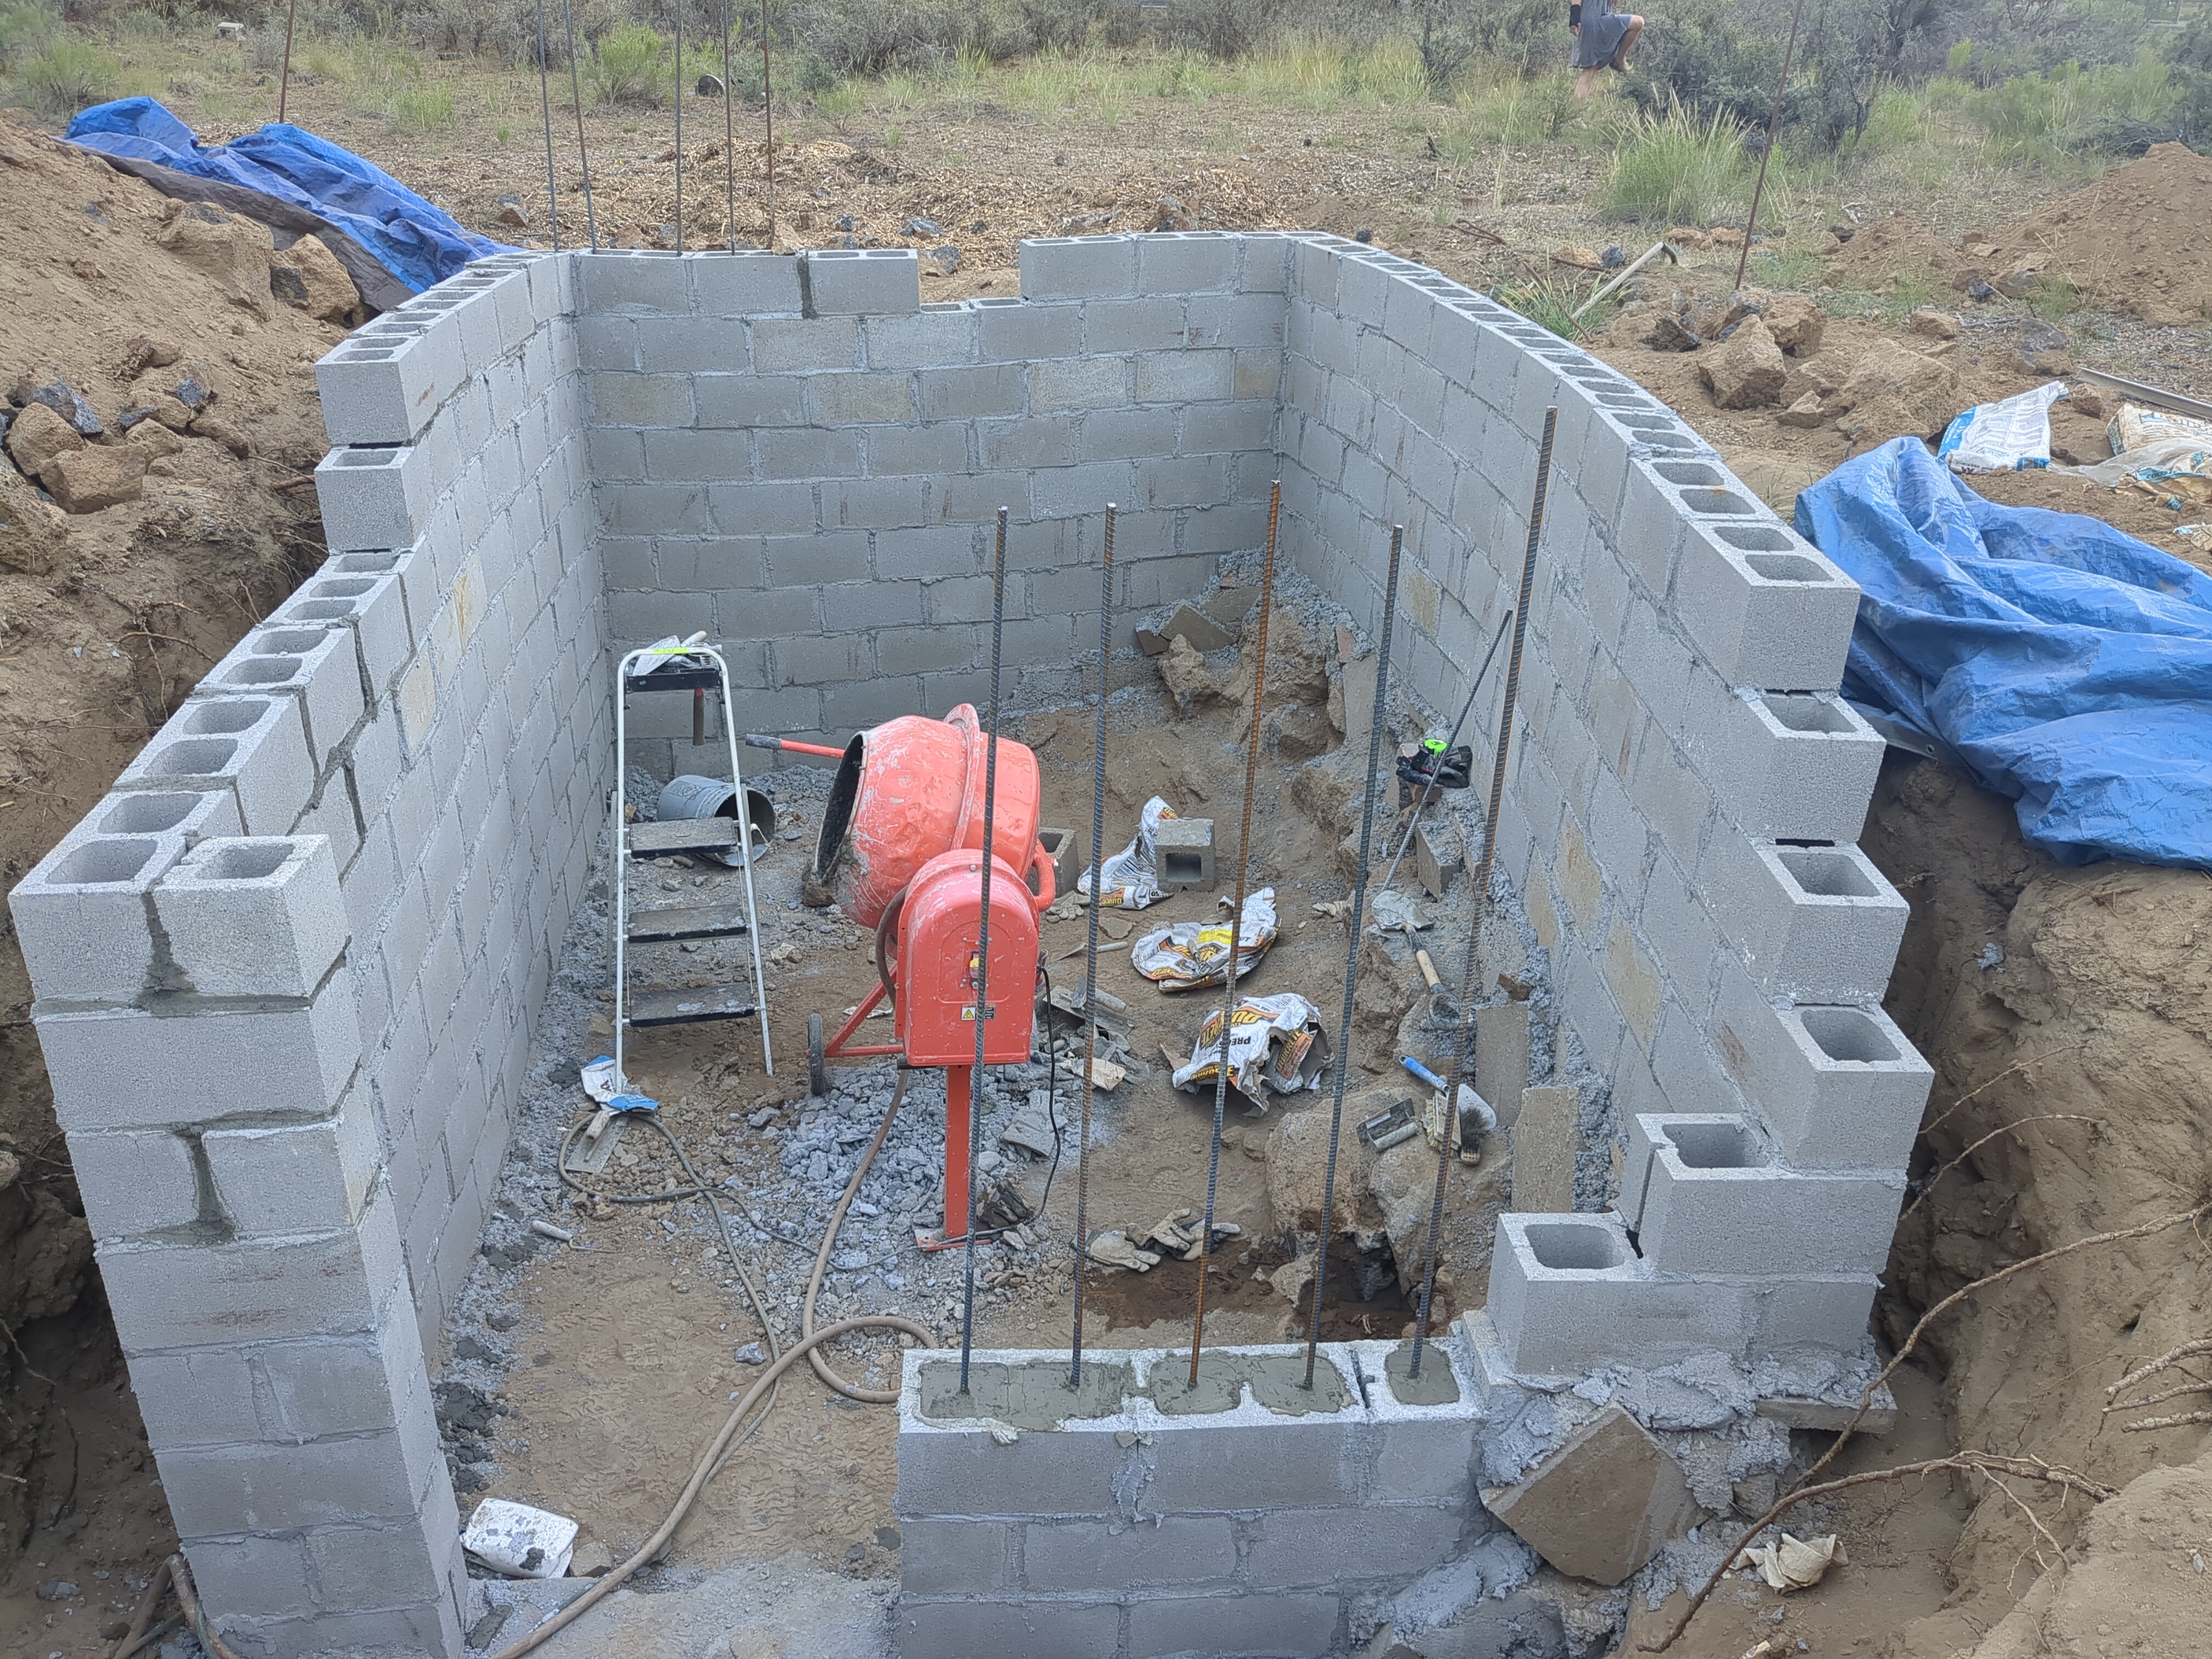
I also managed to smooth out the curvature of the right hand wall somewhat
Getting in/out/up/down
The next major problem I had, was that getting in and out of the hole while carrying additional cinderblocks and 80lb bags of mortar and concrete was getting increasingly difficult. I needed stairs. So I built some. Extending the walls outwards where I wanted the staircase would go, I wedged a piece of 2x12 board between them and filled everything behind it to level with rocks and cement. Wait for it to cure, and repeat, until I reach the surface.
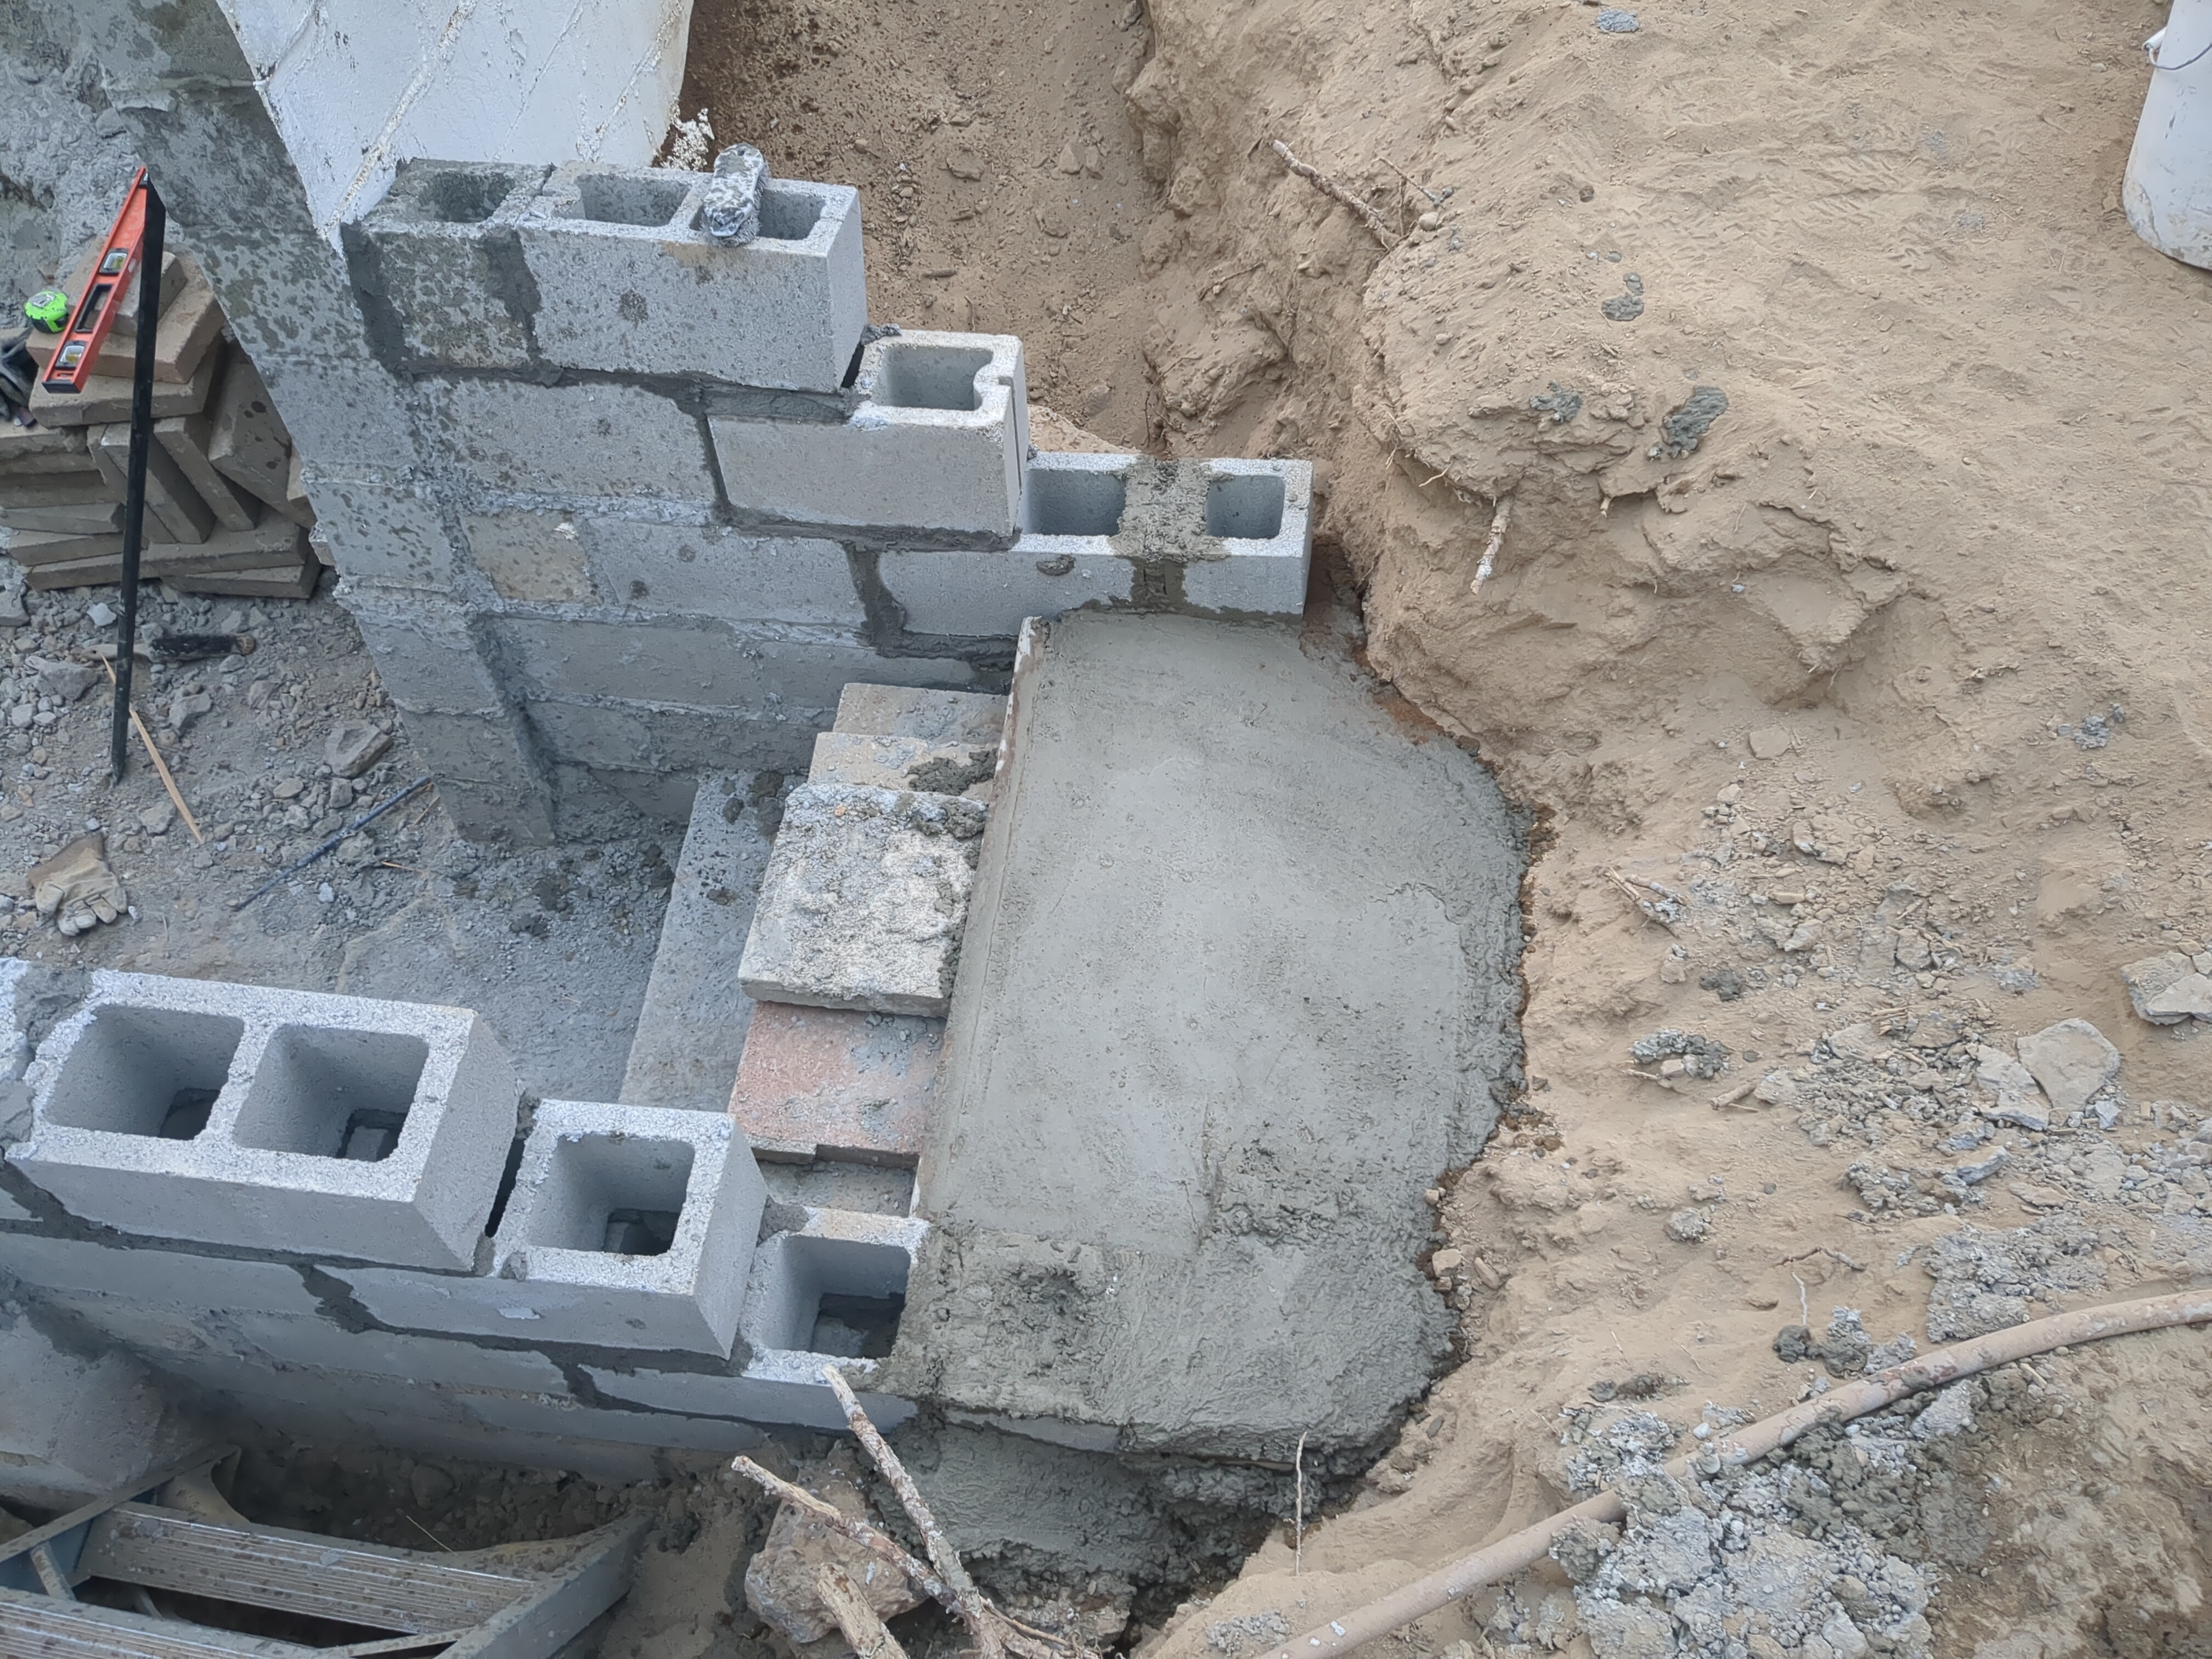
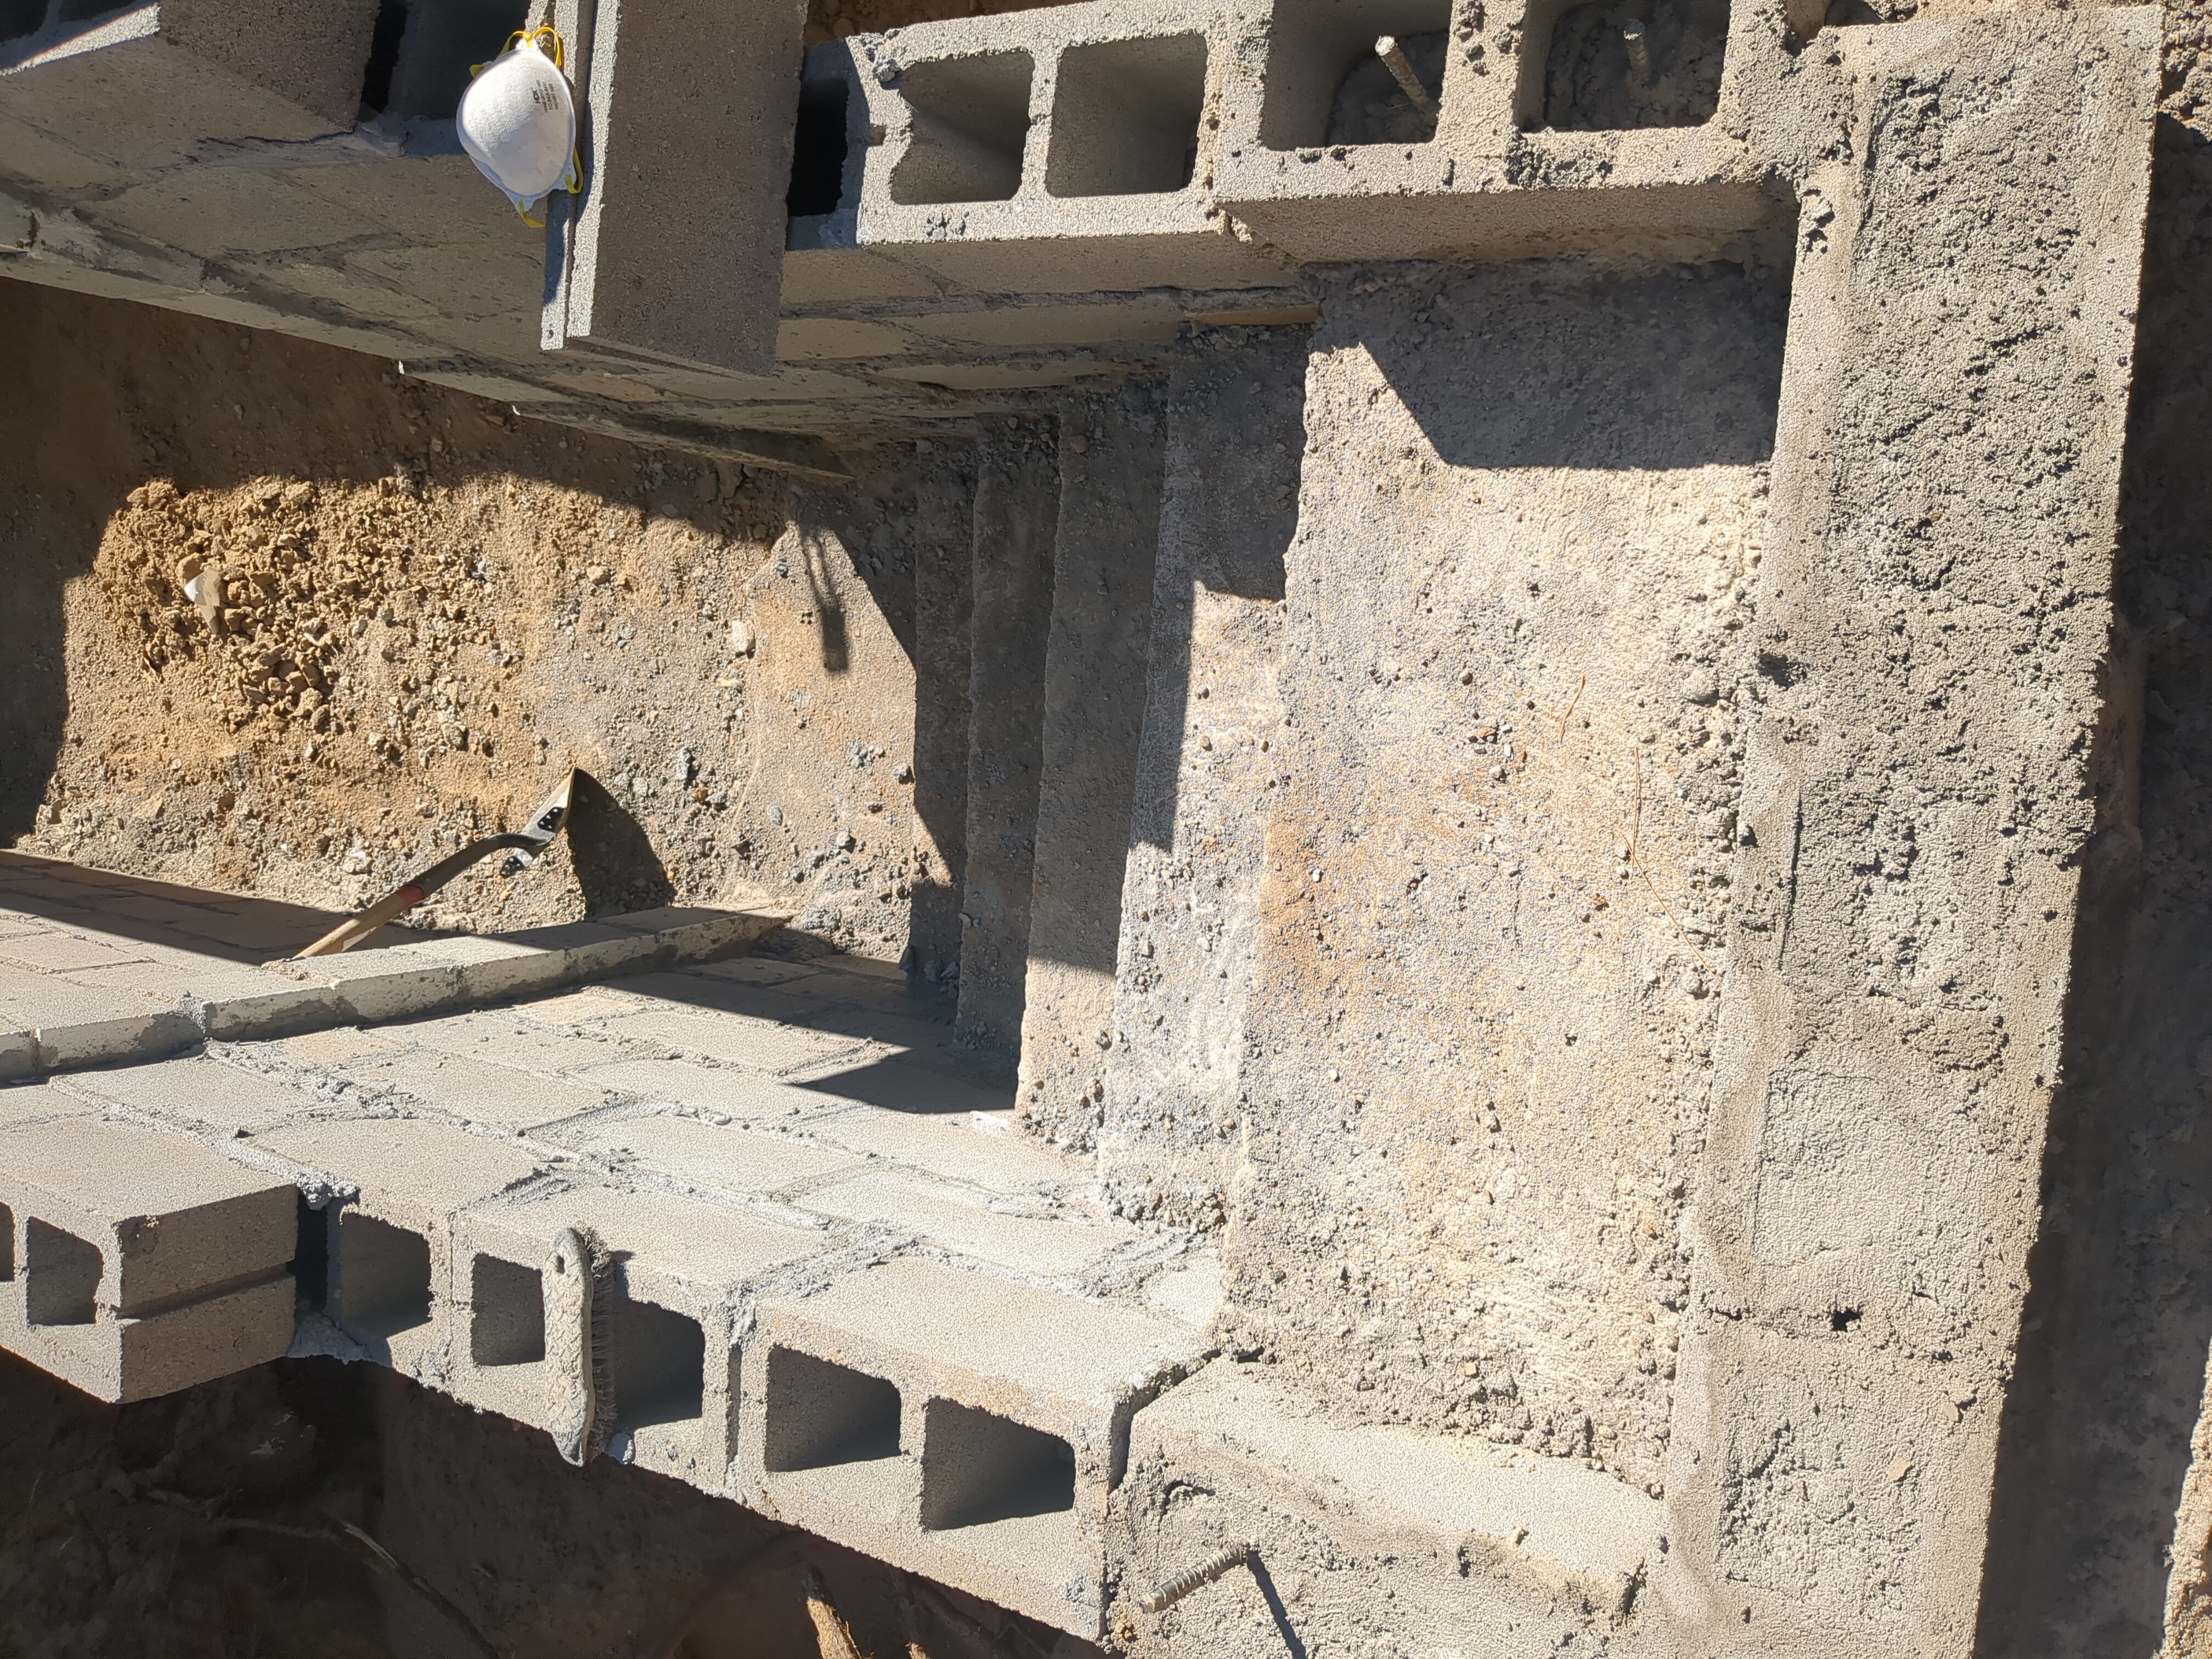
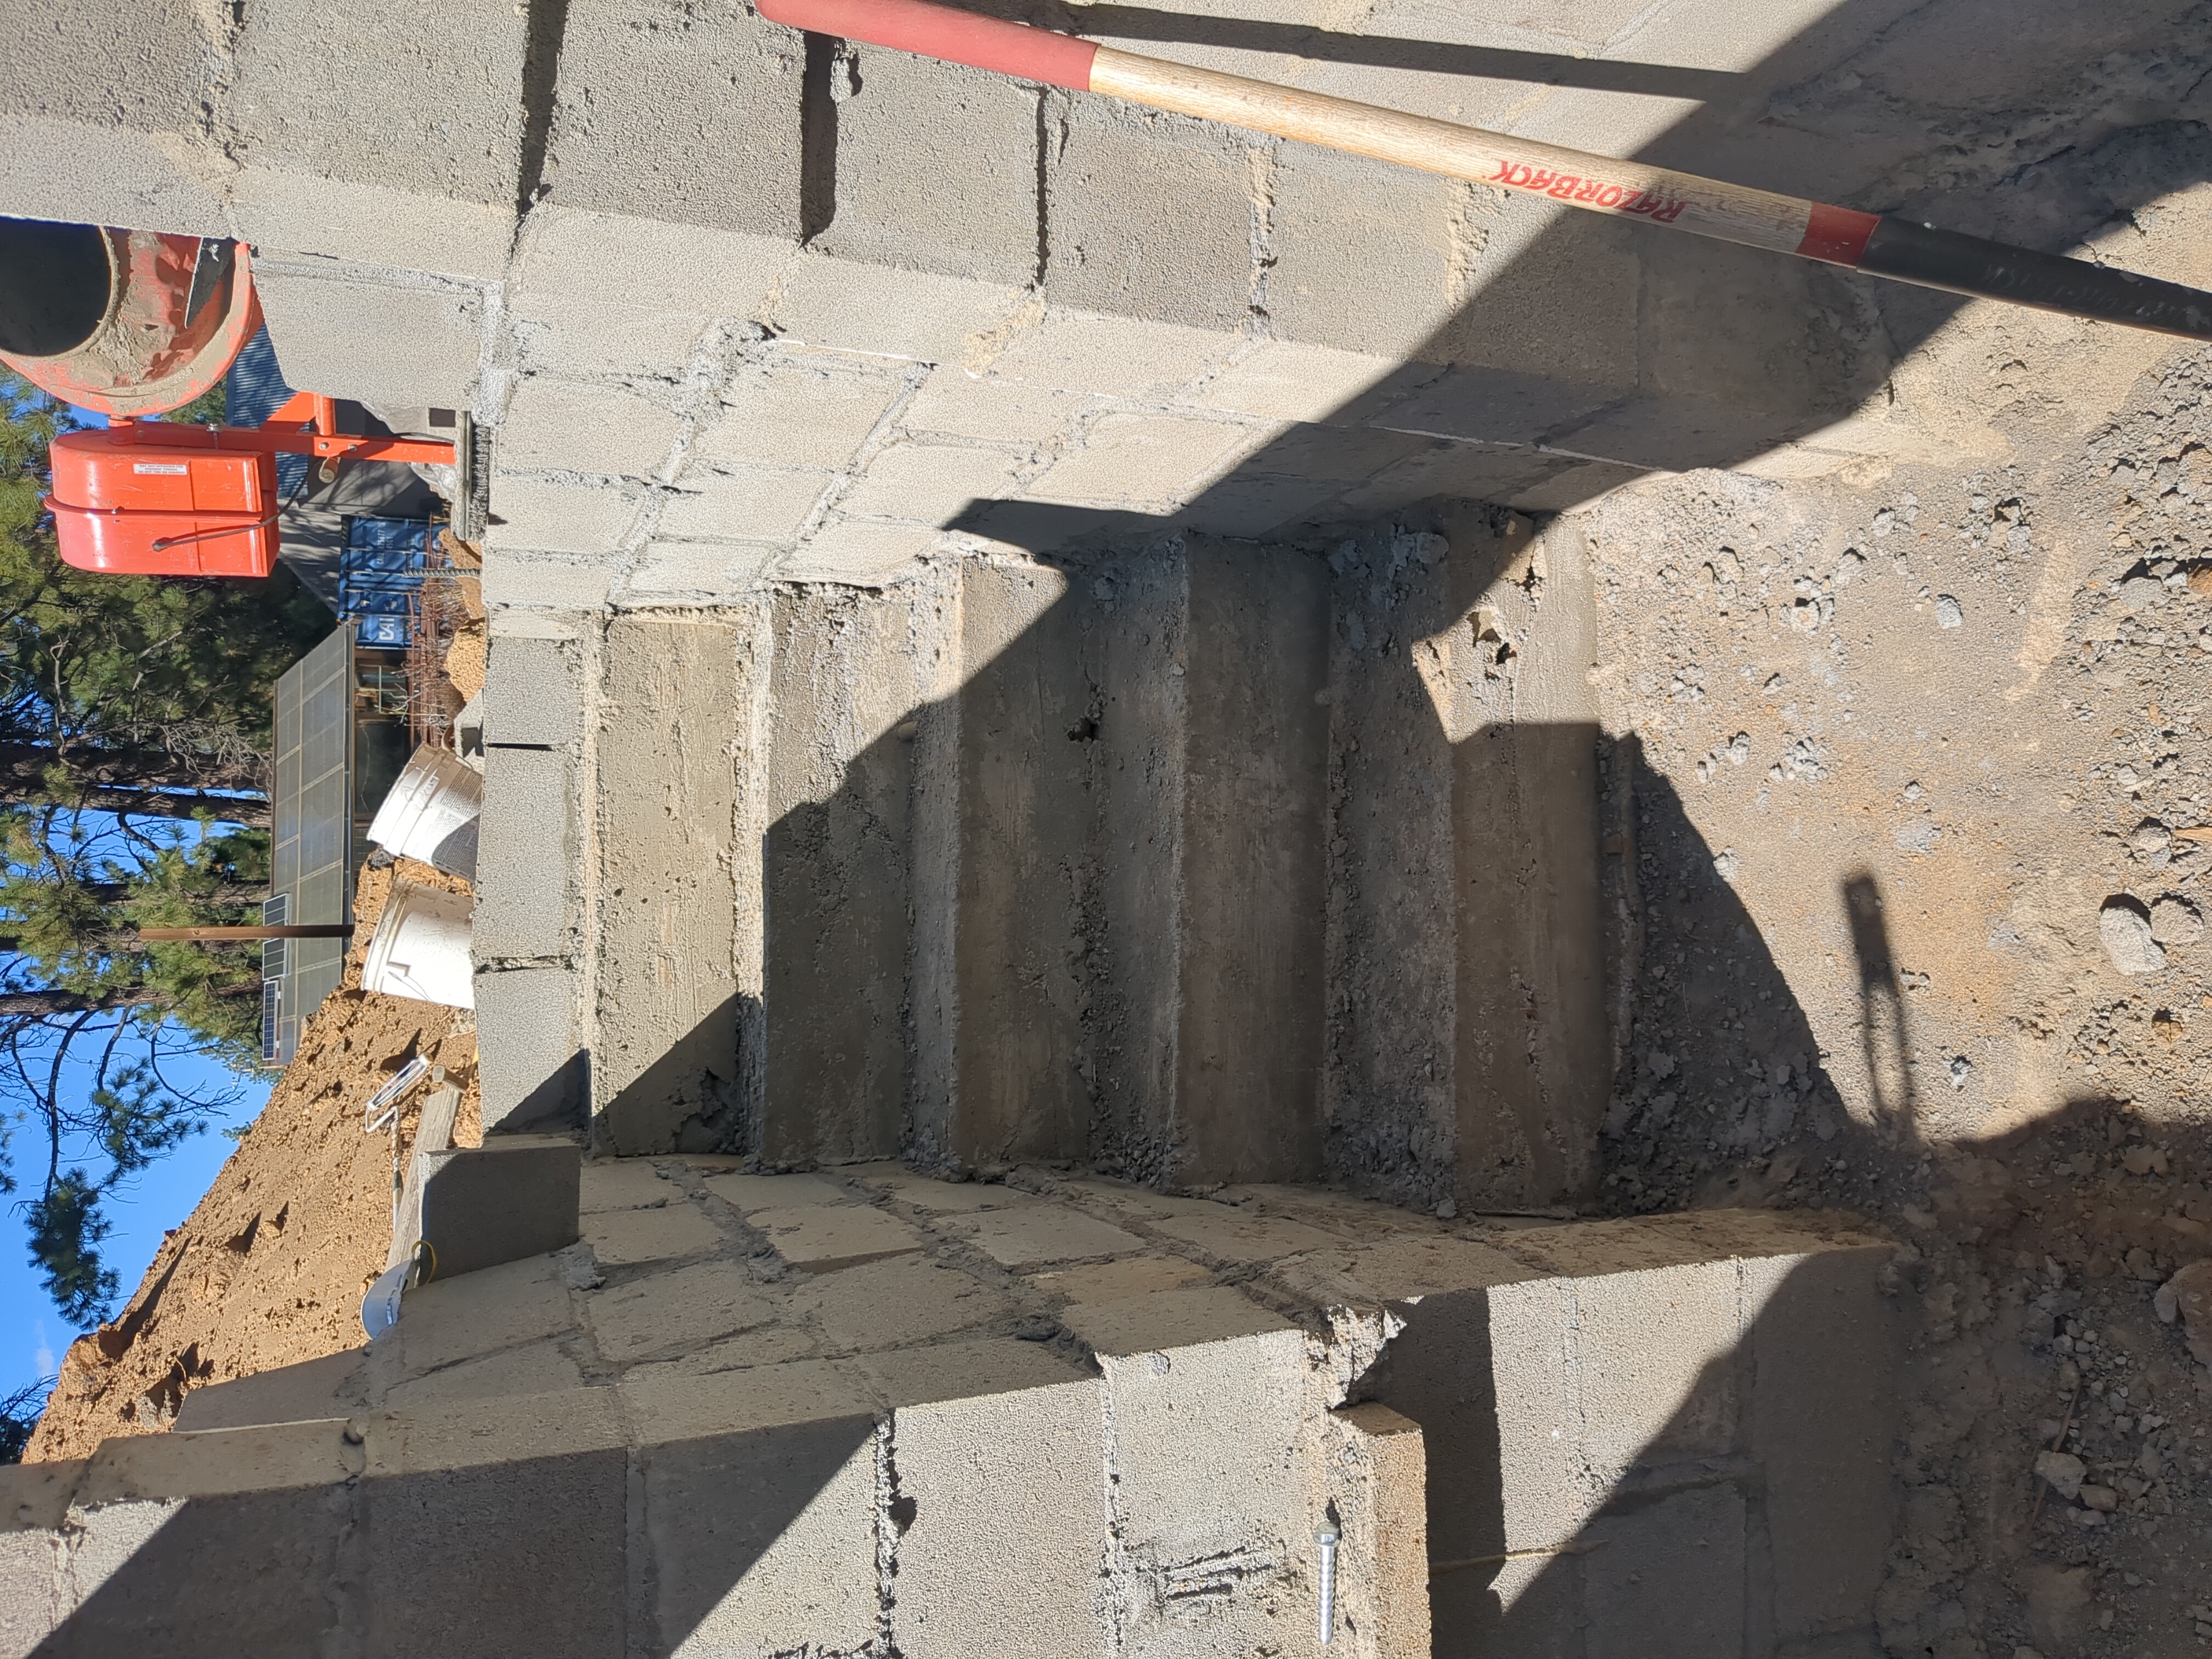
With the stairs done and the structure walls complete, the next big task was wall reinforcement. Like I mentioned before, cinderblock holes are for (among other things) rebar reinforcement. Which I absolutely wanted, because having no construction expertise, a big part of the goal is to overbuild as much as possible to hold up any consequences of my poor decisions. The ridges in the rebar help it grab onto the grout, and the tensile strength means the wall won't just shear and collapse into a big pile of blocks. Instead, should a wall start to collapse inwards from ground pressure or whatever, it will bow over, held up by the rebar as it slowly fails, rather than simply catastrophically failing all at once and killing me. Had I known this from the start, I would have actually put the vertical rebar in the ground foundation on which I laid the blocks, but I didn't know at the time. Oh well.
Anyway, I stuck steel rebar down nearly every block hole, and then needed to fill it. I did out the math on the volume of a cinderblock hole and figured I needed something like 4 yards of core fill grout, which is far more than I had any desire to mix by hand. So, I called up a concrete company and asked them to send a truck filled with the core fill grout.
A concrete pump would have been several hundred more dollars, so I did not ask for one.
If you have ever had concrete poured out of a truck before, you would know it is not a precise or delicate process. Concrete comes down the chute, which is several feet wide, and and there's no fine control over how much comes out. Had I opted to pay for a concrete pump, the truck would have dumped the grout into the pump, and I would get to hold the end of a hose that I could simply stick in each cinderblock hole in turn, moving when it was full. It would have been easy. What I did instead, was not easy.
Knowing the end of a concrete truck's ramp was much too wide to pour into a cinderblock hole, I made a funnel by cutting a hole in the bottom of a 5 gallon bucket. The cement truck driver was not amused when he arrived, and was convinced I had no idea what I was doing (true) and that the whole endeavor was doomed (not true). I had him back the truck up to near the edge of the hole, extend the ramp all the way, and then he stayed in the truck cab, dispensing grout at a constant rate, while I held the bucket over the cinderblock hole and directed the grout where I wanted. When the hole filled up, I would wave at him, he would tap the gas and creep the truck a few inches forward so I could access the next holes. It was not easy but we got the blocks all filled, and I was grateful to never have to do it again.
Next, I started thinking about water. Concrete is not waterproof; quite the opposite, it will wick water from one side to the other. They make waterproofing paint for exactly this purpose, so I bought some plus a paint roller and covered all exterior walls with 3 coats of the stuff.
A note on water
I'm sure some of you have had the thought by now, "but what about drainage"? And I'm sure, depending on where you're from, if you were to dig a hole 8 feet deep in the ground, you would be left with a 2 foot hole and 6 feet of water. Fortunately, where I live, the water table is hundreds if not thousands of feet below the ground. Bad for people with well water, great if you want to build buildings below grade. Furthermore, the bedrock I'm building on is all lava rock. It's about as porous as you can get for a solid building surface, so even during the rare cases where we might get an inch or two of rain across a couple days (10% of our annual rainfall), hydrostatic pressure really just isn't something that enters into things as much here.
A five-sided cube
With the walls filled with rebar and grout, and waterproofed on the outside, I had most of a building done. Stairs down to a doorway, and four walls. All that was left was a roof. And my roof had requirements. It needed to be concrete. It needed to be buried underneath several inches of dirt and rock. And, it needed to not collapse under its own weight. The walls were about 10'x15', which is not a tiny room, and not a tiny span for a roof. While a bare concrete slab might have been able to hold the weight of itself, I wanted to bury mine, and the more weight the slab needed to hold, the larger it would need to be, and the larger it was, the more pressure it would put on my amateur walls and footings. I didn't know the limits of my structure, so I didn't want to push it with a foot thick of concrete.
As the size of the overhang increases, so too increases the needed strength of the roof. So the easiest way to get a lighter roof, was to decrease the span it needed to support. That meant either a pillar or a beam to hold things up in the middle. A pillar would get in the way of interior storage space, plus require a footing inside the cellar, so I went with a beam instead.
The folks who make glu-lam beams for projects like this publish engineering tables that tell you how much weight they can hold for a given span, in terms of pounds per linear foot. Going with a 16 foot span (larger than reality), I looked up the expected weight of 4 inches of concrete across the 10 foot horizontal gap, plus a foot of wet dirt on top, and then increased that number by about 20% for safety. With that, I came up with a 6.75"x13.5"x16' beam, able to support over 1100 pounds per foot.
In case anyone is nervous right now because 20% seems like way too low of a safety margin if I don't know what I'm doing: I picked this based on the weight of the entire roof. But the beam isn't supporting the entire roof. There are also walls on the sides, which will take a not-insignificant amount of weight. Furthermore, that 1100 pound number is actually the rating for continuous load, which wet dirt is not; dirt doesn't stay soaking wet here for long, even in winter. The transient load allowable for this beam on a 16-foot span is a whopping 1560 pounds per foot, or nearly 12 tons for the whole roof. When finished I should be able to park a car on top if I wanted, not that I would.
Having picked out my beam, my neighbor kindly ordered it for me, since he's a licensed GC and gets free delivery on building materials like this. It was delivered a couple days later, and he helped me place it atop the structure. It's not the lightest thing to move by hand, but we used some metal pipes to roll it into place. Since concrete will wick moisture, you don't want direct wood-cinderblock contact, as it will rot the wood; I solved this by placing the beam atop some asphalt roofing shingles. With the stairs, waterproofing, rebar, and beam done, here's what it looked like.
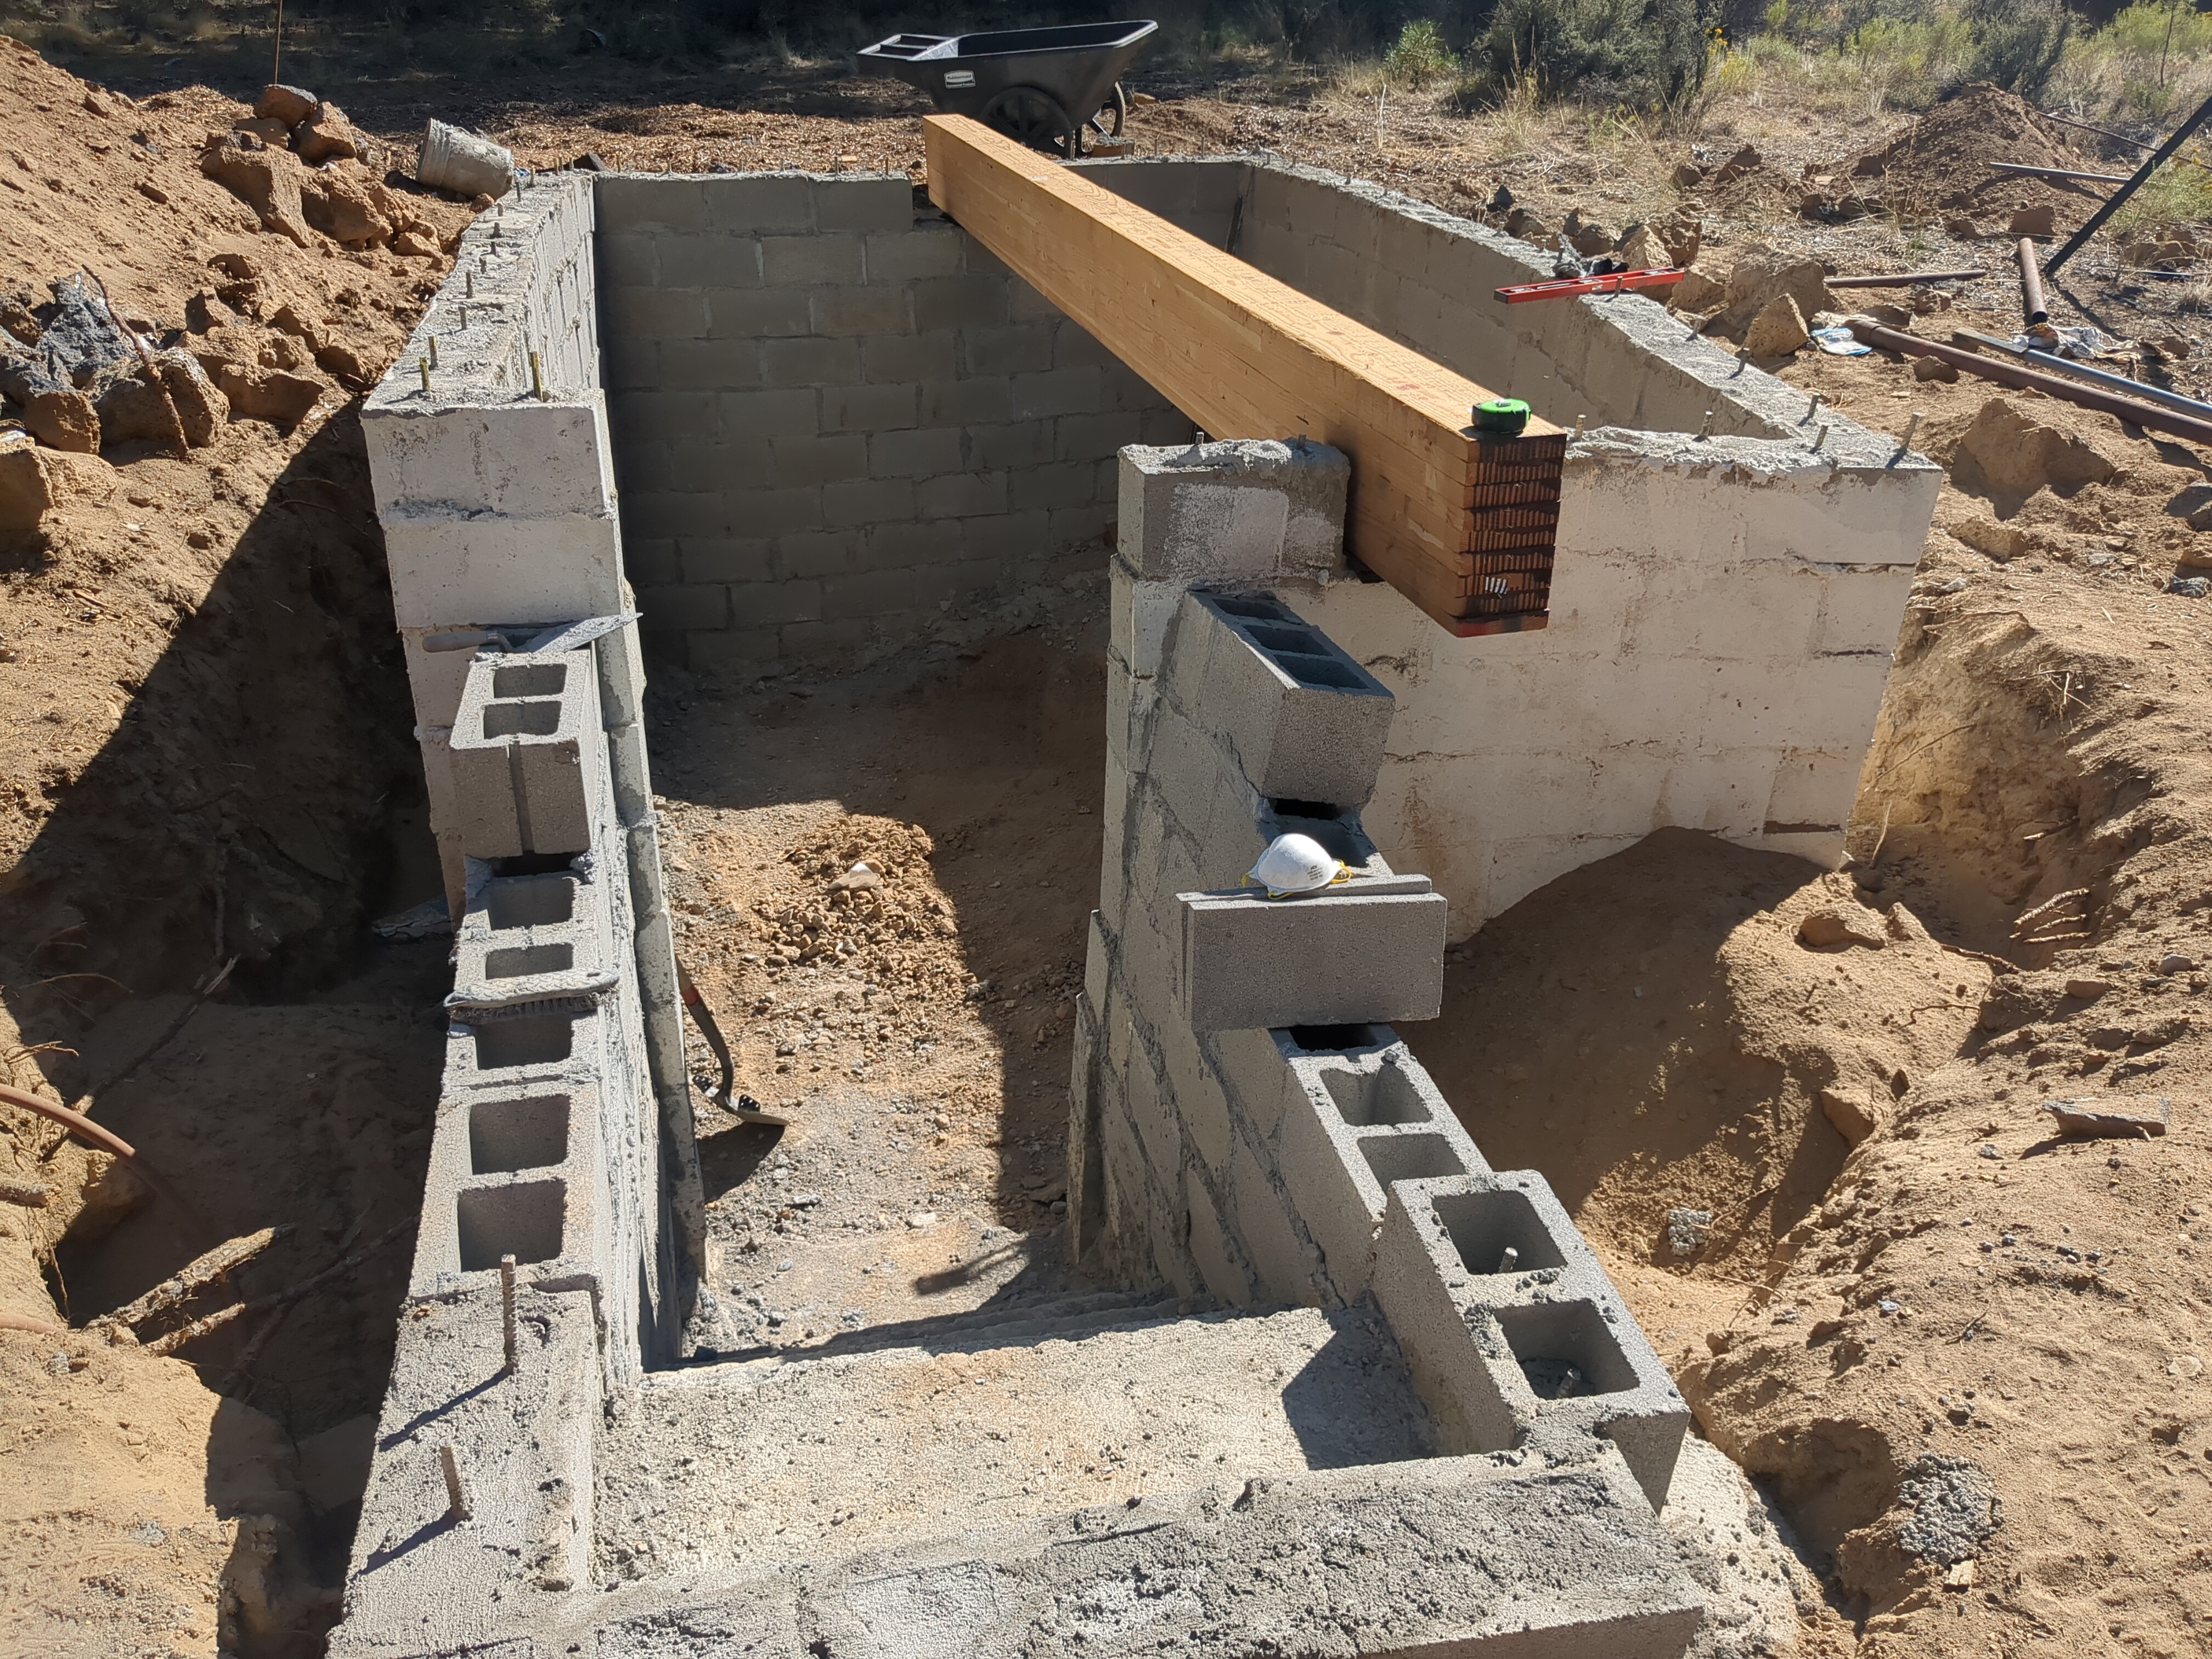
On to the rest of the roof. You'll notice in the photo above, there are large voids in the areas where the concrete needs to go, and unfortunately, concrete does not levitate [citation needed] so I would need something to pour the concrete roof onto. There are a number of youtube videos etc out there of people building similar cellars, and generally what they did was build an interior structure of plywood, pour the concrete onto the plywood, wait for it to cure, and then dismantle the interior wood supports. Frankly, this terrified me. Not only the idea of pulling plywood down from hopefully-stable concrete while standing beneath it, but also if I built the plywood poorly, it would collapse during the concrete pour and I would have a cellar filled with concrete, ruining months of work.
They make this thing called "composite metal decking", which is a corrugated metal plate made to have concrete poured on top of it, and bond to the concrete adding strength and permanently becoming part of the floor. Next time you're in a large multistory building with poured concrete floors, IKEA for example, look up while on the first floor and you will probably see the ceiling is wavy metal. That's this stuff. Just like with the glulam beam, I pulled up the engineering tables, and decided that 16 gauge steel should be good for my purposes. The margins were definitely a lot thinner here than with the beam, though, because this metal decking is expensive. Fortunately for me, after they took my order, the decking company rep called me up apologetically, and informed me that they shouldn't have taken the order, because the 16ga decking was actually backordered for several months, but if it wasn't too much trouble for me they would be happy to send me the same quantity of 12ga decking immediately at no extra charge. Terribly sorry for the inconvenience.
Having never laid this before, but figuring it couldn't be too hard, and noticing that the 12ga metal was VERY solid, I layered the pieces along the roof, and then spent a few days out with an angle grinder chopping the ends off all of the deck pieces to help it conform to my strangely shaped mostly-straight walls, with cutouts for the ends of the rebar. I had the beginnings of a roof!
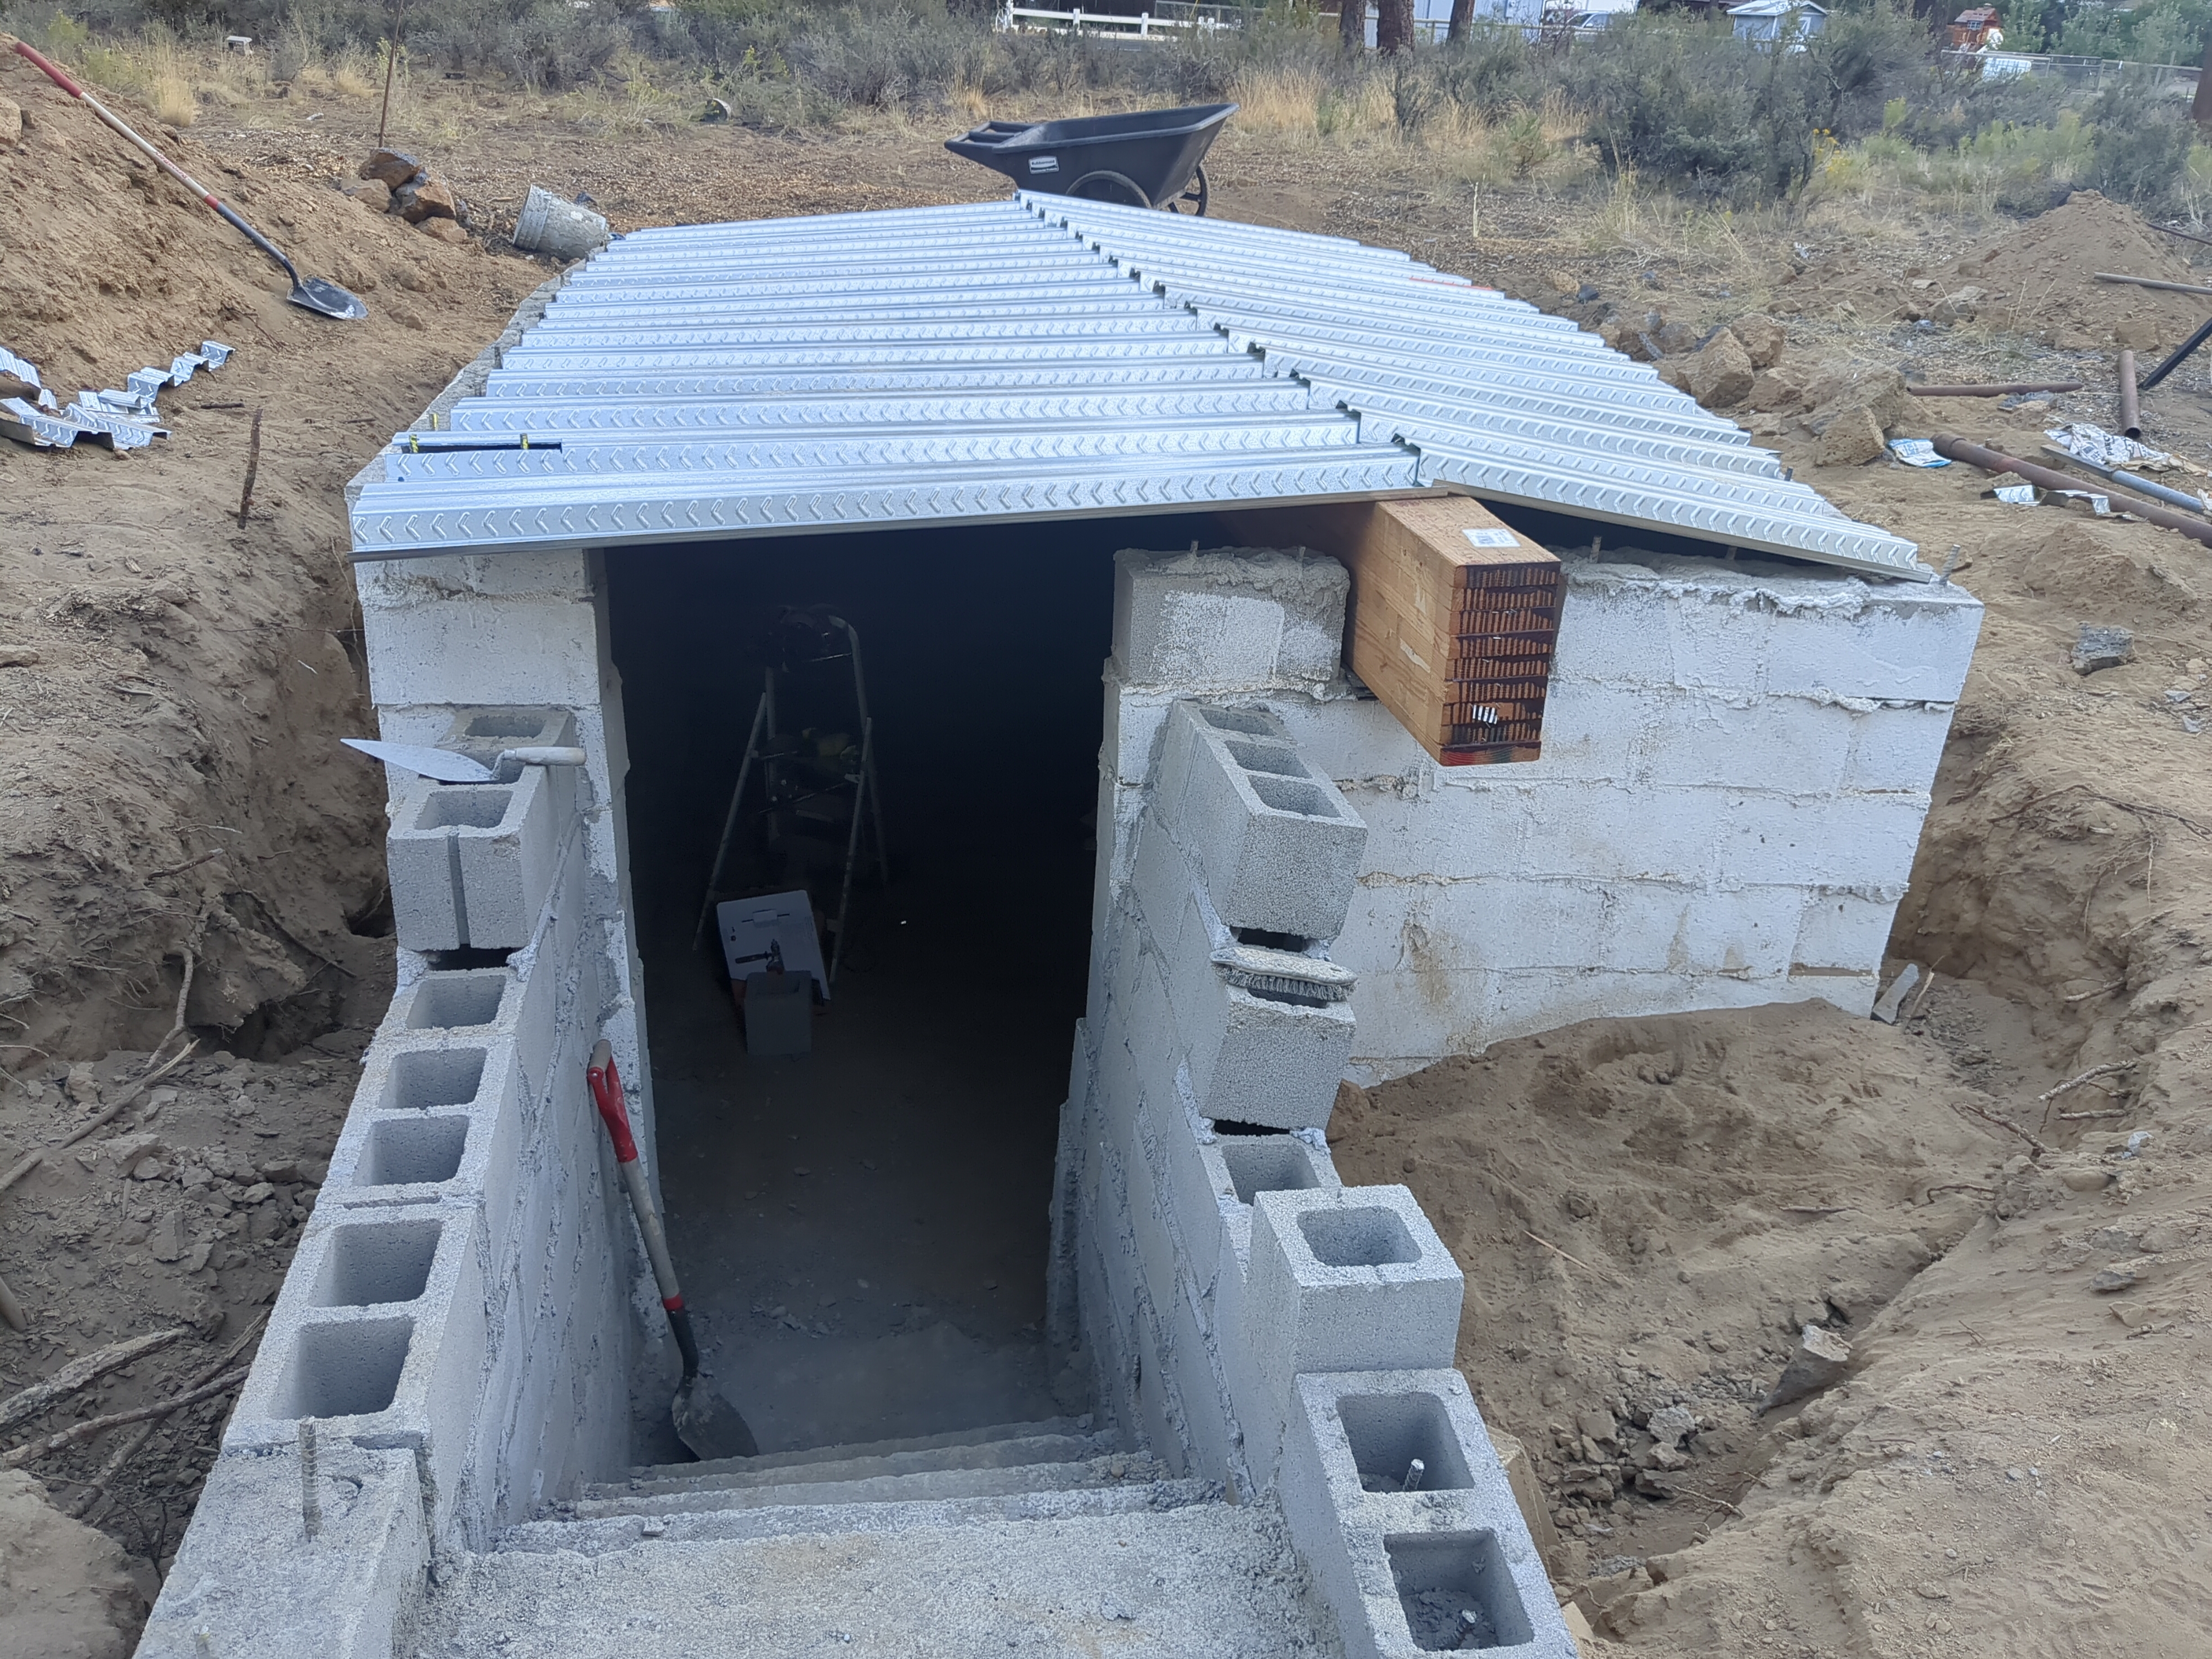
Obviously if I tried to pour concerete onto that, it would just run off the edge and onto the ground. I attached some 2x12 boards around the exterior, bolting them directly into the cinderblock walls with some expansion bolts to hold them in place. I then used an ungodly amount of expanding foam to fill in all of the gaps between the sheets, preventing the cement from draining into the cellar itself.
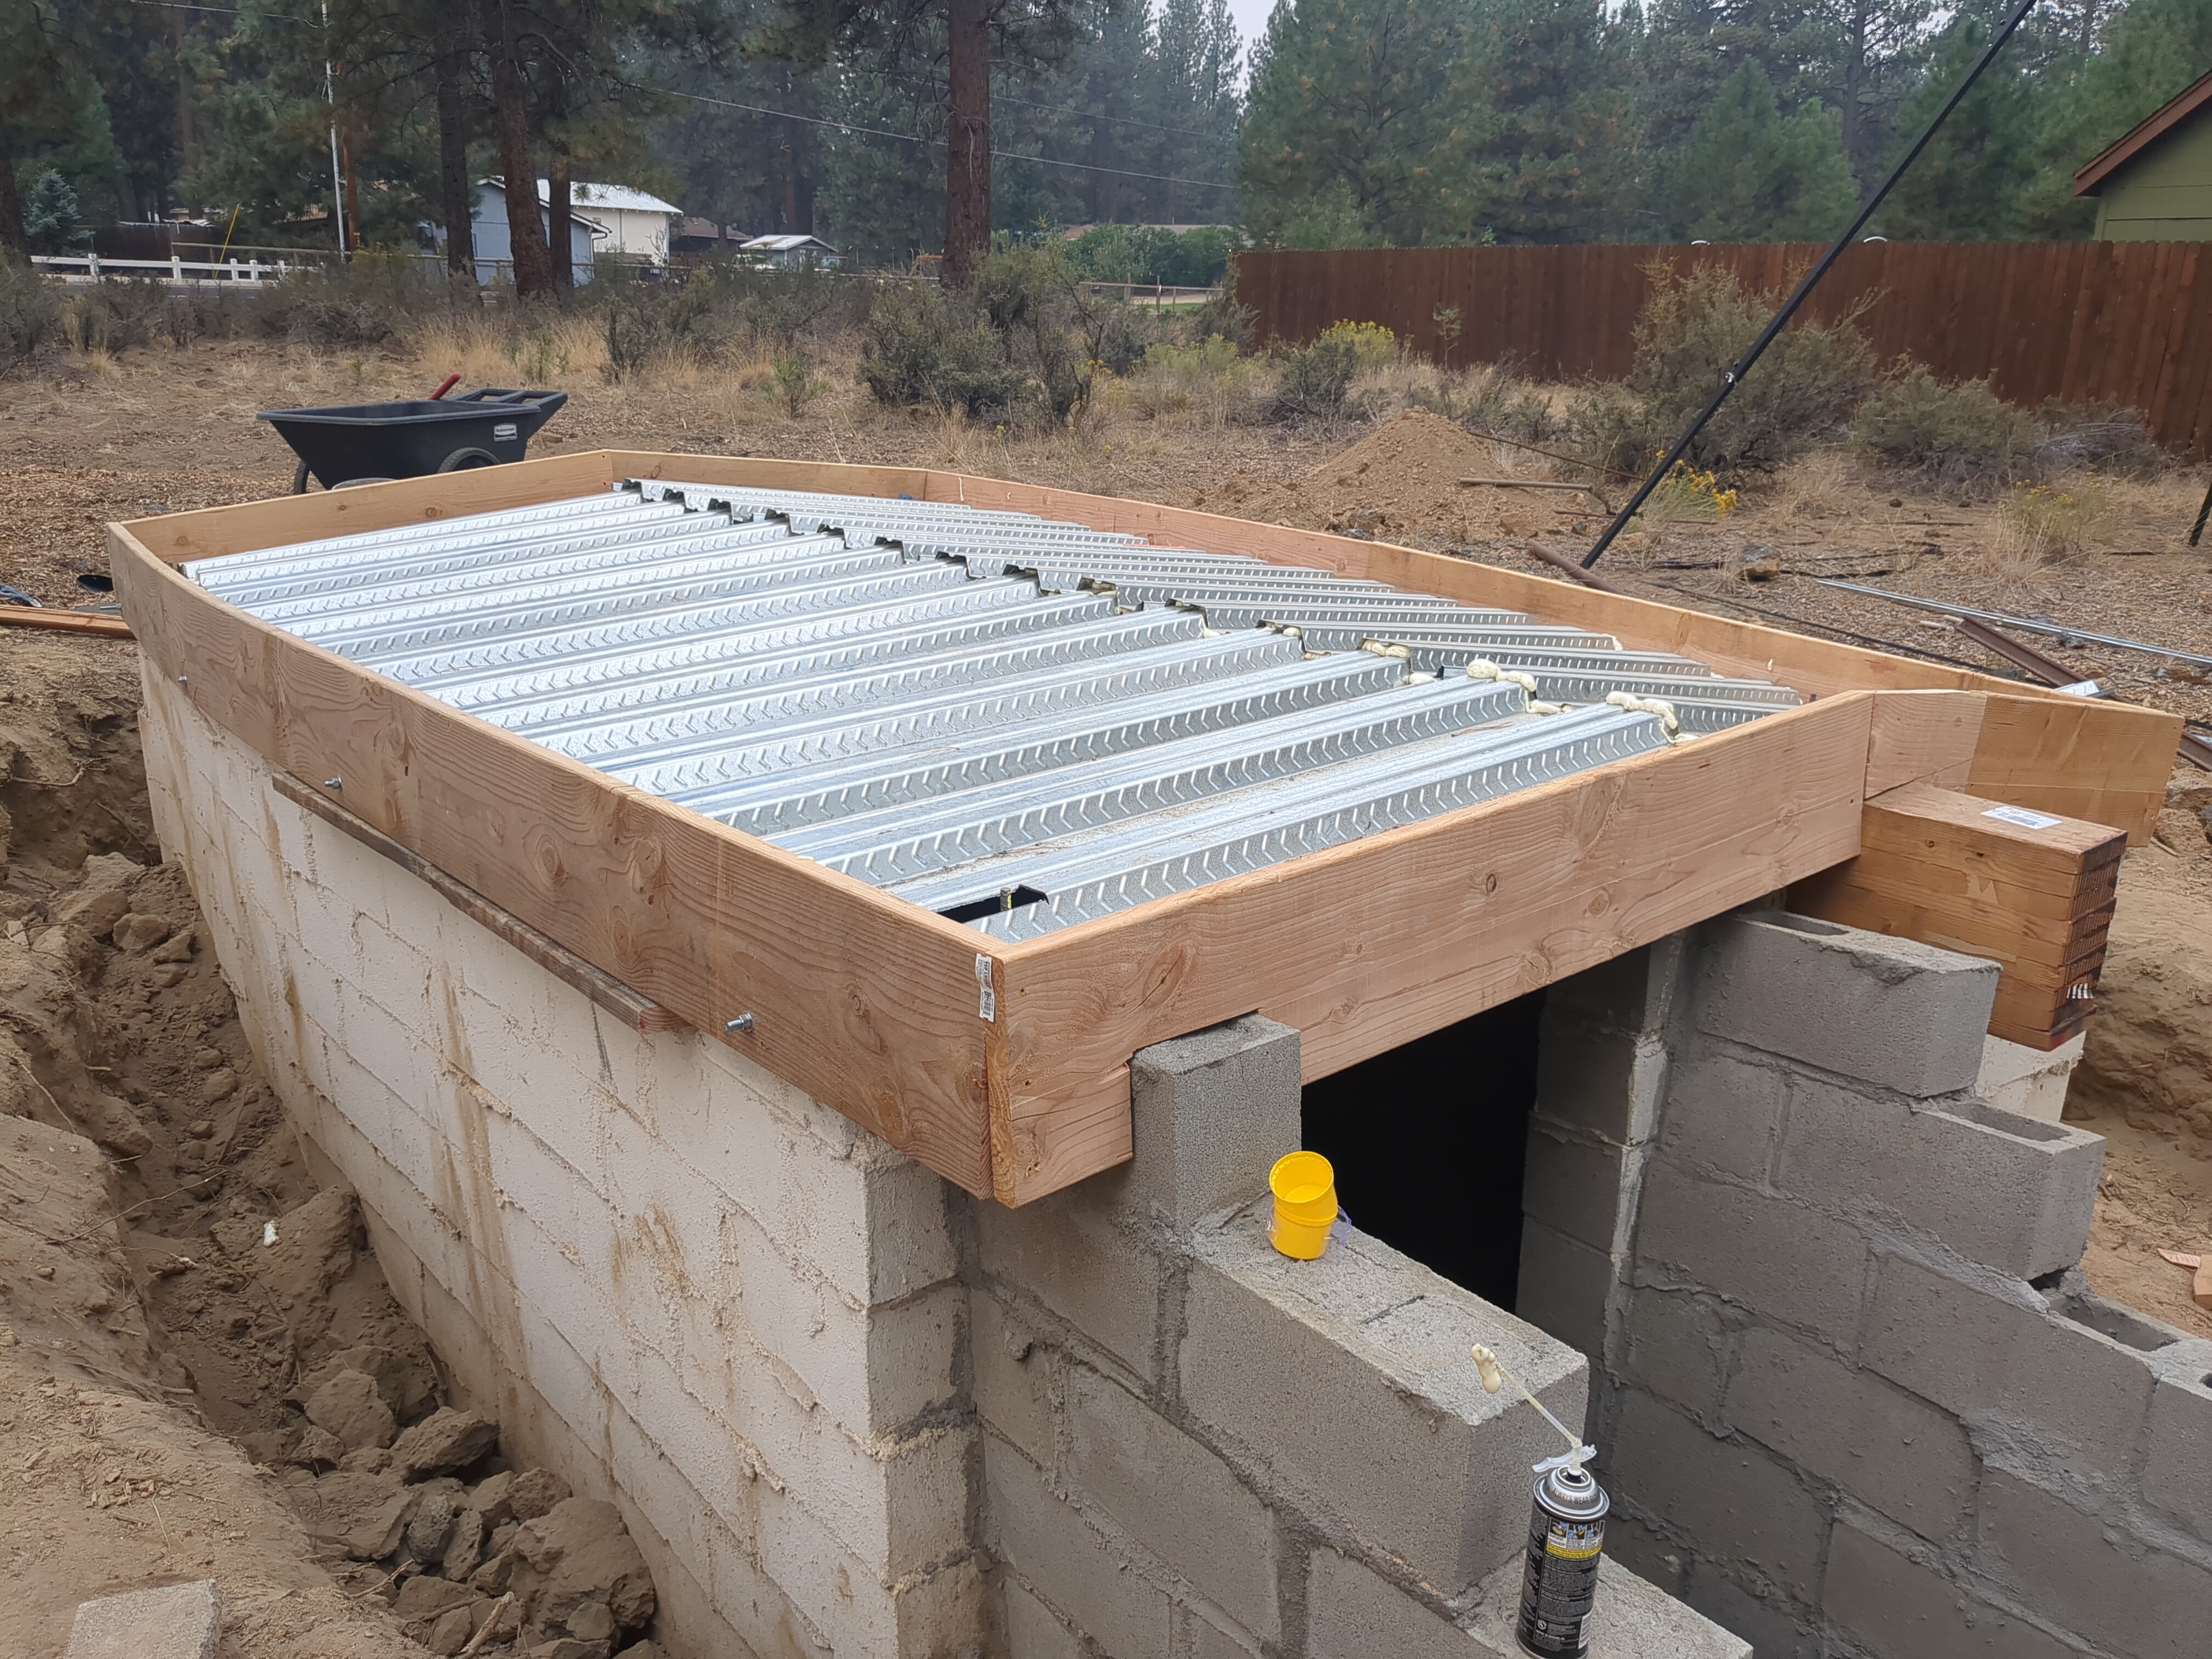
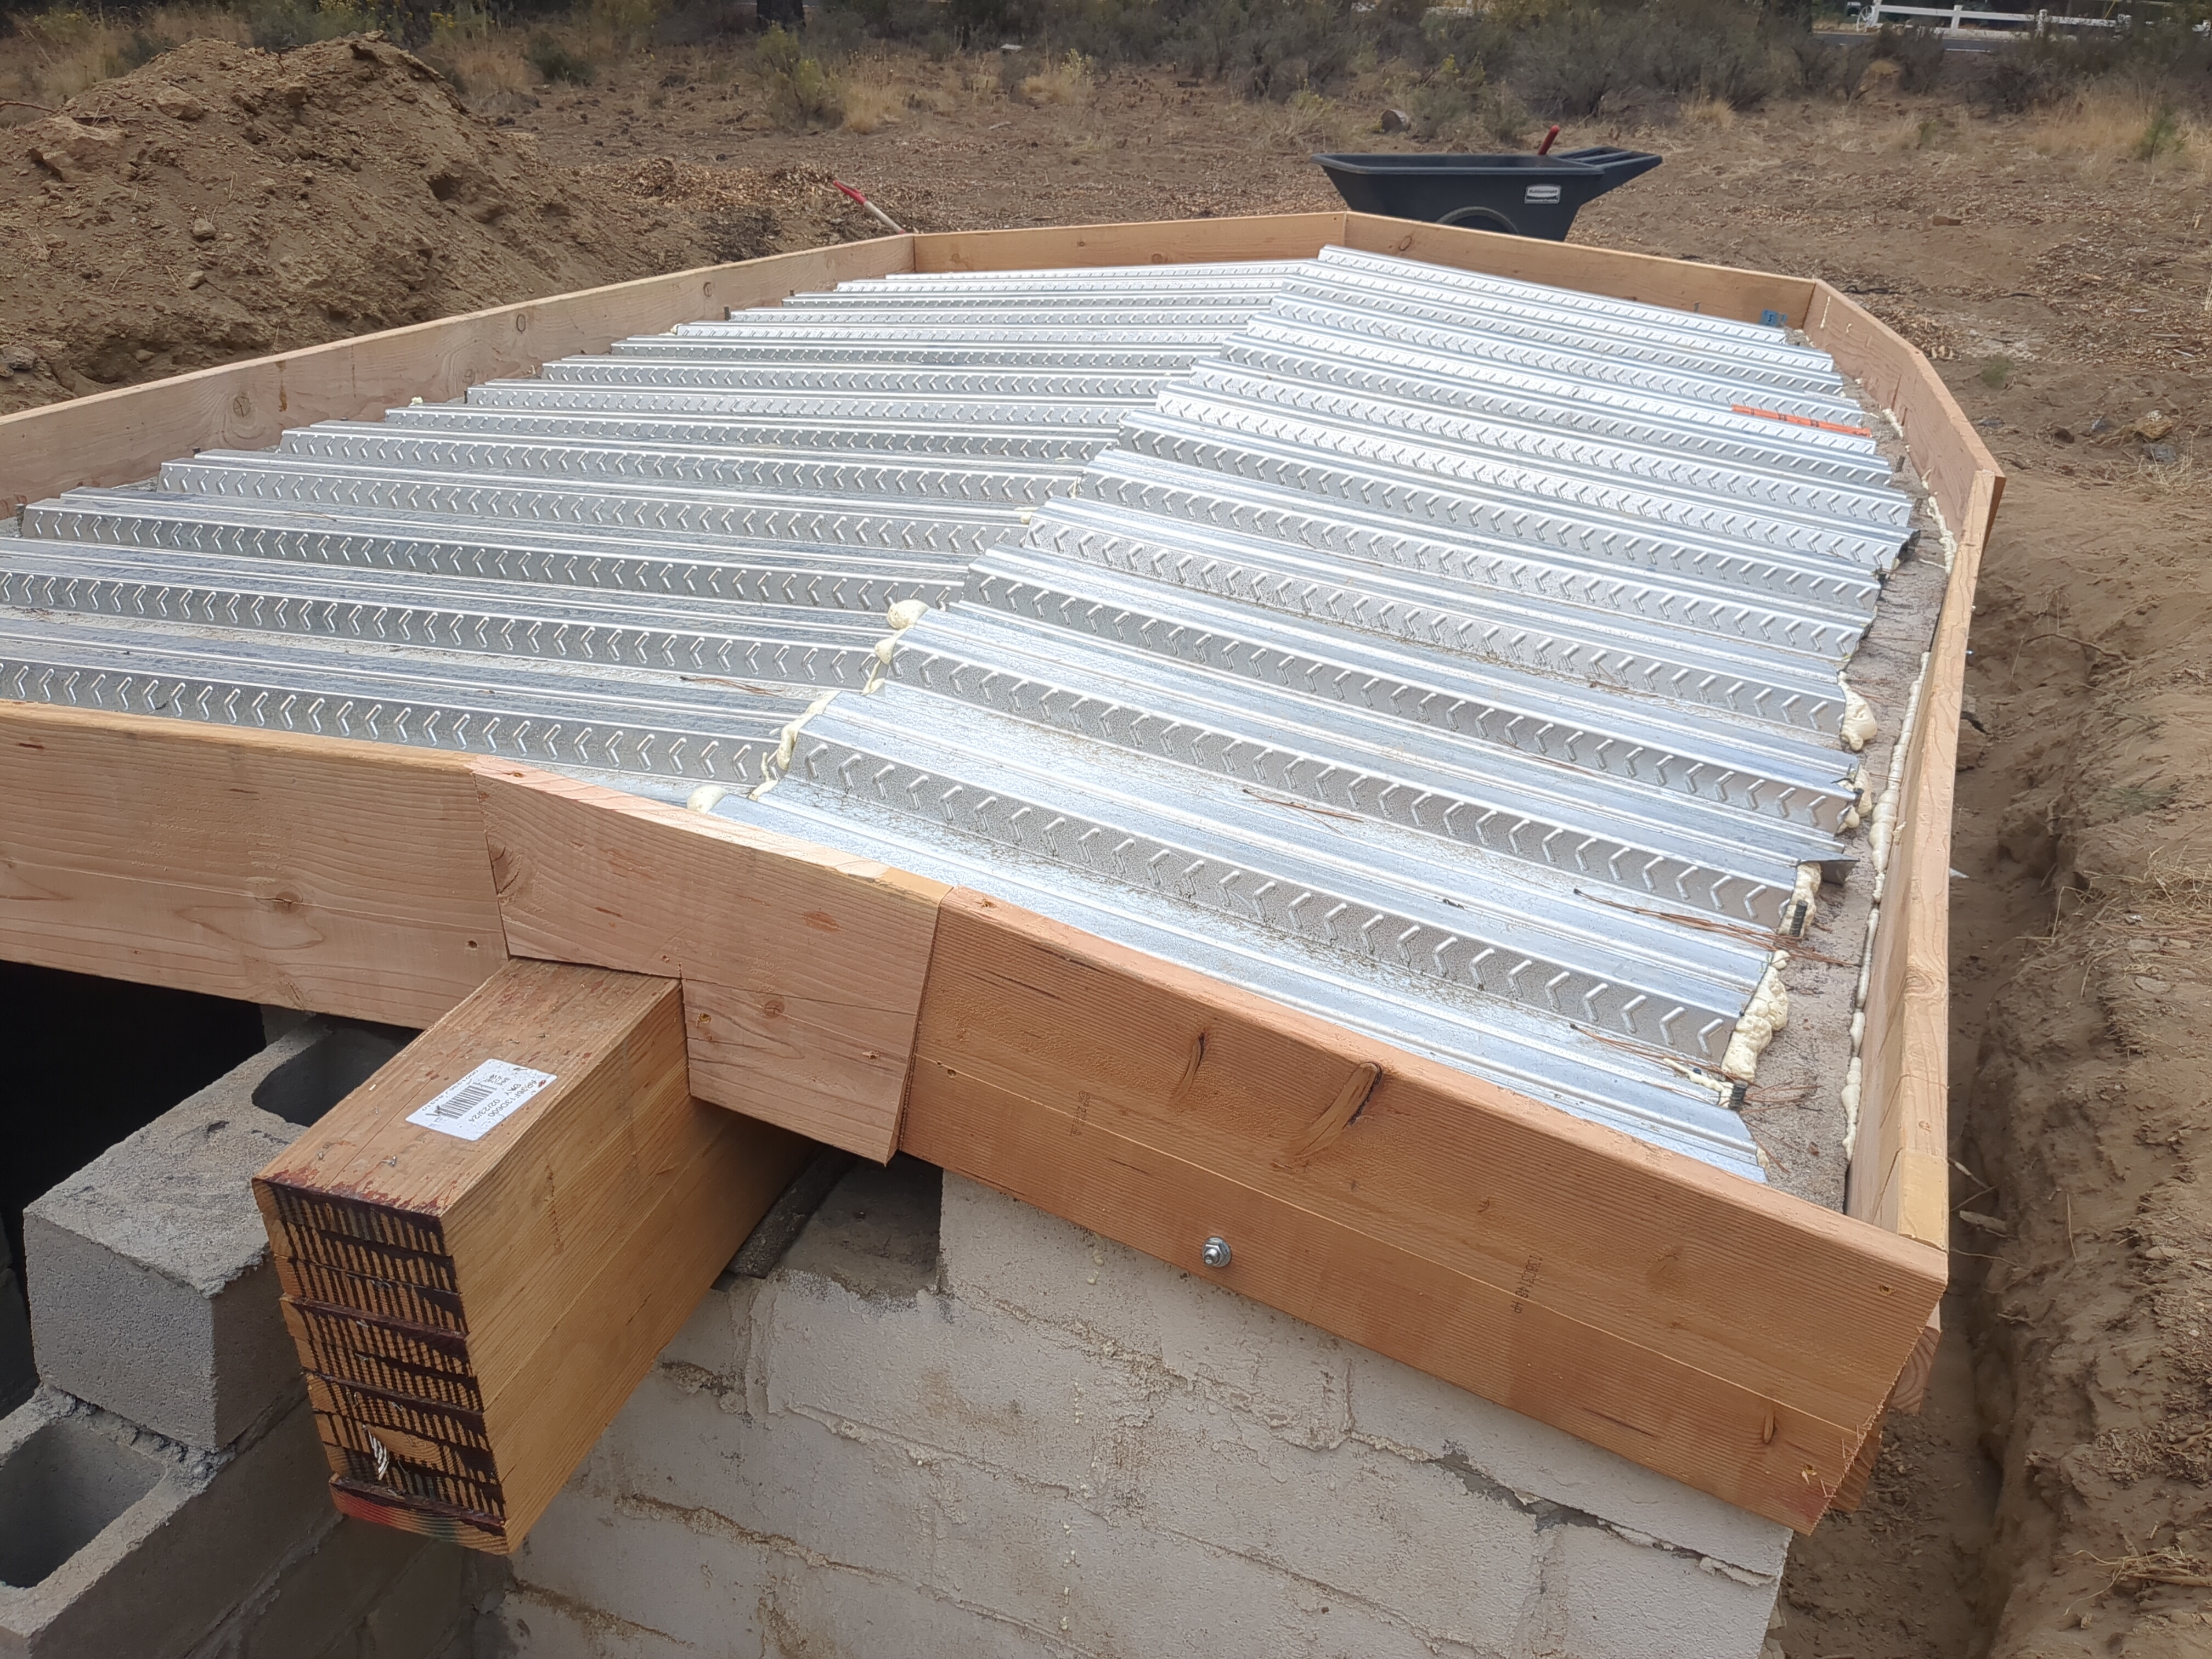
I wanted rebar in the roof, too. But here I had a problem. As rebar rusts, it expands, cracking the concrete around it. In walls, this isn't as much of an issue, since the concrete is nicely in compression just sitting on top of other concrete (ignoring for the moment inward pressure from the outside dirt). But in a roof, where there's both compression and tension going on, constantly. Cracks could result in a catastrophic loss of strength in the concrete. Of course, I planned to waterproof the concrete roof before burial, but still; for all the work I put in, I want the building to be permanent, not just last a decade. My solution, fiberglass rebar. Just as strong in tension as steel(ish), way lighter and easier to work with, and completely non-corrodable. It wouldn't be suitable for walls because it can snap in half instead of slowly bending over if the wall collapsed, but in a ceiling it should be ok; steel rebar would not meaningfully slow the speed of the ceiling collapsing on me if it were to do so, and the roof is supported by the composite decking anyway.
Rebar in place, I called another cement truck to pour the roof. This was much, much easier than the core fill truck; with a big area to pour onto more-or-less at ground level, the truck just backed up and let loose, and I raked the concrete into the corners and used a tool called a float to smooth it out.
Even with all the overages on the specs for the beam, I was still really nervous about the roof pour, so I got a temporary support pillar rated to 10k lbs and wedged it underneath the midpoint of the beam before the pour. Fortunately it went fine.
Finishing touches
Once the concrete had had two weeks to dry, I pulled off the form, removed the support pillar, and waterproofed the roof with the same white goop I had used on the walls. I had a full building with a roof! All that was left was the entryway. I wanted a storm cellar-style door, so I started framing that out.
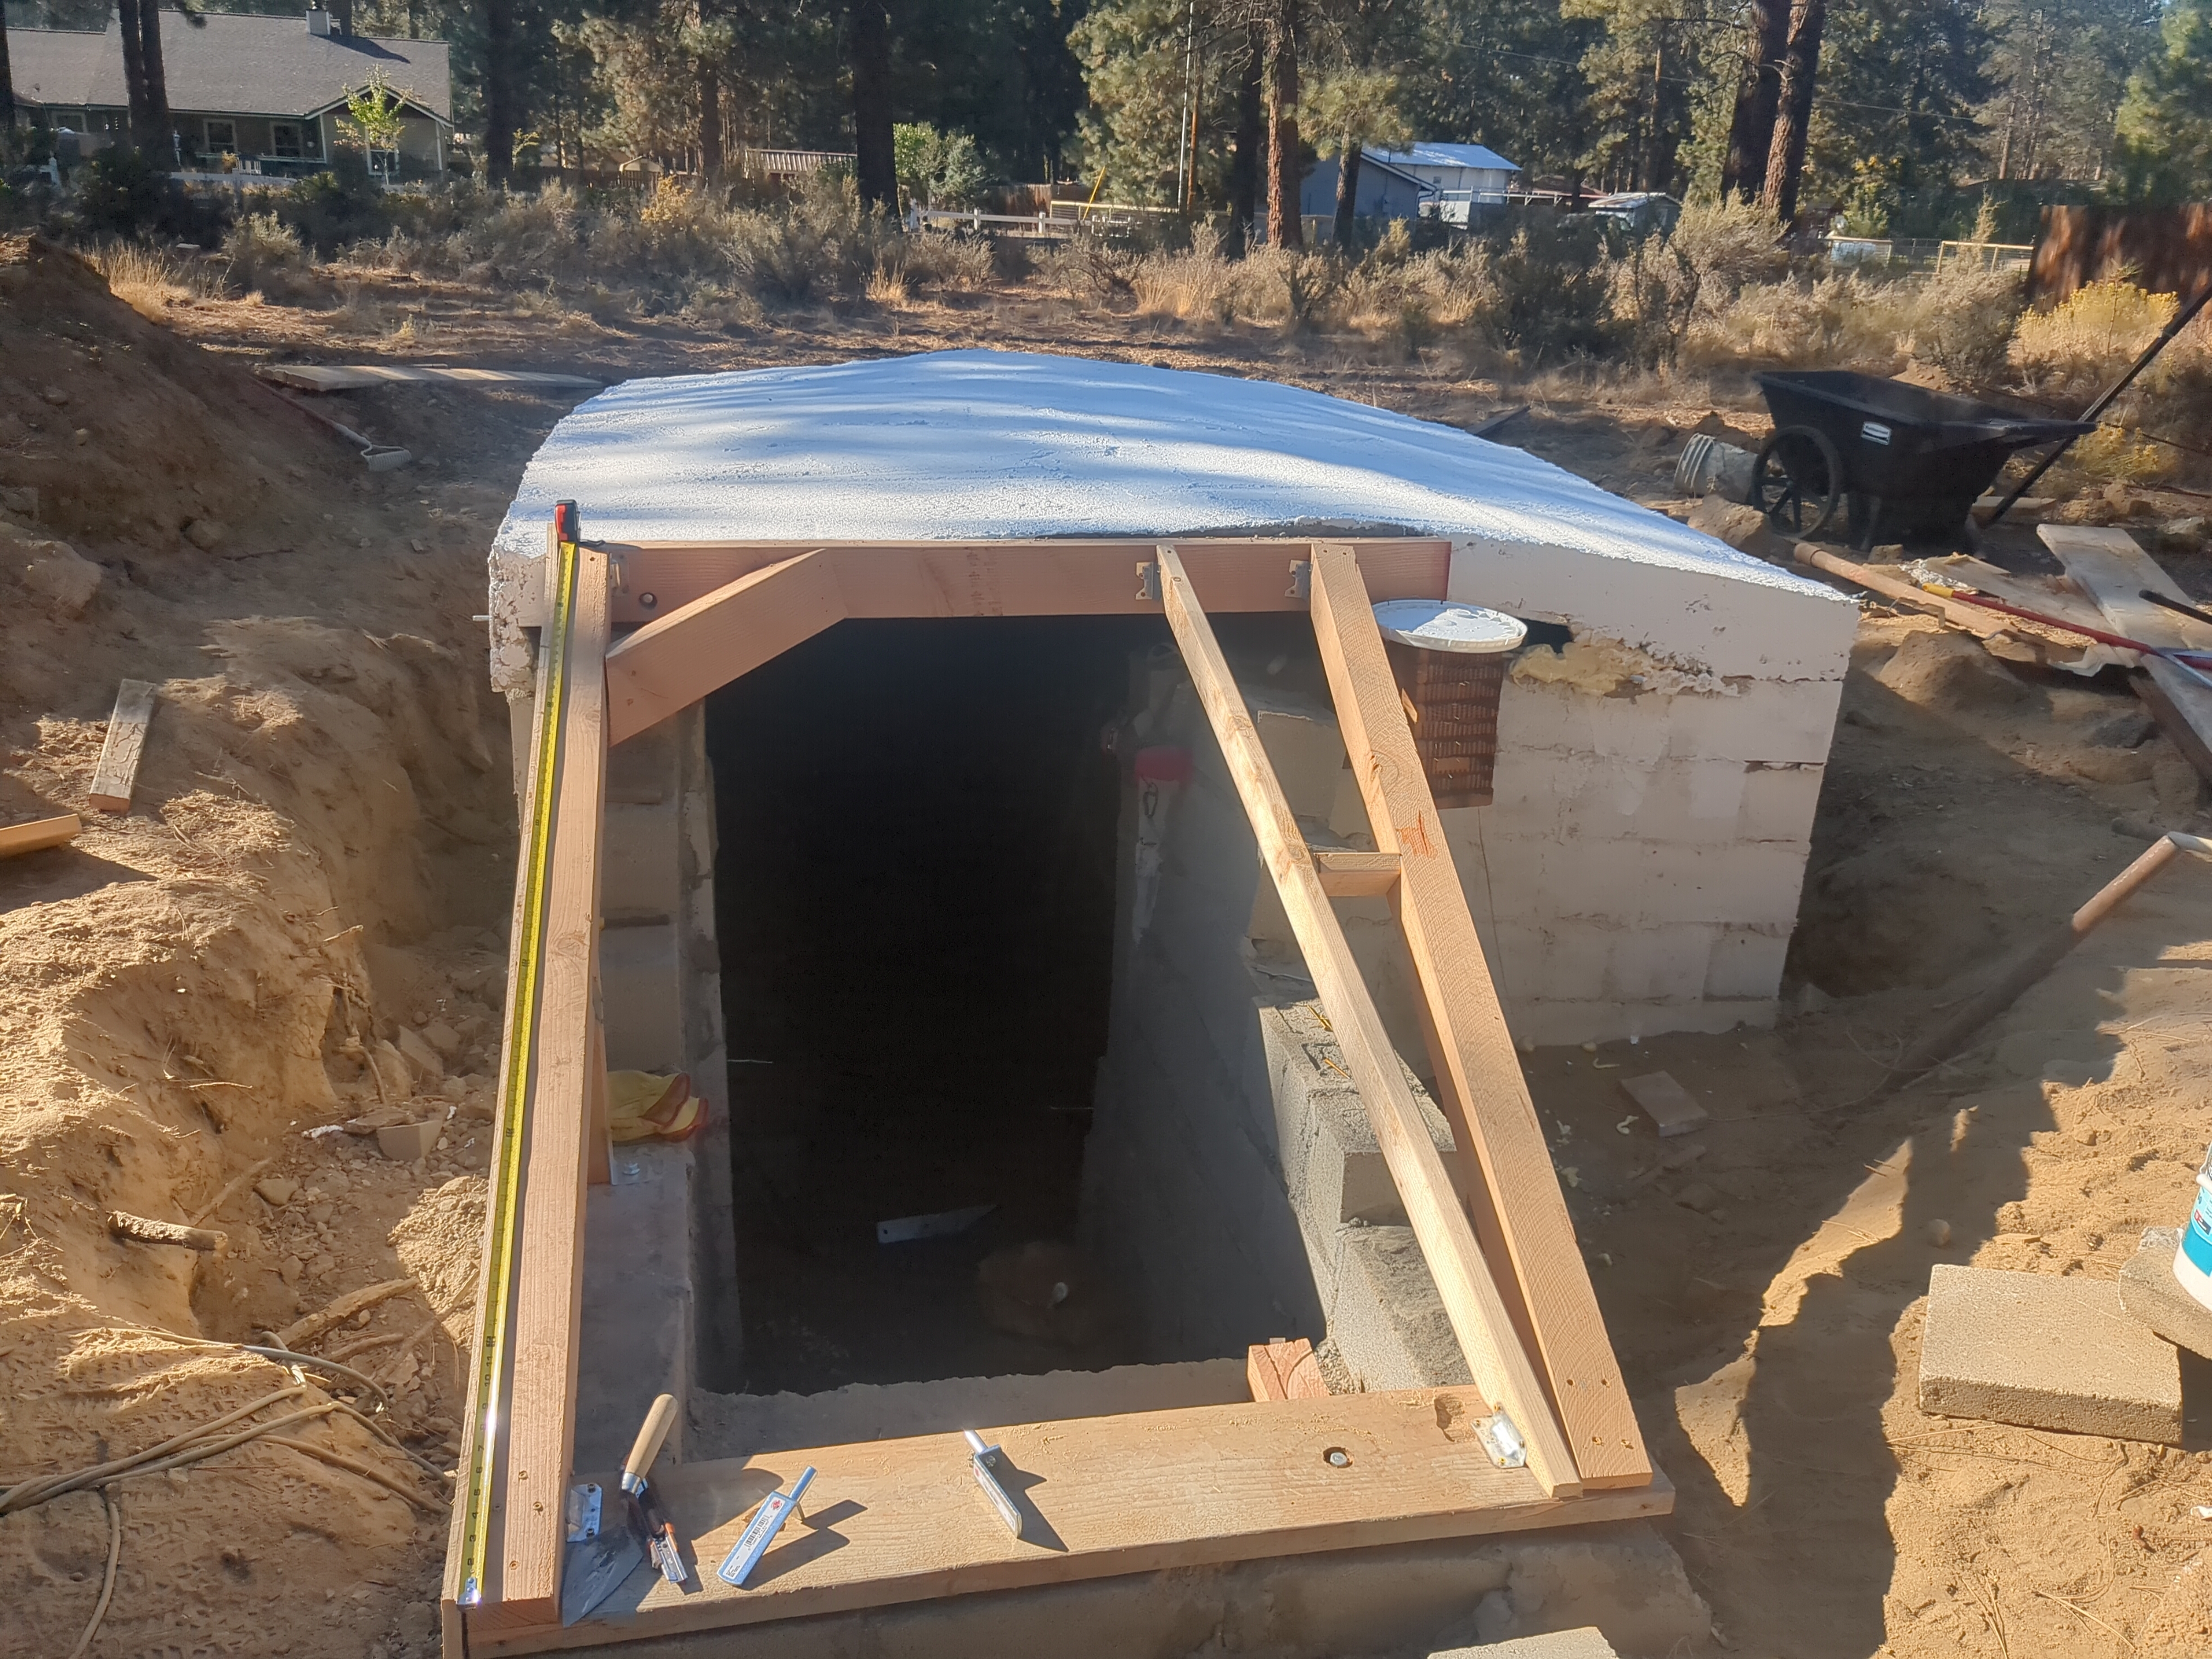
Then, I built the door itself, with some framing lumber and a sheet of plywood.
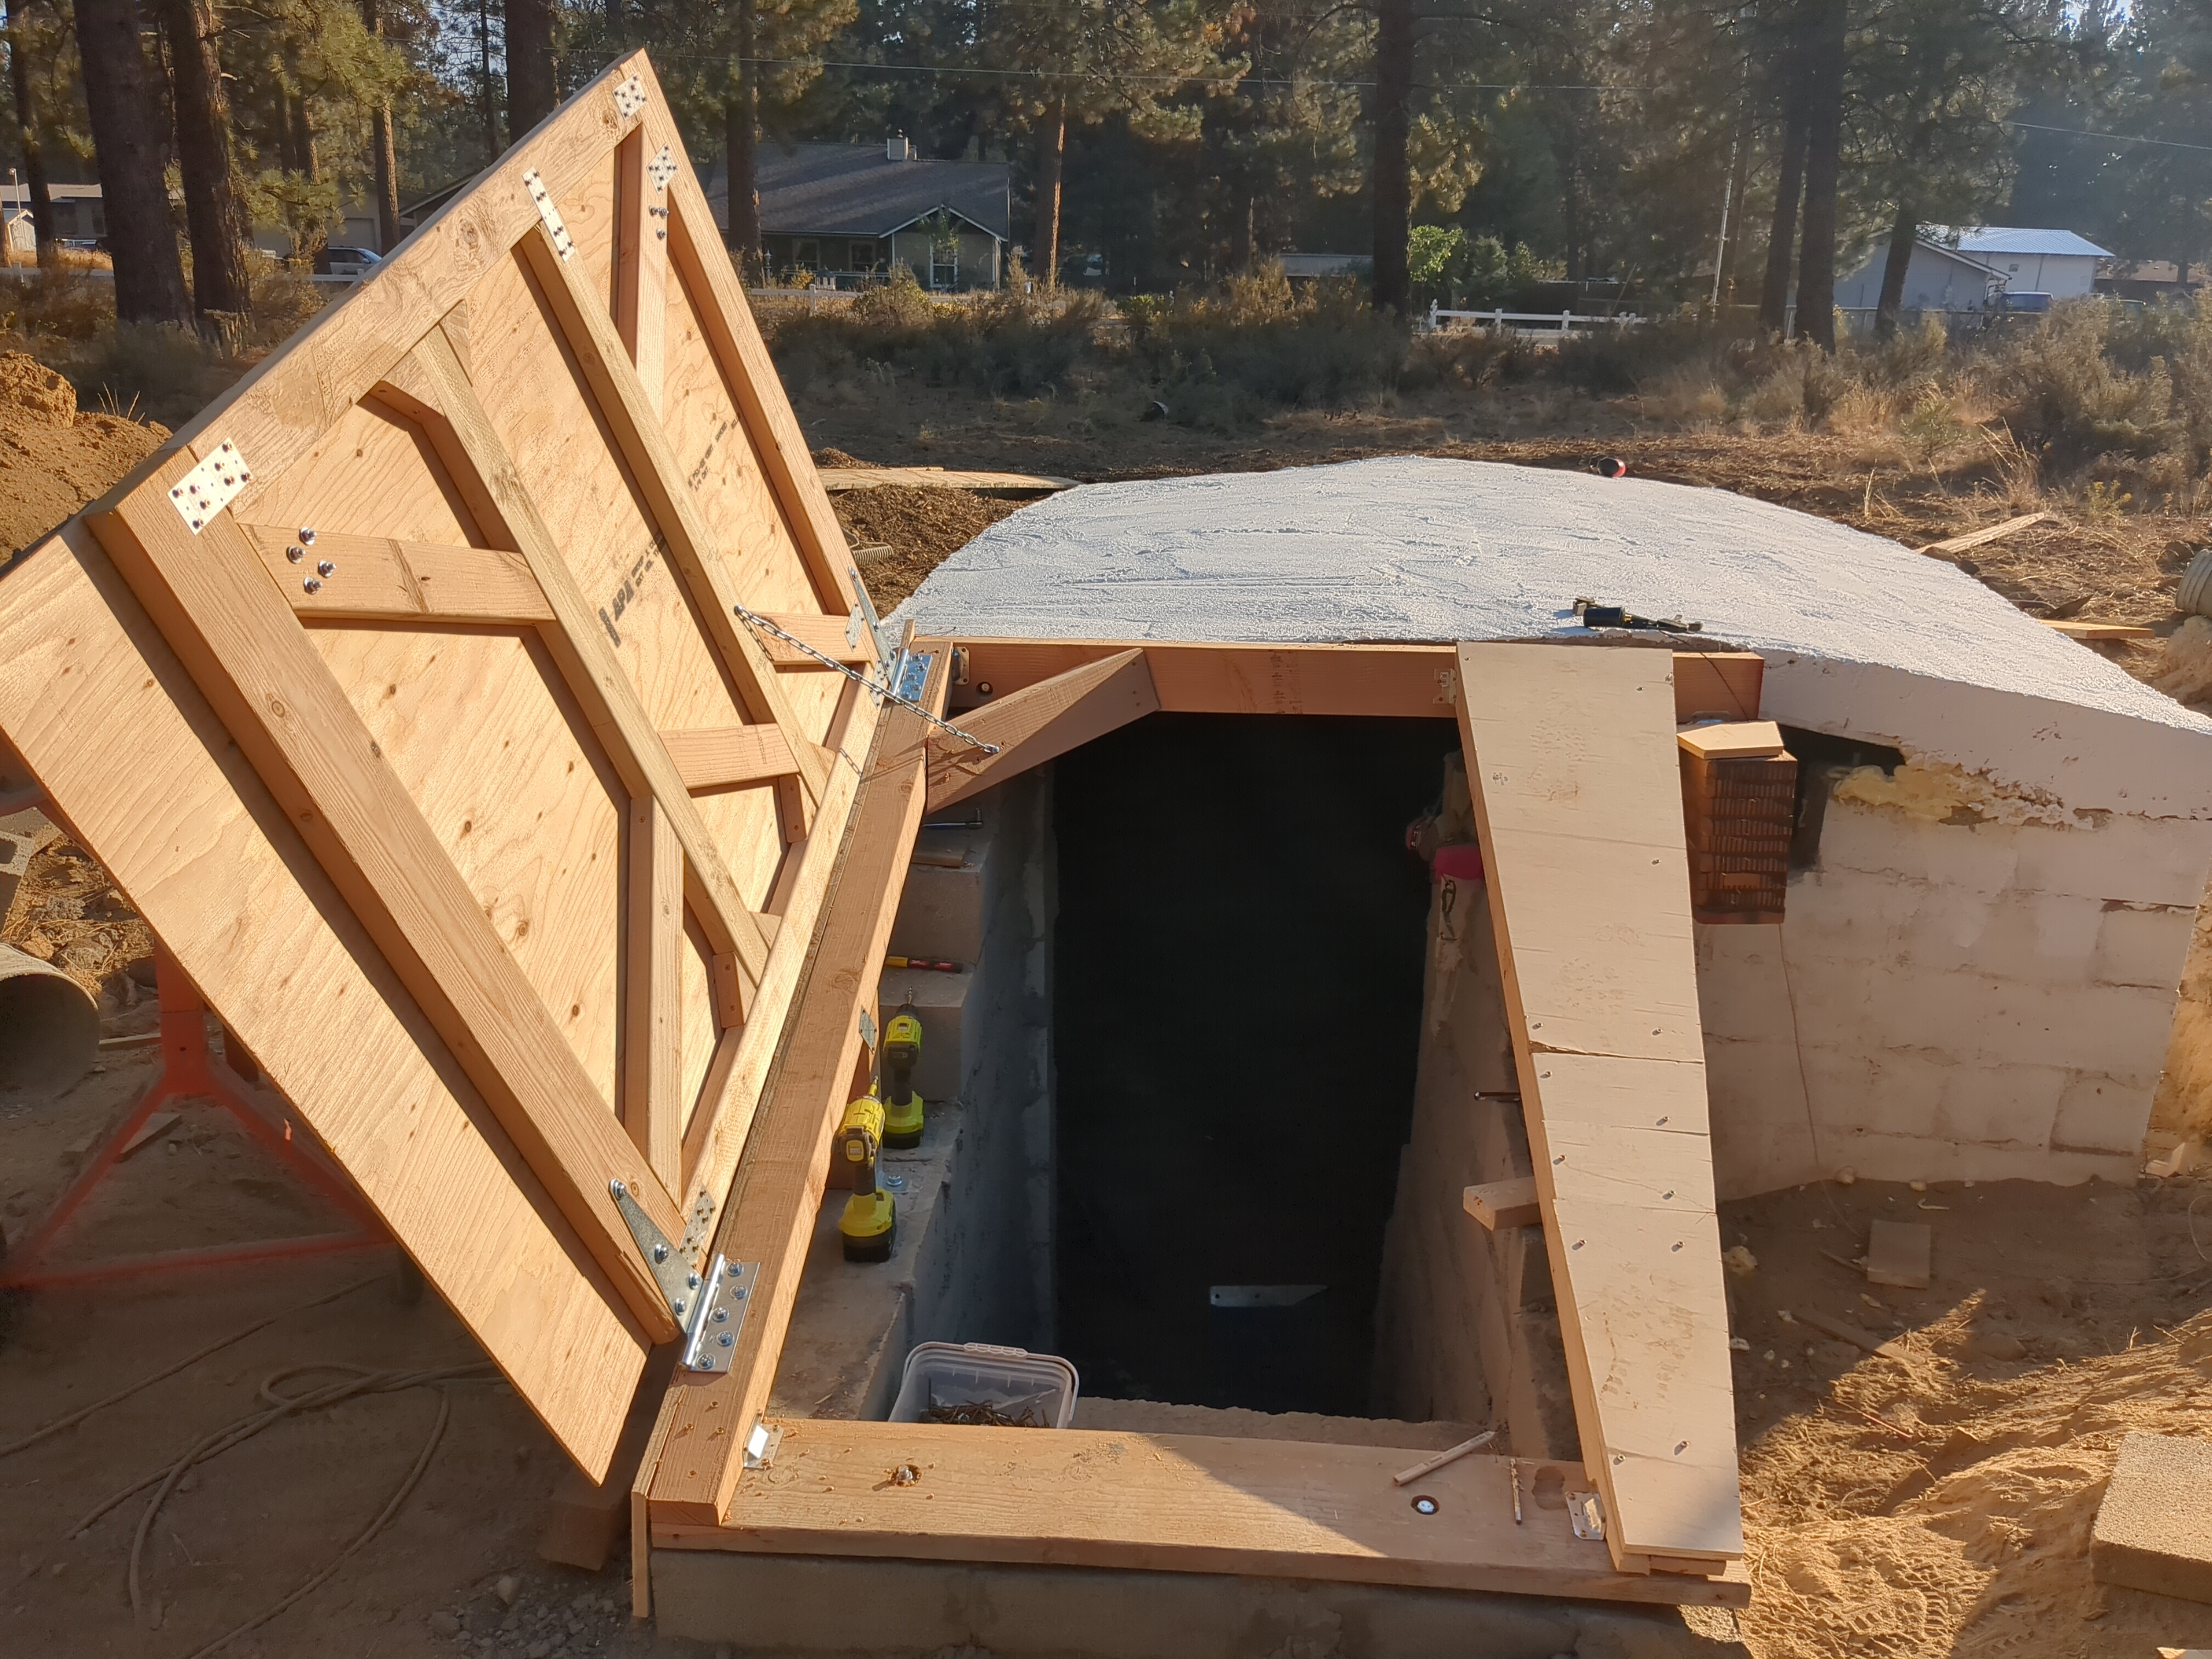
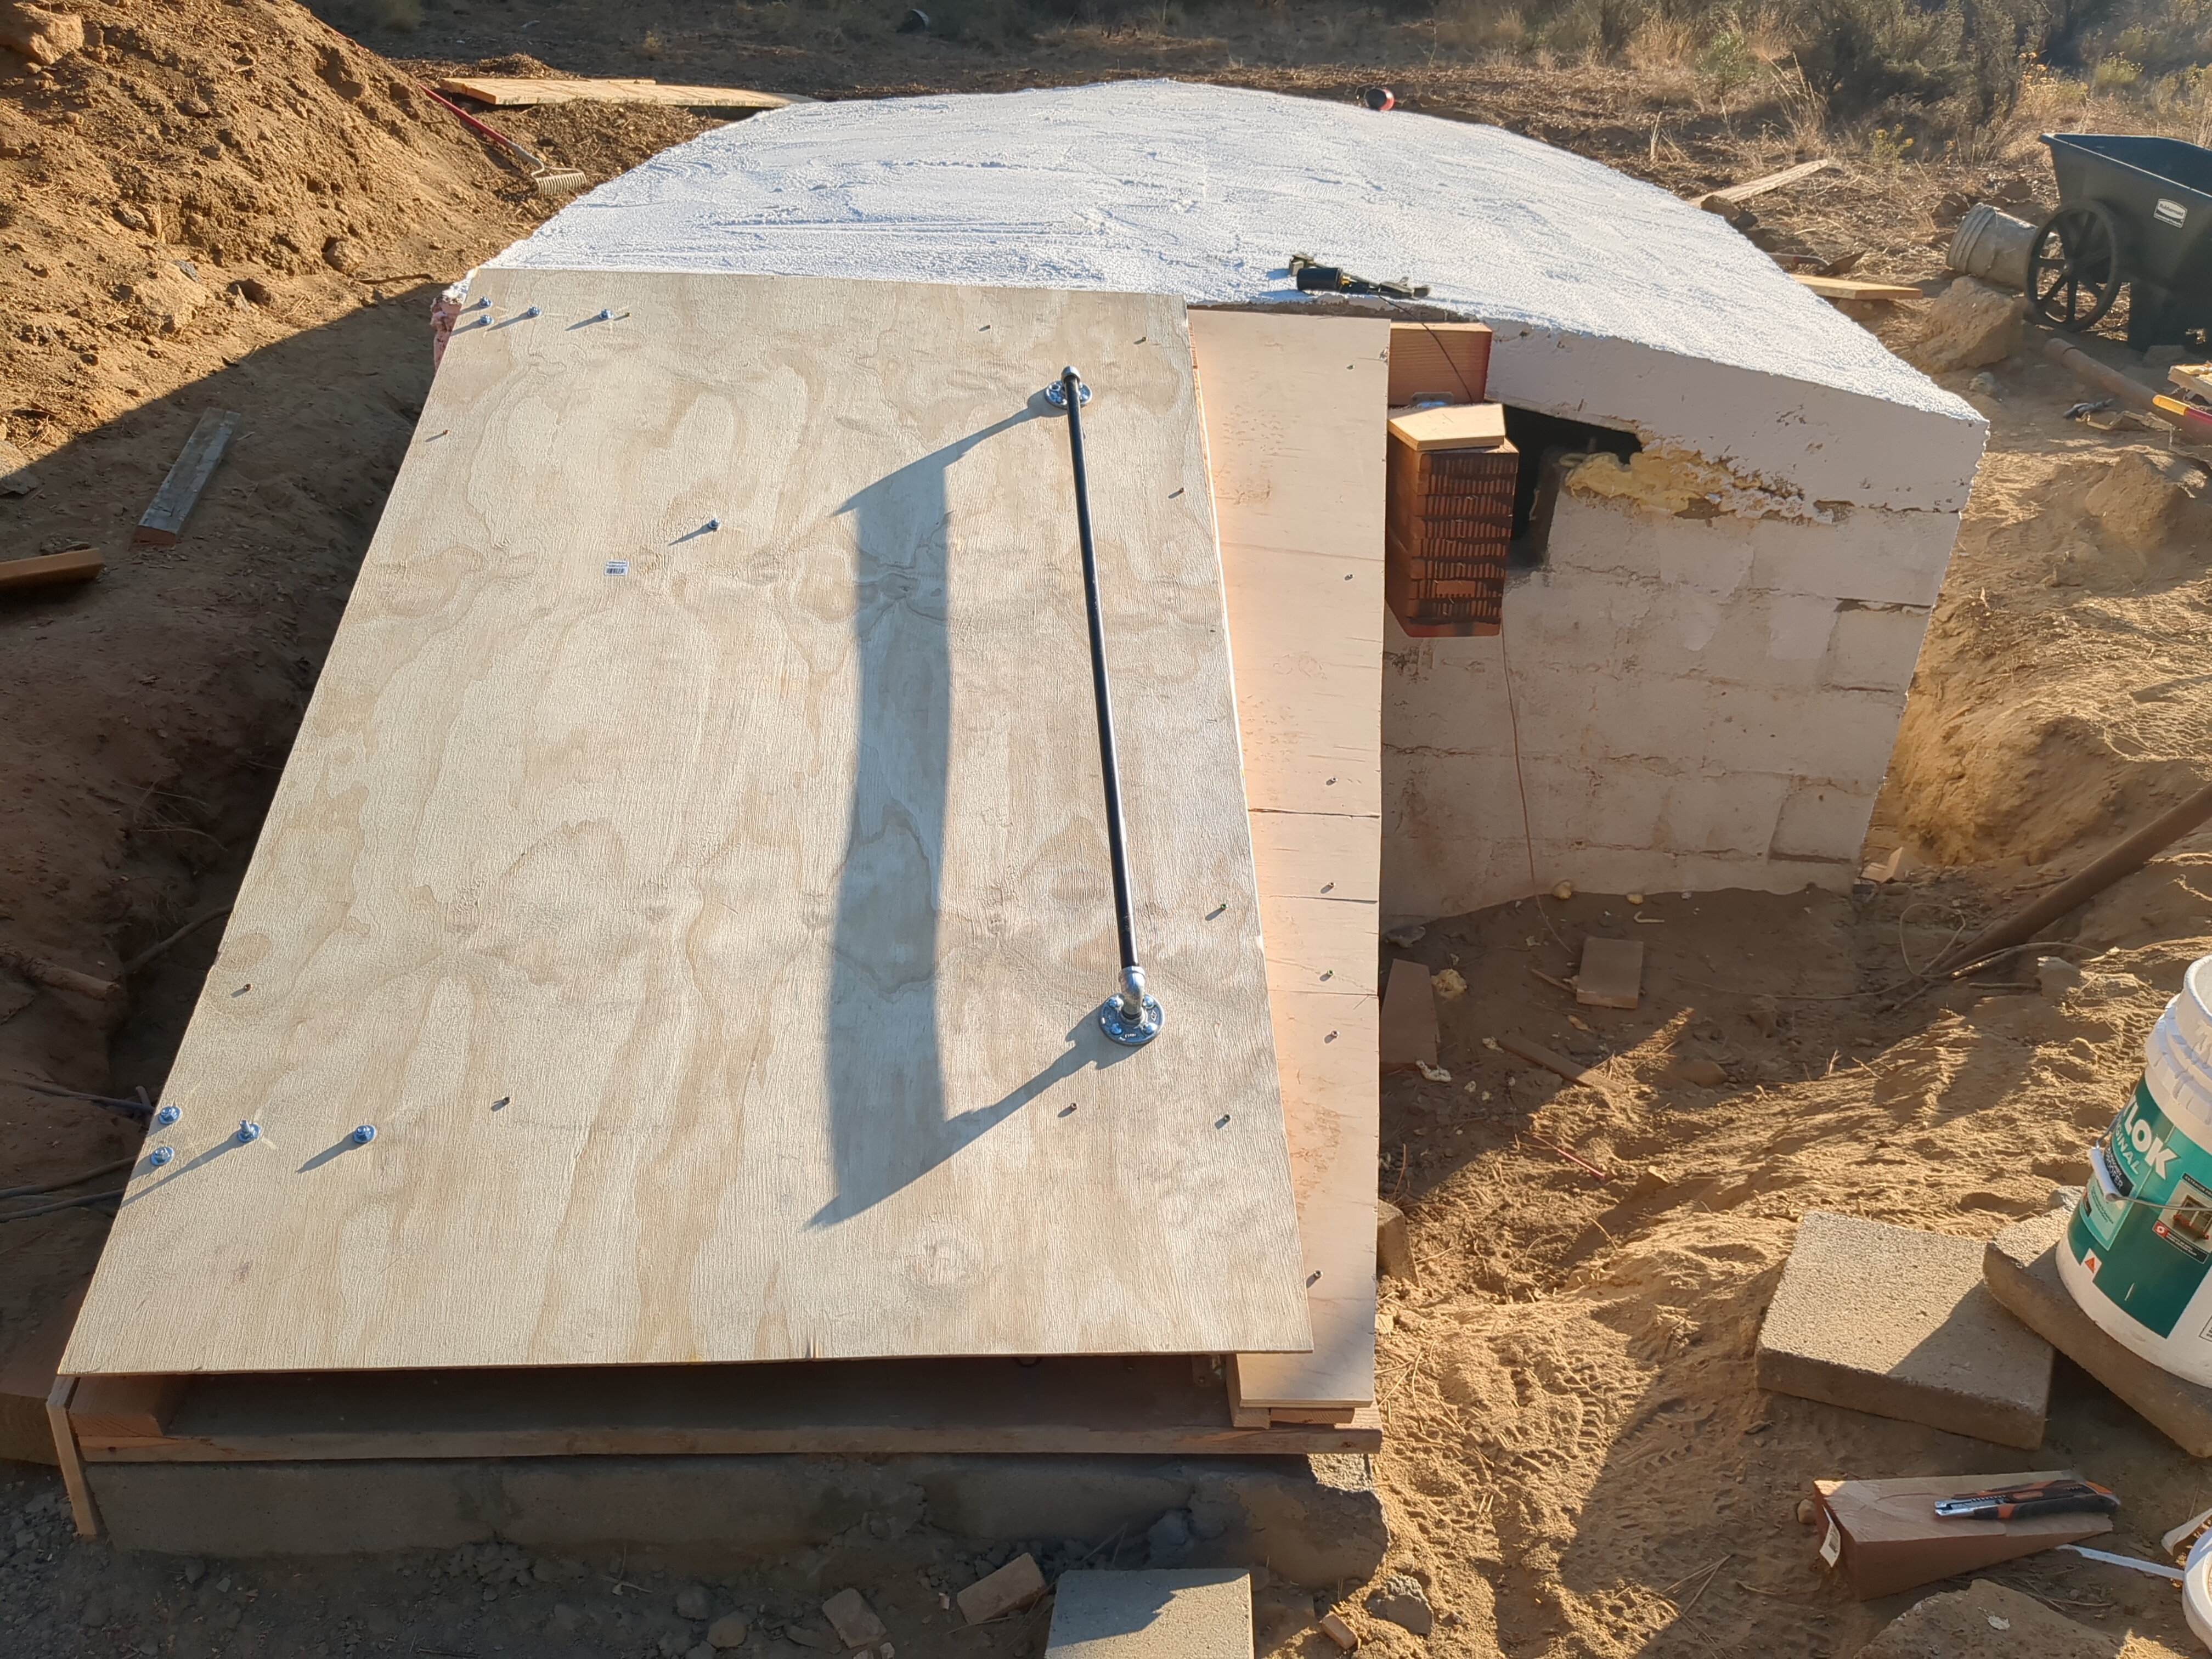
Some steel pipe and pipe flanges made a good handle
As an aside, one of my major worries building this was the buildup of toxic gasses underground. Radon could be a problem. When I fermented cider down in the cellar, it could cause a buildup of CO2. If I ever chose to store some vegatables down there, they could rot and produce nasty gases (side note: potatoes giving off particularly toxic gases when rotting is a myth. Solanine gas is not something that exists at temperatures compatible with human presence. Rotten potatoes are not particularly more toxic to breathe near than any other rotting vegetable. Personal opinion, I think the myth originated because solanine is a member of a chemical group called glycoalkaloids which is often abbreviated GAs). Anyway, to prevent all of that I left a nice gap open to the right of the beam, as you can see in the photos. The purpose is to run two air pipes, one intake from a shaded area, and one exhaust, a black pipe which will pull from the ceiling and stick straight up outdoors, acting as a solar chimney for passive ventilation. The gap also allows me to run electrical wires into the cellar, so with a solar panel and battery I can have temperature tracking and lighting without needing a massive permanent extension cord.
Back to the door. Finally, to withstand the elements, I covered the whole thing in thick plastic sheeting, and tacked on some cedar shakes that I had picked up at a farm auction a few months prior. Cedar is rot resistant, and I slathered on some water repellant outdoor wood finish so it'll shed moisture.
And that was it. The building exterior was complete. I rented an excavator again, and buried the whole thing.
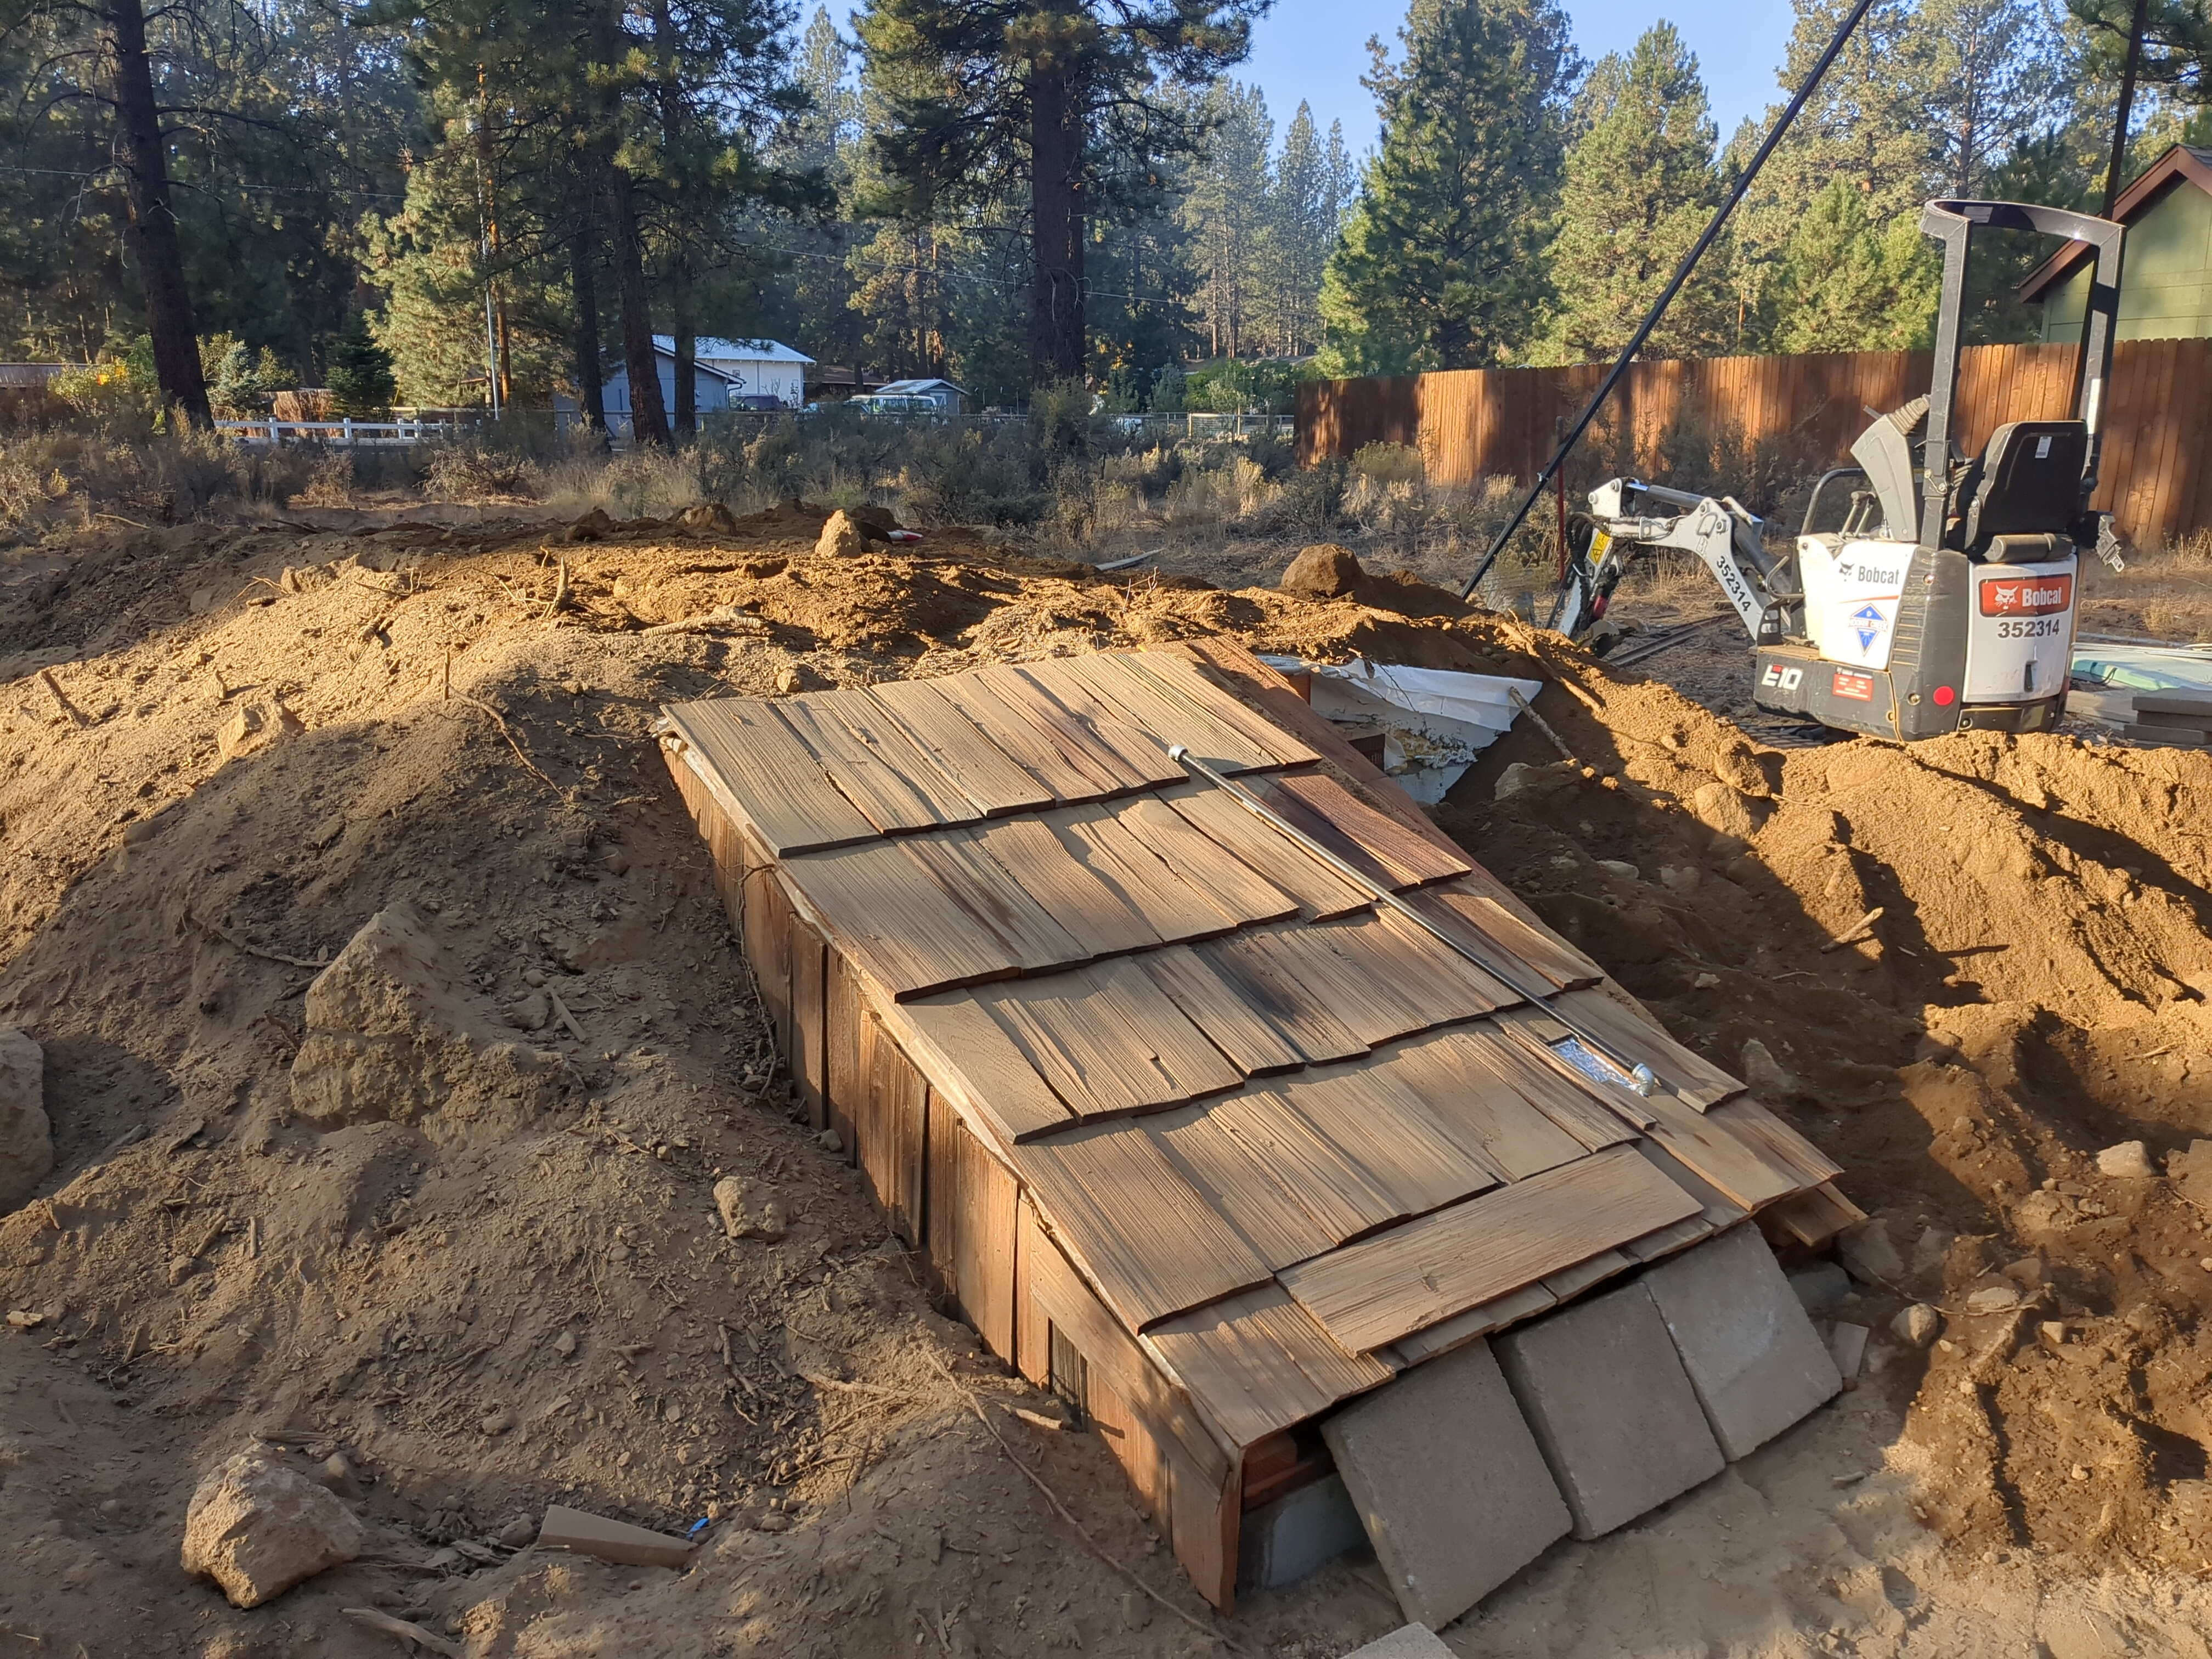
The exterior door, you might notice, has a massive gap underneath which will let out all the cold air and allow in all sorts of rodents and insects. So, at the bottom of the staircase I paid a GC to install an actual house exterior door. I chose to pay someone for this part, because if you notice from the earlier photos, straight lines are not necessarily my forte when doing something for the first time, and I wanted the door to be correctly installed and not cause me problems.
Once all the doors were on, I put up a 100W solar panel on the outside and fished through the wires to a charge controller and 12V battery. I put temperature sensors at the ceiling, midlevel, and floor of the cellar. A strip of LEDs stuck to the bottom of the beam provided light. I started building out shelving, generally affixing it directly to the concrete walls with expansion bolts for stability. Once complete, I moved all of my cider in, as well as much of the fermentation gear, and have been storing and fermenting cider down there ever since.
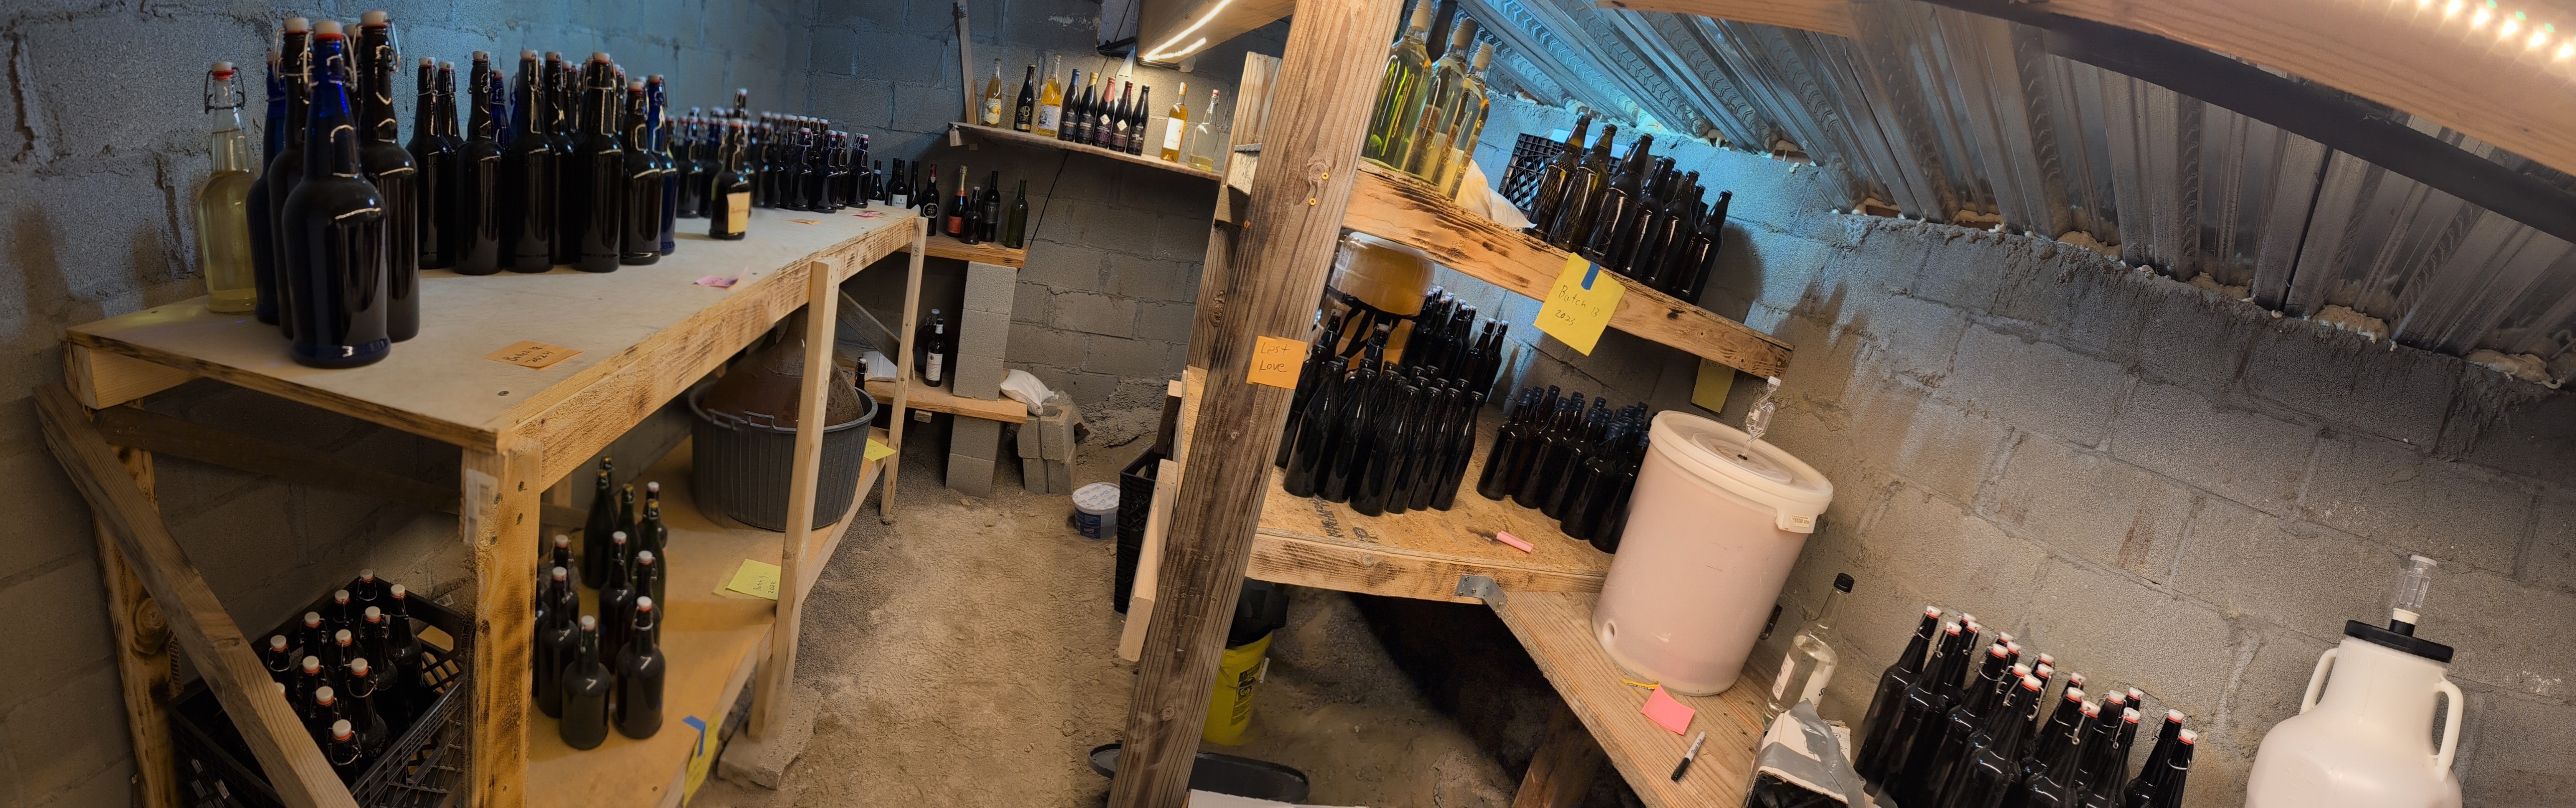
Here's a view of the inside. Sorry about the obnoxious panorama stitching error.
And that's how to build a cellar in your yard. The whole process took me a solid 6 months, April to October of 2024. No collapses or real problems yet! If you are a structural engineer who sees something here that might kill me though please do reach out.